From Idea to Object: Your Guide to 3D Printing with an Irish Service
From Idea to Object: Your Guide to 3D Printing with an Irish Service
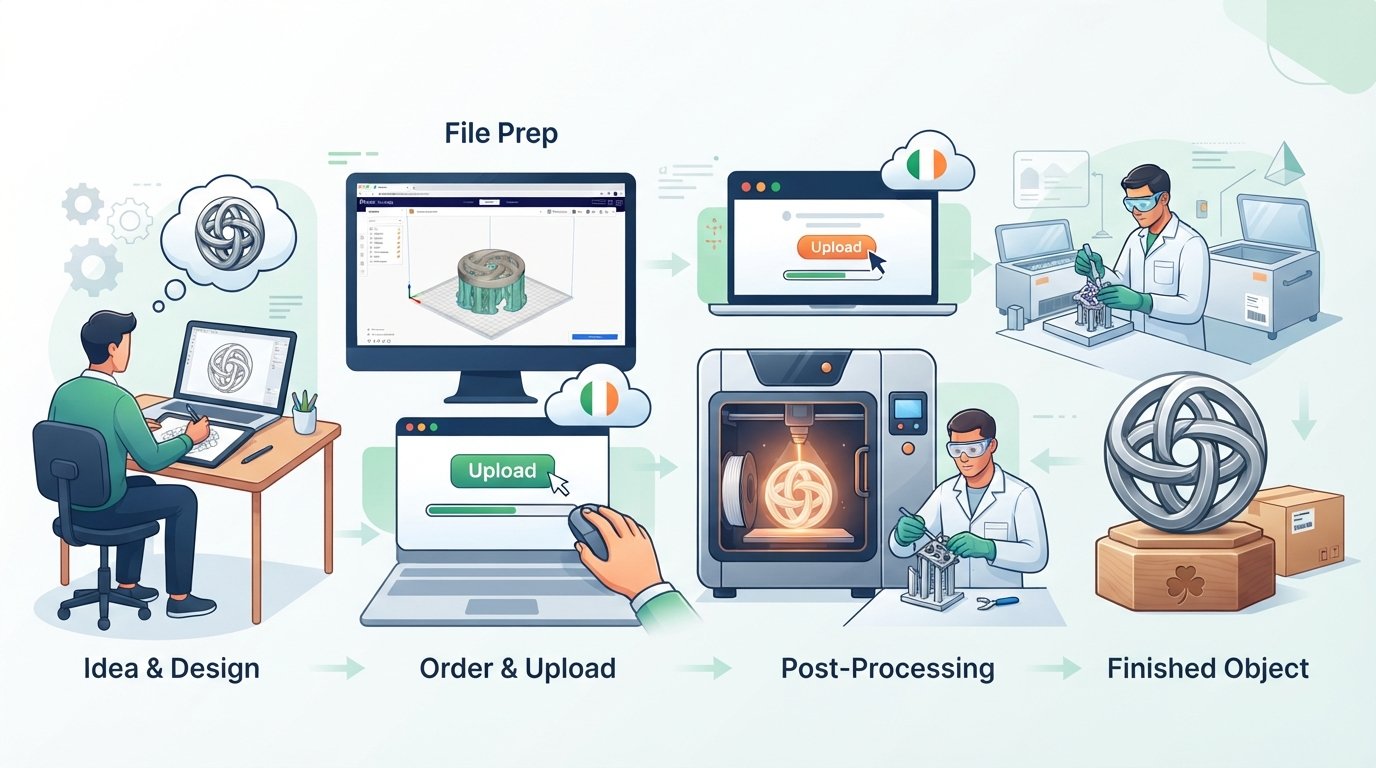
Do you have a brilliant idea or a crucial part that needs to come to life, but you don't own a 3D printer? Perhaps you're based in Iceland, searching for reliable 3D printing services, specifically looking for 3d prentun ísland or 3d prentun reykjavík, and wondering how an experienced Irish service can help you achieve your goals. Whether you’re an inventor, a designer, a hobbyist, or a business professional, transforming a concept into a tangible 3D printed object can seem daunting. This comprehensive guide will walk you through every step of the process, showing you how PrintIn3D.ie, your trusted Irish 3D printing partner, makes it "hassle-free" to convert your vision into a physical reality, no matter where you are in the EU/EEA, including Iceland.
You'll learn about the initial ideation, the critical role of 3D design, material selection, and how to seamlessly collaborate with a professional 3d prentunarþjónusta to bring your ideas to life. We’ll demystify the process, highlight key considerations, and empower you to confidently move from a mere concept to holding your very own prenta 3d hlut. By the end of this guide, you’ll understand why choosing an experienced and award-winning service like PrintIn3D.ie is the smart choice for efficient, high-quality 3d prentun eftir pöntun.
Who This Is For
- Individuals and businesses in Iceland (and wider EU/EEA) without a 3D printer who need custom parts or prototypes.
- Designers and engineers looking for reliable, high-quality 3D printing.
- Entrepreneurs needing rapid prototyping services to test new product ideas.
- Hobbyists and makers who want to bring their unique creations to life without the investment of owning a printer.
- Anyone with a concept (from a sketch to a CAD file) who needs professional 3D design and printing support.
Step 1: Sparking the Idea – From Concept to Sketch
Every great 3D print begins with an idea. It might be a functional part for a broken appliance, a unique piece of jewelry, a custom gaming accessory, or a prototype for a new product. The first step is to clearly define what you want to create. Don't worry if your idea is just a rough sketch on a napkin or a detailed mental image; the key is to capture its essence and purpose. This initial phase is about brainstorming, envisioning, and outlining the core features of your desired prenta 3d hlut.
Consider the function, size, aesthetics, and any specific requirements your object will have. Will it need to fit into another part? Does it need to withstand certain temperatures or forces? How big or small should it be? Answering these questions early will significantly streamline the subsequent design and printing stages. Even a simple drawing with dimensions can provide a solid foundation for the next steps.
- Brainstorm: Write down all your ideas, no matter how small or large.
- Sketch it Out: Draw your concept from different angles. Don't aim for perfection, just clarity.
- Define Purpose: What problem does this object solve? What function does it serve?
- Consider Constraints: Think about the approximate size, shape, and any critical features.
Tip: Don't be afraid to iterate on your initial concept. Many successful projects go through several rounds of refinement at this early stage. The clearer your concept, the easier it will be to translate into a 3D model.
Step 2: Designing Your Vision – From Sketch to 3D Model
Once you have a clear concept, the next crucial step is to translate it into a digital 3D model. This model is the blueprint that a 3D printer reads to create your physical object. There are two primary paths you can take here: designing it yourself or utilizing professional 3D design services.
Option A: Design It Yourself (If You Have the Skills)
If you have experience with 3D modeling software, you can create your own digital file. Popular software options include:
- CAD Software: Programs like SolidWorks, Fusion 360, TinkerCAD, AutoCAD, or Blender are widely used. Fusion 360 and TinkerCAD are particularly popular for hobbyists and small businesses due to their accessibility and powerful features.
- Scanning: If you have an existing physical object you want to replicate or modify, 3D scanning is an excellent way to create a digital model.
Creating your own model gives you complete control over the design. Ensure your model is "watertight" (no holes or gaps) and correctly scaled. Most 3D printing services prefer files in .STL or .OBJ format.
- Choose Your Software: Select a 3D modeling program that suits your skill level and project needs.
- Model Your Design: Carefully translate your sketches and ideas into a digital 3D model.
- Export to .STL or .OBJ: Ensure your file is in a compatible format for 3D printing.
Warning: Poorly designed models with errors (like non-manifold edges or inverted normals) can lead to failed prints. Always check your model for integrity before sending it for printing. If you're unsure, it's often best to seek professional help.
Option B: Leverage Professional 3D Design Services
For many, especially those who are new to 3D printing or lack the time and expertise in 3D modeling, utilizing professional 3D design services is the most efficient and reliable route. PrintIn3D.ie offers expert 3D design services that can transform anything from a simple sketch, a detailed drawing, a photograph, or even just an idea, into a print-ready 3D model. This is especially useful for those seeking specific solutions like 3d prentunarþjónusta reykjavík but needing the design expertise from afar.
Our experienced designers understand the nuances of additive manufacturing and can optimize your design for printability, material properties, and functionality. This ensures your final product is not only accurate to your vision but also structurally sound and cost-effective to produce.
- Provide Your Concept: Share your sketches, drawings, photographs, or detailed descriptions with our design team.
- Collaborate with Experts: Our designers will work with you to refine the concept and ensure all requirements are met.
- Receive a Print-Ready File: We will deliver a high-quality 3D model optimized for printing.
Tip: Even if you have a partial design or an existing object that needs modification, our 3D design services can help. This service bridges the gap between a brilliant idea and a perfect print. Learn more about our 3D design services.
Step 3: Preparing Your 3D Model File for Printing (If You Have One)
If you’ve designed your own 3D model, preparing it correctly is paramount to a successful print. This step involves more than just saving your file; it's about optimizing it for the 3D printing process. For anyone looking for a reliable 3d printing ísland solution, understanding these preparation steps ensures your print is perfect the first time.
A. File Format and Integrity
The most commonly accepted file formats for 3D printing are .STL (stereolithography) and .OBJ. These formats represent the surface geometry of a 3D object using a collection of interconnected triangles.
- Export Correctly: When exporting from your 3D modeling software, choose .STL or .OBJ. Ensure the export settings are appropriate for 3D printing (e.g., fine resolution to capture details without creating excessively large files).
- Check for Errors: Use model repair tools (many CAD programs have them, or online services like Netfabb) to check for and fix common issues like:
- Non-manifold edges: Where two faces share more than two edges.
- Inverted normals: Faces pointing inwards rather than outwards.
- Open boundaries/holes: These make the model "not watertight," meaning the printer cannot correctly determine the interior and exterior.
- Scale and Units: Confirm your model is scaled correctly (e.g., in millimeters or inches). Mismatched units are a common cause of incorrect print sizes.
Warning: Skipping file integrity checks is a common mistake that can lead to failed prints, wasted material, and delays. A corrupt or faulty file will almost certainly result in an unusable physical object. For more details, consult our guide on accepted file formats.
B. Wall Thickness and Detail Consideration
Think about the physical strength and integrity of your printed part. Thin walls can be fragile and might not print correctly, while overly complex details might be lost or merged.
- Minimum Wall Thickness: Ensure all walls and features are thick enough for the chosen material and printing technology. A general rule for FDM printing is at least 1mm, but this varies.
- Detail Resolution: Understand the limitations of the 3D printer. Very fine details might not be reproduced accurately. Consider simplifying intricate designs where necessary or choosing a printing process capable of higher resolution.
- Clearances: If your design includes moving parts or parts that fit together, ensure sufficient clearance between them (e.g., 0.2-0.5mm depending on printer and material) to allow for smooth assembly.
Tip: If you are unsure about wall thickness or detail resolution, discuss it with our 3d prentunarþjónusta when you submit your file. Our experts can advise on the best approach for successful printing.
Step 4: Choosing the Right Material and Finish
The material you choose will significantly impact the properties of your final prenta 3d hlut, affecting its strength, flexibility, appearance, and suitability for its intended application. PrintIn3D.ie offers a range of high-quality filaments from trusted brands like Bambu Lab and SUNLU, perfect for various needs, whether you're in Iceland or anywhere else in the EU/EEA.
A. Common 3D Printing Materials
- PLA (Polylactic Acid):
- Pros: Easy to print, biodegradable, wide range of colors, good for general-purpose models, prototypes, and decorative items. Very popular for its ease of use and environmental friendliness.
- Cons: Brittle, low heat resistance, not ideal for outdoor use or high-stress applications.
- Ideal for: Figurines, display models, simple prototypes, educational projects.
- PETG (Polyethylene Terephthalate Glycol):
- Pros: More durable and flexible than PLA, good layer adhesion, better temperature resistance, water-resistant. A great all-rounder.
- Cons: Can be stringy, requires slightly higher printing temperatures than PLA.
- Ideal for: Functional parts, mechanical components, outdoor applications, sturdy prototypes, phone cases.
- Other Materials (available upon request or for specific projects):
- ABS: Strong, durable, good heat resistance (but can warp).
- TPU: Flexible and rubber-like, excellent for gaskets, protective covers, or wearable items.
- Nylon: High strength, flexibility, and durability, often used for engineering applications.
Tip: Always consider the environment and purpose of your part when selecting a material. If it will be exposed to sunlight or high temperatures, PLA might not be the best choice. For robust items or those needing some flexibility, PETG or TPU could be superior. Explore our range of 3D printer filaments for more options.
B. Color and Finish
Beyond the material properties, consider the aesthetic of your print:
- Color: Most filaments come in a wide array of colors. Think about how the color will affect the visual impact of your finished product.
- Surface Finish: FDM 3D prints typically have visible layer lines. For a smoother finish, post-processing (sanding, painting, or coating) can be applied. Discuss these options with PrintIn3D.ie if a specific aesthetic is crucial for your 3d prentun eftir pöntun.
Warning: Not all materials are available in all colors or compatible with all printers. Confirm availability with the service provider before finalizing your choice. For instance, if you're keen on a specific colour of Bambu Lab PLA, check its availability directly on our site, like Bambu Lab PLA Pure Refill.
Step 5: Getting a Quote and Placing Your Order
With your 3D model prepared and your material chosen, the next step is to get a quote and place your order. This is where the "hassle-free" aspect of using PrintIn3D.ie truly shines, simplifying the process for clients seeking 3d prentun ísland or anywhere else in the EU/EEA.
A. Submitting Your File for a Quote
The process is designed to be straightforward:
- Upload Your File: Visit our website and navigate to our custom 3D printing section. You'll typically find an easy-to-use upload tool where you can submit your .STL or .OBJ file.
- Specify Requirements: Along with your file, you'll provide details such as:
- Material choice: PLA, PETG, etc.
- Color preference: Specify your desired color.
- Infill percentage: The internal density of your print, affecting strength and weight (e.g., 20% for decorative, 100% for solid functional parts).
- Layer height/Print Quality: Fine layers for smooth finish, thicker layers for faster prints.
- Quantity: How many copies do you need?
- Any special instructions: Specific post-processing, strength requirements, etc.
- Receive a Quote: Our system or team will review your submission and provide a detailed quote, including material costs, printing time, and estimated shipping to your location, whether that's in Reykjavík or rural Ireland.
Tip: For complex projects or bulk orders, it’s always a good idea to communicate directly with the PrintIn3D.ie team via WhatsApp or email. This allows for personalized advice and ensures all nuances of your project are understood. We’re your dedicated 3d prentunarþjónusta partner.
B. Understanding Pricing and Turnaround Times
Several factors influence the cost and time required for your 3d prentun eftir pöntun:
- Material Type and Volume: More expensive or denser materials will cost more. The overall volume of your object dictates material usage.
- Print Time: Larger or more detailed objects take longer to print, affecting cost. Infill percentage and layer height also play a role.
- Complexity: Intricate designs requiring more support structures or specialized printing techniques may increase costs.
- Post-Processing: Any additional finishing, like sanding or painting, will add to the price.
- Shipping: The cost and speed of delivery to your location (e.g., to 3d prentun reykjavík) will be factored in. PrintIn3D.ie offers fast delivery across the EU/EEA.
We offer various custom 3D printing services with different turnaround options, from standard to express. This flexibility ensures you can choose a service that fits both your budget and your deadline. For example, explore our 8-hour, 12-hour, or 24-hour custom printing services for urgent needs.
- Review the Quote: Carefully examine the detailed breakdown of costs and estimated delivery times.
- Confirm Order: Once satisfied, proceed with payment to finalize your order.
Warning: Always double-check your order details before confirming. Changes after production has started can incur additional costs and delays.
Step 6: Reviewing and Approving Your Prototype/Print
Depending on the complexity and scale of your project, especially for business applications or critical functional parts, you might receive progress updates or even a prototype for review before full production. This step is crucial for ensuring accuracy and quality, particularly for those using 3d prentunarþjónusta for the first time.
A. Quality Assurance During Production
PrintIn3D.ie employs strict quality control measures throughout the printing process. This involves:
- Initial File Check: A final automated and manual check of your 3D model for printability issues.
- Printer Calibration: Ensuring our Bambu Lab X1C and P1S printers are perfectly calibrated for optimal results.
- In-process Monitoring: Our team monitors prints to catch any anomalies or potential failures early.
For custom 3d prentun eftir pöntun, especially large or complex ones, we might provide:
- Digital Renderings: Previews of how the finished product will look.
- Photos/Videos: Updates from the print bed during critical stages.
Tip: If your project is a critical prototype or requires exact dimensions, communicate this upfront. We can implement tighter tolerances and provide more frequent updates. Remember, the goal is to make sure your final prenta 3d hlut perfectly matches your expectations.
B. Prototype Review (If Applicable)
For multi-part assemblies or complex prototypes, a small batch or single print might be produced first for your review. This is an invaluable opportunity:
- Physical Inspection: Check dimensions, fit, and overall appearance.
- Functionality Test: If it's a functional part, test its performance in its intended environment.
- Feedback: Provide any feedback for adjustments. This iterative process ensures the final production run is flawless.
Warning: Be thorough in your review. Any overlooked issues at the prototype stage could be replicated across a larger production run, leading to costly reworks.
Step 7: Receiving Your 3D Printed Reality
The final and most exciting step is receiving your finished 3D printed object. PrintIn3D.ie prides itself on efficient processing and fast delivery, making your journey from concept to reality as smooth as possible, even for customers seeking 3d printing ísland.
A. Packaging and Shipping
Once your order is complete and passes final quality checks, it will be carefully packaged for dispatch. We understand the importance of your creations, so we ensure they are protected during transit.
- Secure Packaging: Items are securely packed to prevent damage during shipping.
- Fast Dispatch: For filament orders, we offer same-day dispatch before 4 PM. For 3D prints, dispatch happens as soon as production is complete.
- Tracked Delivery: All orders come with tracking information, so you can monitor your package's journey from our facility in Ireland right to your doorstep, whether you're in Reykjavík or anywhere else in the EU/EEA.
Tip: Keep an eye on your tracking number. While we aim for 2 working days delivery in Ireland and 5-7 working days for Europe, knowing your package's status can help you plan for its arrival.
B. Unboxing and Enjoying Your Creation
The moment has arrived! Unpack your custom 3D printed object and marvel at its transformation from a digital file or simple sketch into a tangible, physical item.
- Inspect the Print: Do a final check for any transit damage or unexpected issues.
- Test Fit/Function: If applicable, test the fit and function of your new part.
- Share Your Success: We love seeing what our customers create! Share your projects with us and on social media.
Warning: Handle delicate prints with care, especially immediately after unboxing. If you encounter any issues with your print upon arrival, contact our friendly WhatsApp support immediately. Remember, we offer a 30-Day Risk-Free Return policy, including shipping, to ensure your complete satisfaction.
Common Mistakes to Avoid in 3D Printing
Even with expert 3d prentunarþjónusta, understanding common pitfalls can help you ensure a smooth process for your 3d prentun ísland projects:
- Ignoring Wall Thickness: Designing parts with walls that are too thin is a common error, leading to fragile or incomplete prints. Always consider the minimum recommended wall thickness for your chosen material.
- Neglecting File Integrity: Submitting a 3D model with errors (e.g., non-manifold geometry, open meshes) can cause print failures or incorrect outputs. Always use repair tools or consult with design experts.
- Incorrect Scale or Units: Accidentally designing in millimeters but exporting in inches (or vice-versa) can result in prints that are drastically too large or too small. Double-check your units at every stage.
- Choosing the Wrong Material: Selecting a material purely based on cost or color without considering its functional properties (strength, heat resistance, flexibility) can lead to an unsuitable final product.
- Underestimating Turnaround Time: While PrintIn3D.ie offers fast services, custom 3d prentun eftir pöntun still requires time for design, printing, and shipping. Plan your projects with realistic timelines.
- Vague Design Instructions: When using design services, unclear or incomplete instructions can lead to misunderstandings and revisions. Provide as much detail as possible, including sketches and reference images.
- Overlooking Post-Processing Needs: Assuming a print will come out perfectly smooth without considering post-processing can lead to disappointment if a specific finish is desired. Discuss finishing options upfront.
- Not Utilizing Expert Advice: Hesitating to ask questions or seek guidance from our experienced team can prevent you from optimizing your design or material choice. Our WhatsApp support is there to help!
Frequently Asked Questions (FAQ)
Can PrintIn3D.ie provide 3d prentunarþjónusta reykjavík or for other parts of Iceland?
Absolutely! While PrintIn3D.ie is based in Ireland, we are your trusted 3D printing partner across the EU/EEA, including all of Iceland. We regularly ship custom 3D prints and filament orders to customers in Reykjavík and throughout the country with fast and reliable delivery. Our online platform makes it easy to submit your files and manage your orders from anywhere.
What if I only have a concept or a sketch, but no 3D file?
No problem at all! This is precisely where our comprehensive 3D design services come in. Our expert designers can take your idea, sketch, technical drawing, or even a physical object (through 3D scanning) and transform it into a professional, print-ready 3D model. We make the journey from "concept to print" completely hassle-free, turning your vision into a tangible prenta 3d hlut.
What file types do you accept for 3D printing?
We primarily accept .STL and .OBJ file formats, which are industry standards for 3D printing. If you have a file in a different format (e.g., .STEP, .IGES), please contact us, and we may be able to convert it or advise on the best way to proceed. For best results, ensure your .STL or .OBJ file is "watertight" and free of errors. You can learn more about accepted file formats here.
How fast is delivery to Iceland?
We pride ourselves on fast turnaround times. For filament orders, we offer same-day dispatch before 4 PM. For custom 3D prints, the production time varies based on complexity and size, but we offer express services (e.g., 8-hour, 24-hour options). Once dispatched, typical delivery times to Iceland are 5-7 working days. You will receive tracking information to monitor your order's progress every step of the way.
Why should I choose an Irish 3D printing service instead of buying my own printer, especially if I'm in Iceland?
Choosing an established Irish 3d prentunarþjónusta like PrintIn3D.ie offers significant advantages, particularly for those in Iceland. You get access to professional-grade equipment (like Bambu Lab X1C and P1S printers) and expert knowledge without the upfront investment, maintenance, or learning curve of owning a printer. We handle material selection, print optimization, and quality control, ensuring high-quality results every time. Plus, our award-winning service and risk-free guarantee provide peace of mind. For a deeper dive, check out our resource: 3D Printing Service vs. Own Printer in Iceland: The Smart Choice.
Next Steps: Bring Your Ideas to Life with PrintIn3D.ie
Ready to turn your concepts into reality? Whether you have a detailed 3D model or just a spark of an idea, PrintIn3D.ie is here to be your ultimate 3d prentunarþjónusta partner. Visit PrintIn3D.ie today to upload your file for a quick quote, explore our custom 3D printing services, or connect with our friendly team to discuss your project. Let's make your 3D dreams a reality, hassle-free!