How to Get Custom 3D Printed Parts in the US (No Printer Needed!)
How to Get Custom 3D Printed Parts in the US Without Owning a Printer
The world of 3D printing is buzzing with innovation, offering unparalleled freedom to create custom objects, prototypes, and functional parts. From intricate models for hobbies to robust components for industrial applications, the possibilities are virtually limitless. However, many aspiring innovators, entrepreneurs, and makers in the US face a common hurdle: the upfront cost and learning curve of owning and operating a 3D printer.
Perhaps you have a brilliant idea for a new product, need a replacement part that’s no longer manufactured, or simply want to bring a unique design to life. The good news is that you absolutely don't need to invest in your own equipment to achieve professional-grade results. This comprehensive guide will walk you through everything you need to know about accessing a reliable on-demand 3D printed parts service in the USA. You'll learn how to transform your concepts into tangible objects, choose the right materials, prepare your designs, and seamlessly order custom 3D printed parts from expert providers. Say goodbye to the complexities of maintenance, material sourcing, and print failures – your 3D printing partner is here to handle the heavy lifting, ensuring a hassle-free experience from start to finish. Ready to print your 3D dreams?
What You'll Need
- A clear idea or concept for your custom 3D printed part.
- Access to a computer or smartphone for design and ordering.
- (Optional) Basic sketching tools or 3D modeling software.
- An internet connection to connect with professional services.
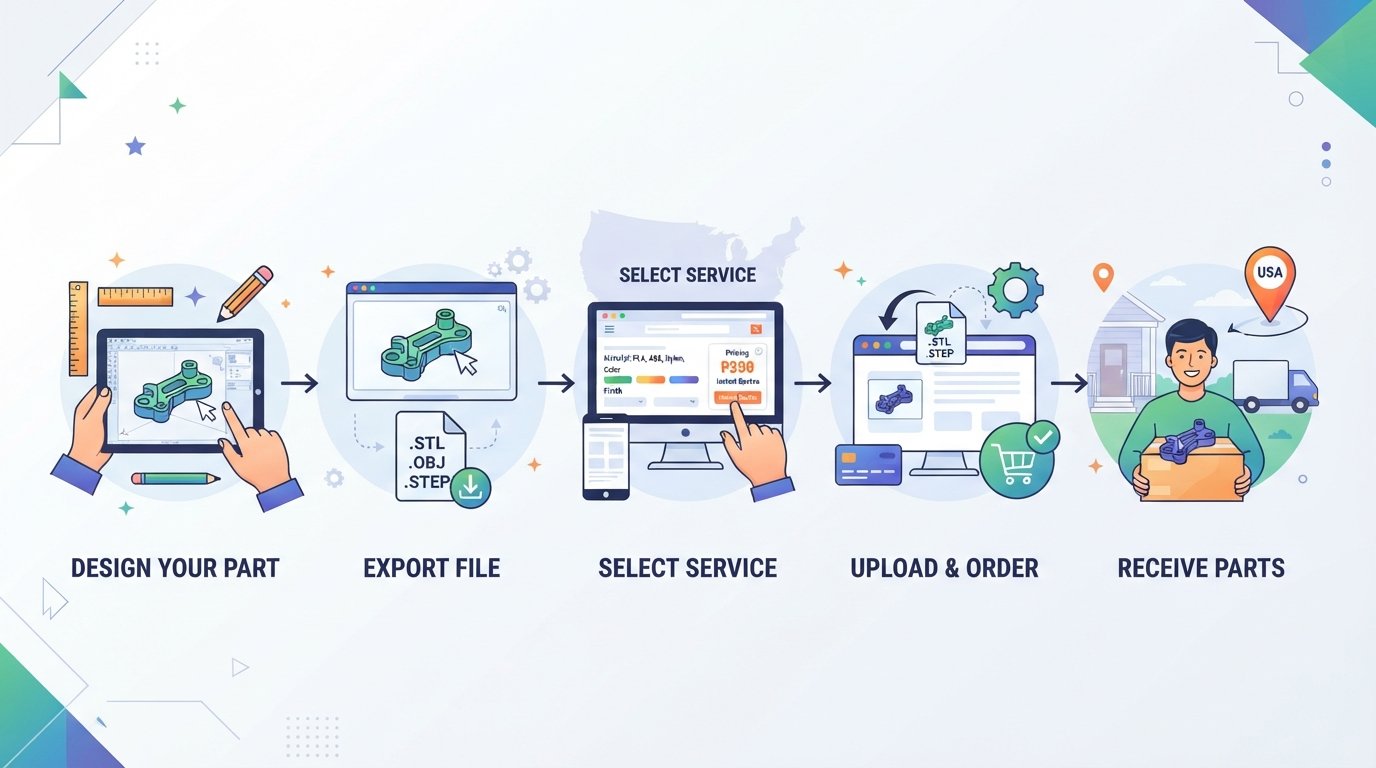
Step 1: Ideation & Concept Development – Turning Your Vision into a Digital Blueprint
Every great 3D print begins with an idea. Whether it's a rough sketch on a napkin, a mental image, or a specific problem you need to solve, the first step is to clearly define what you want your custom 3D printed part to be. This phase is crucial because it sets the foundation for all subsequent steps, especially if you don't have a 3D model yet. Don't worry if you're not a CAD expert; professional services often bridge this gap.
Start by visualizing the part's function, dimensions, and aesthetic. Consider what purpose it will serve, how it will interact with other objects, and any specific environmental conditions it needs to withstand. The more details you can gather and document at this stage, the smoother the design and printing process will be. Think about size, required strength, flexibility, color, and surface finish. This initial brainstorming is vital for communicating your needs to a 3D design specialist or ensuring your existing file is print-ready.
- Sketch it out: Draw your idea from multiple angles. Include measurements if you have them.
- Gather reference images: Find similar objects or parts that inspire your design.
- Document functional requirements: List specific uses, environmental factors (heat, moisture), and desired physical properties (rigidity, flexibility).
- Consider existing objects for scanning: If you need to replicate or modify an existing physical object, 3D scanning services can capture its exact geometry.
Tip: Even a simple hand-drawn sketch with basic dimensions is often enough for a professional 3d design and 3d printing service to begin developing a CAD model. Don't feel intimidated if you're not an artist – clarity is more important than artistic skill here.
Step 2: Choosing Your 3D Printing Material – The Right Fit for Your Function
Once you have a clear concept, the next critical decision is selecting the right material for your custom 3D printed parts. The material dictates the final part's strength, flexibility, heat resistance, surface finish, and overall durability. Professional 3D printing services offer a wide array of materials, each with unique properties. For beginners, understanding the basics of the most common filaments like PLA, PETG, and TPU is a great starting point.
Different applications require different materials. A decorative desk organizer will have different needs than a functional prototype for a machine or a flexible phone case. Consider the environment the part will be used in, how much stress it will endure, and any specific aesthetic requirements. Don't hesitate to consult with your chosen 3D printing service, as they are experts in material selection and can guide you based on your specific project needs.
- PLA (Polylactic Acid):
- Pros: Easy to print, biodegradable, wide range of colors, good for general-purpose applications and prototypes. Often considered the best 3d printer filament for beginners due to its ease of use.
- Cons: Lower temperature resistance, can be brittle, not ideal for outdoor or high-stress applications.
- Applications: Models, toys, display items, non-functional prototypes.
- Availability: Widely available, including 1.75 mm PLA filament USA suppliers.
- PETG (Polyethylene Terephthalate Glycol):
- Pros: Stronger and more durable than PLA, good layer adhesion, food-safe options, higher temperature resistance, good for functional parts.
- Cons: Can be prone to stringing, requires slightly higher printing temperatures.
- Applications: Functional prototypes, mechanical parts, containers, outdoor components.
- Availability: Many PETG filament supplier USA options.
- TPU (Thermoplastic Polyurethane):
- Pros: Extremely flexible and durable, impact-resistant, high abrasion resistance.
- Cons: Can be challenging to print without proper equipment, slower print speeds.
- Applications: Flexible phone cases, gaskets, seals, wearable parts, protective covers.
- Availability: You can buy TPU filament online from specialized 3d printing materials supplier.
- Other Materials: Services may offer ABS, Nylon, ASA, PC, and even advanced composites for specific industrial needs.
Warning: Don't underestimate the importance of material selection. Using the wrong material can lead to a part that fails prematurely, doesn't fit correctly, or doesn't meet your functional expectations. Always discuss your application with the service provider if you're unsure.
Step 3: Preparing Your 3D Model File – From Concept to Print-Ready
This step is where your idea truly begins to take digital form. You have two primary paths here: providing an existing 3D model file or utilizing a professional 3d design service to create one for you. Many individuals and businesses in the US find immense value in outsourcing this design phase, especially for complex parts or if they lack the expertise in CAD software.
Option A: You Already Have a 3D Model File
If you've created your own 3D model using software like Fusion 360, SolidWorks, Blender, or SketchUp, you'll need to ensure it's in a compatible format for 3D printing. The most common and widely accepted file formats are STL (.stl) and OBJ (.obj). Some services may also accept more advanced formats like 3MF or STEP.
- Check for manifold errors: Ensure your model is "water-tight" with no holes or inverted normals. Most CAD software has tools to fix these.
- Verify dimensions and scale: Double-check that your model's dimensions are accurate and scaled correctly for the desired physical size.
- Consider wall thickness: Ensure all walls and features are thick enough to be printed without breaking. Most printers have minimum wall thickness requirements (e.g., 0.8mm to 1.5mm).
- Export in a compatible format: Save your design as an STL or OBJ file. These formats represent the surface geometry of your 3D object as a collection of triangles.
Tip: If you're unsure about your file's print-readiness, most reputable 3D printing services offer a free file analysis or review as part of their quoting process. Don't hesitate to submit your file and ask for feedback.
Option B: You Need a 3D Model Designed
This is where professional cad design services for 3d printing become invaluable. If you have an idea, a sketch, or even a physical object you want to duplicate or modify, a professional designer can translate that into a precise 3D model. This is an integral part of a comprehensive 3d design and 3d printing service, allowing you to go from concept to physical part without any design software knowledge.
- Provide detailed input: Share your sketches, reference images, functional requirements, and any critical dimensions from Step 1.
- Communicate clearly: Work closely with the designer, providing feedback on drafts and ensuring the model meets your expectations.
- Request iterations: A good design service will offer revisions to perfect the model before printing.
- Understand pricing: Design services are typically quoted separately from printing, often based on complexity and estimated hours.
Warning: Be very specific with your design requirements when working with a designer. Ambiguity can lead to designs that don't match your vision, causing delays and potentially additional costs for revisions.
Step 4: Finding the Right Professional 3D Printing Service in the USA
With your idea solidified and your 3D model (or a plan to get one designed) ready, the next crucial step is to select a reliable and high-quality 3d printed parts service USA. The market offers various options, from local bureaus to large online platforms. For individuals and businesses looking for convenience, expertise, and a hassle-free experience without owning a printer, an online professional service is often the best choice.
When evaluating providers, look for companies that prioritize customer experience, offer a wide range of materials, provide transparent pricing, and have a strong track record of quality. An ideal partner will offer not just printing but also design consultation and support, acting as your comprehensive 3D printing solution. Consider their customer support options, turnaround times, and any unique guarantees they offer.
- Search for "Custom 3D Printing Service USA": Use this or similar terms to find online providers. Look for services that specifically cater to the US market for faster shipping and relevant support.
- Evaluate Material Selection: Ensure the service offers the materials you identified in Step 2, and ideally, a good variety for future projects.
- Check for Design Services: If you need help with your 3D model, confirm they offer CAD design services for 3d printing as part of their offering. This streamlines the entire process.
- Read Reviews and Testimonials: Look for evidence of customer satisfaction, quality prints, and reliable delivery. An award-winning service often signals exceptional quality and commitment.
- Assess Turnaround Times: For prototype 3d printing service needs, quick turnarounds are often critical. Check their estimated lead times for both printing and shipping.
- Inquire About Customer Support: Good communication is key. Do they offer friendly WhatsApp support, email, or phone assistance?
- Review Shipping Policies: Confirm they ship across the US efficiently and understand their return policy.
Tip: Look for a service that acts as a true partner, offering guidance from concept to final print. A company with accolades like a "Rising Star" award demonstrates a commitment to excellence and innovation, which translates directly to quality service for your custom 3D printed parts.
Step 5: Requesting a Quote & Placing Your Order – Bringing Your Part to Life
Once you've selected your ideal 3D printing partner, the next step is to obtain a quote for your project and formally place your order. This is where the details you've gathered and the files you've prepared come into play. A clear and precise request 3d printing quote process is a hallmark of a professional service.
Most online 3D printing services have an intuitive platform where you can upload your 3D model file (or specify design service needs), choose your material, desired color, infill density, and any post-processing options. The system will then generate an instant or near-instant quote based on these parameters. If your project is complex or requires extensive design work, you might submit a custom request for a personalized quote.
- Upload Your File: Navigate to the service's "Custom 3D Printing" or "Get a Quote" section and upload your STL or OBJ file. If you need design services, follow their specific instructions for concept submission.
- Select Material and Finish: Choose the material you decided on in Step 2 (e.g., PLA, PETG, TPU) and any specific color or surface finish options available.
- Specify Print Settings: You may be able to choose infill percentage (how dense the inside of the part is, affecting strength and weight) or layer height (affecting detail and print time). If unsure, trust the service's default or ask for recommendations.
- Add Post-Processing Options: Do you need sanding, painting, assembly, or other finishes? Specify these if offered.
- Review Your Quote: Carefully examine the generated quote, which will typically include the cost of printing, material, any design fees, and shipping to your US address.
- Confirm and Pay: Once satisfied, proceed to payment to confirm your order. Many services offer secure online payment options.
Warning: Always double-check all specifications (material, dimensions, quantity, shipping address) before finalizing your order. Mistakes at this stage can be costly and delay your project.
Step 6: Reviewing Your Prototype & Iteration (If Applicable)
For many projects, especially those involving new product development or complex functional parts, the initial custom 3D printed part might serve as a prototype. This prototype phase is invaluable for testing, validating, and refining your design before committing to a larger production run. A professional prototype 3d printing service understands this iterative process.
When you receive your first print, thoroughly inspect it. Does it fit as expected? Does it function correctly? Are there any areas that need adjustment for strength, aesthetics, or usability? This feedback loop is essential for optimizing your design. If modifications are needed, you'll go back to Step 3 (design refinement) and then place another order for the revised prototype.
- Thoroughly Inspect the Print: Check for dimensional accuracy, surface quality, structural integrity, and any visual defects.
- Test Functionality: If it's a functional part, install it, use it, and put it through its intended paces.
- Gather Feedback: Share the prototype with colleagues, potential users, or stakeholders to get diverse perspectives.
- Document Changes: Clearly note all necessary adjustments for the next iteration.
- Consult with the Service: Discuss any issues or desired changes with your 3D printing partner. They can often provide insights on how to improve printability or functionality.
Tip: Don't be afraid to iterate. Prototyping is all about learning and improving. Even minor adjustments can significantly enhance the final product. A reliable 3D printing partner will support you through this process.
Step 7: Receiving Your Custom 3D Printed Parts & Quality Assurance
The final and most exciting step is receiving your finished custom 3D printed parts. Your chosen service will meticulously print, post-process (if requested), and package your items for safe delivery to your US location. This is the culmination of your design vision and the professional execution of your 3D printing partner.
Upon arrival, take the time to conduct a final quality check. Ensure that the parts meet all your specifications, are free from damage, and reflect the quality you expect from a premium service. Reputable services pride themselves on delivering high-quality products and often have robust quality control procedures in place, backed by customer guarantees.
- Unpack Carefully: Remove parts from packaging gently to avoid damage.
- Perform Final Inspection: Check against your original design specifications, especially for critical dimensions and features.
- Verify Material and Color: Confirm you received the correct material and color.
- Address Any Issues Promptly: If there are any discrepancies or defects, contact the 3D printing service immediately. Many services offer a risk-free return policy or support to resolve concerns.
- Enjoy Your Custom Parts: Integrate your new custom 3D printed parts into your project, product, or everyday life!
Warning: While rare with professional services, always inspect your delivery upon arrival. If packaging is visibly damaged, note it with the carrier before accepting. This helps in case of any claims for damaged goods.
Common Mistakes to Avoid When Outsourcing 3D Printing
Navigating the world of custom 3D printed parts can be straightforward, especially with a reliable partner. However, being aware of common pitfalls can save you time, money, and frustration. Here are some key mistakes to avoid:
- Vague Design Specifications: Not providing clear dimensions, functional requirements, or reference images to your designer or service. Ambiguity leads to misinterpretations and revisions.
- Ignoring Material Properties: Choosing a material based solely on cost or color without considering its suitability for the part's intended function, environment, and stress tolerance.
- Overlooking Wall Thickness: Designing features that are too thin to be printed reliably, leading to fragile parts or print failures. Always check minimum wall thickness recommendations for your chosen material and printer.
- Not Checking File Printability: Submitting an STL file with non-manifold edges, inverted normals, or other errors that can cause issues during slicing and printing. Utilize pre-print checks or ask the service to verify.
- Failing to Prototype: Skipping the prototyping phase for critical or complex parts. This can result in costly mistakes if a design flaw isn't caught until a larger batch is produced.
- Choosing the Cheapest Service: Prioritizing the lowest price over quality, reliability, and customer support. A cheap service might use lower-quality materials, have poor print quality, or offer inadequate communication.
- Underestimating Turnaround Time: Expecting instant delivery for complex designs or large orders. While some services offer expedited options, allow realistic time for design, printing, and shipping, especially for a custom 3D printing service online.
- Not Communicating Changes: Making design revisions without informing your 3D printing partner or updating the submitted files, which can lead to parts being printed from an outdated version.
- Neglecting Post-Processing Needs: Forgetting to specify if your part requires special finishes like sanding, painting, or assembly, which can impact the final look and feel.
FAQ About Getting Custom 3D Printed Parts in the US
What file types do I need to submit for custom 3D printing?
The most commonly accepted file formats are STL (.stl) and OBJ (.obj). These are standard for representing 3D models for additive manufacturing. Some services may also accept 3MF or STEP files for more detailed information. If you're using a cad design services for 3d printing, they will typically provide the file in the correct format once the design is approved.
How do I know which material is best for my custom 3D printed part?
Choosing the right material depends entirely on your part's intended application. For general prototypes or decorative items, PLA (like 1.75 mm PLA filament USA suppliers offer) is often a good start because it's easy to print and versatile. For stronger, more durable, or heat-resistant parts, PETG (check out a reliable PETG filament supplier USA) is an excellent choice. If you need flexibility, then TPU (you can buy TPU filament online) is ideal. When in doubt, consult with your 3d printing materials supplier or the service provider directly – they are experts and can recommend the best 3d printer filament for beginners or advanced users based on your specific requirements.
Can I get a request 3d printing quote if I only have a sketch or idea, not a 3D model?
Absolutely! Many full-service providers specialize in offering a complete 3d design and 3d printing service. You can submit your sketches, descriptions, or even reference photos. They will then use their expertise in CAD design services for 3d printing to create a print-ready 3D model for you, followed by printing your custom part. This is perfect for those who don't have CAD software experience.
What is the typical turnaround time for custom 3D printed parts in the US?
Turnaround times can vary significantly based on the complexity of your part, the material chosen, the specific service provider, and their current workload. Simple prints might be ready in a few days, while complex parts or those requiring design work could take longer. Most services will provide an estimated turnaround time when you request 3d printing quote. For urgent needs, inquire about expedited or prototype 3d printing service options, though these may incur additional costs.
Is it more cost-effective to use a 3d printed parts service USA than to buy my own 3D printer?
For most individuals and businesses who need custom parts occasionally or for prototyping, using a professional service is significantly more cost-effective. Owning a 3D printer involves a substantial upfront investment, ongoing costs for filament (even 1.75 mm PLA filament USA can add up), maintenance, troubleshooting, and the time commitment to learn and operate the machine. A service eliminates these burdens, providing expert results without the hassle. For a detailed comparison, check out our guide on DIY 3D Printing vs. Professional Services in the US.
Next Steps: Unlock Your 3D Printing Potential with a Trusted Partner
You now have a comprehensive understanding of how to obtain custom 3D printed parts in the US without the need to own your own printer. By partnering with a trusted and expert service, you can effortlessly bring your ideas to life, whether for innovative prototypes, functional components, or unique creations. Ready to transform your concepts into reality? Get started today by visiting PrintIn3D.ie to request a quote for your custom 3D printing project and experience a truly hassle-free journey from design to delivery.