How to Prepare Your 3D Model File for Professional Printing in Ireland
Introduction: Unlock Perfect Prints with Expert File Preparation
Embarking on a 3D printing project is exciting, whether you're bringing a complex prototype to life or creating a unique custom part. However, the journey from a digital 3D model to a tangible object requires careful preparation of your file. Many assume that a great design automatically translates into a great print, but the reality is that the quality of your printed part is heavily dependent on how well your 3D model file is prepared for the specificities of additive manufacturing. This is especially true when leveraging professional 3D printing services, such as those offered by PrintIn3D.ie.
This comprehensive guide is your essential roadmap to mastering 3D model file preparation for professional printing in Ireland and across Europe. We'll demystify the technical jargon and provide actionable steps to ensure your digital masterpiece is print-ready, saving you time, money, and potential headaches. From understanding critical file formats to optimising mesh integrity and wall thickness, you'll learn everything required to achieve flawless results. Whether you're an experienced designer or new to the world of 3D modelling, preparing your file correctly is the crucial first step to turning your ideas into a high-quality physical reality. Let PrintIn3D.ie be your trusted partner in this process, ensuring your project, whether it's for `3d prentunarþjónusta reykjavík` or a local Irish business, gets the professional finish it deserves.
Who This Is For
- Individuals and businesses seeking professional 3D printing services in Ireland, Iceland, and across the EU/EEA.
- Designers, engineers, hobbyists, and entrepreneurs who have a 3D model and need it printed.
- Anyone looking to understand the technical requirements for submitting a 3D model to a print service.
- Customers of PrintIn3D.ie wanting to ensure their files meet optimal standards for the best print quality.
Step 1: Understand the Foundation – Watertightness and Mesh Integrity
The single most critical concept in preparing any 3D model for printing is ensuring it is "watertight" or "manifold." Imagine your 3D model as a solid object that could hold water if filled. If there are any holes, gaps, or internal inconsistencies, the "water" would leak out. In 3D printing terms, this means the slicing software won't know where the inside and outside of your model are, leading to errors, missing layers, or failed prints. Watertightness refers to a completely enclosed volume, without any open edges, intersecting faces, or inverted normals.
Mesh integrity is closely related. A 3D model is composed of a mesh of polygons (usually triangles or quadrilaterals) that define its surface. For successful printing, this mesh must be clean, coherent, and free of defects. Common issues include non-manifold edges (edges shared by more than two faces), duplicate faces, zero-area faces, and inverted normals (where the "inside" of a face is pointing outwards). Most 3D modelling software has tools to check and repair these issues. Before you even consider exporting your file, spend time verifying the structural soundness of your model's mesh.
- Check for open edges: Ensure every edge on your model is shared by exactly two faces. If an edge is only shared by one face, it's an open edge, indicating a hole.
- Examine intersecting geometry: Confirm that no parts of your model are intersecting themselves in an unintended way. While some intersections are fine, self-intersections can confuse slicers.
- Verify face normals: Normals are vectors perpendicular to each face, indicating which way is "out." All normals on the exterior of your model should point outwards. Most CAD and 3D modelling software can display and flip normals.
- Utilise repair tools: Many software packages (e.g., Blender, Meshmixer, Netfabb, or online tools like MakePrintable) have automated repair functions to fix common mesh issues.
Step 2: Selecting the Optimal File Format for Professional Services
While many 3D file formats exist, professional 3D printing services typically prefer a select few for their reliability and universal compatibility. The most common and recommended formats are STL, OBJ, and 3MF. Each has its strengths, and understanding these can help you make the best choice for your specific project when you wish to `prenta 3d hlut`.
The **STL (STereoLithography)** format is the industry standard. It describes only the surface geometry of a 3D object using a collection of interconnected triangles. It's simple, widely supported, and excellent for models without colour or complex material data. For most straightforward prints, STL is your go-to. However, it lacks information about units, colour, or texture, which means you need to communicate these details to your printing service separately.
The **OBJ (Object)** format is another popular choice, particularly if your model includes colour, texture maps, or multiple material definitions. Unlike STL, OBJ files can store complex information beyond just geometry. If your design relies on aesthetic details like specific colours or surface textures that need to be reproduced, OBJ might be more suitable. However, ensure that any accompanying MTL (material library) and texture files are included with your OBJ file.
The **3MF (3D Manufacturing Format)** is a newer, more advanced format designed specifically for additive manufacturing. It's an improvement over STL, as it can contain not only geometry but also colour, textures, materials, and even print parameters within a single file. This "package" approach significantly reduces potential errors and simplifies communication, making it an excellent choice for complex projects or multi-material prints. PrintIn3D.ie strongly recommends 3MF when possible due to its comprehensive data storage capabilities.
- Prioritise STL for simplicity: For monochrome or single-material prints, STL is often the easiest and most universally accepted format.
- Use OBJ for visual fidelity: If your model has colour or textures you want transferred to the print service for reference or multi-colour printing (if supported), OBJ with accompanying files is a good option.
- Opt for 3MF for advanced projects: For models with intricate details, multiple materials, or colour information, 3MF provides the most robust and error-free solution, enhancing your `3d prentun ísland` experience.
- Verify export settings: Always ensure your software is exporting to the correct binary or ASCII format (binary is usually smaller and faster for STL).
Step 3: Precision in Scale and Dimensions
One of the most common and easily avoidable mistakes in 3D printing is incorrect scaling. Your 3D model exists in a digital space with abstract units. When it's translated to a physical print, those units become critical. A model designed in millimetres but interpreted as inches during printing will result in a part that is 25.4 times larger than intended – a very costly error! Ensuring your model's scale and dimensions are accurate and consistent is paramount for any `3d prentun eftir pöntun` service.
Before exporting your model, confirm the units of your design software. Most 3D printing software and services prefer millimetres (mm), as it offers a good balance between precision and ease of use for typical print sizes. If you design in centimetres or inches, either convert your model to millimetres within your software before export or explicitly communicate your chosen units to PrintIn3D.ie. Even better, many file formats like 3MF and some versions of STL allow you to embed unit information directly into the file, reducing ambiguity.
Beyond units, also consider the overall dimensions of your model. Does it fit within the build volume of the printer? While professional services like PrintIn3D.ie often have large format printers, extremely oversized parts might require segmentation or lead to higher costs. Conversely, very tiny features can be challenging to print accurately. Always consider the real-world size your object will have and ensure it aligns with your expectations.
- Define units early: Establish your preferred units (preferably millimetres) at the beginning of your design process and stick to them.
- Check export settings: When exporting, explicitly select millimetres as the output unit if your software offers this option. If not, state your original design units clearly in your order notes.
- Communicate clearly: If there's any doubt about scale or units, add a note to your order or contact PrintIn3D.ie's friendly support team. For instance, when requesting `3d printing ísland`, clearly specify dimensions.
- Add a reference object: For critical dimensions, you might include a small, known-dimension cube in your file (and then remove it or tell the service to ignore it) or specify a key dimension in your project notes to allow the service to verify scale.
Step 4: Optimising Wall Thickness and Fine Details
The physical properties of 3D printing, especially with FDM technology, impose limitations on how thin walls can be and how small details can reliably print. Ignoring these constraints is a surefire way to end up with fragile parts, missing features, or complete print failures. Understanding optimal wall thickness and minimum detail size is crucial for successful 3D model file preparation.
Each material (like PLA or PETG from our filament selection) and printing technology has a minimum advisable wall thickness. For FDM printing, generally, a minimum wall thickness of 1.0mm to 2.0mm is recommended for structural integrity. Thinner walls (e.g., 0.5mm) might print but will be extremely brittle and prone to breaking. If your design requires a thin, flexible wall, consider using a flexible filament like TPU, but still respect the minimum thickness for that material. Always design with the printer's nozzle diameter in mind; walls thinner than two nozzle diameters are problematic.
Similarly, fine details like embossed text, engravings, small holes, or delicate protrusions also have minimum printable dimensions. For raised details, a height of at least 0.5mm to 1.0mm and a width of 1.0mm is typically needed to be visible and robust. Engraved details need similar depths and widths to be clearly defined. Holes smaller than 1.0mm in diameter can sometimes fuse shut during printing. Remember that details might appear perfectly clear on your screen but could be too fine for the physical extrusion process. Always design with a practical minimum in mind, and if unsure, slightly exaggerate the features to ensure they print.
- Check wall thickness: Use analysis tools in your CAD software (like "Thicken" or "Wall Thickness Analysis") to identify areas that are too thin. Aim for at least 1.0-2.0mm for most FDM prints.
- Reinforce delicate features: If thin walls are unavoidable, consider adding fillets or chamfers at connection points to distribute stress and improve strength.
- Size small details adequately: Ensure any text, logos, or intricate features have sufficient dimensions (height/depth and width) to be clearly rendered by the printer nozzle.
- Consider material choice: Different materials have different strengths and flexibilities. A thin wall in PLA might break, but the same thickness in PETG could be more robust. Discuss your needs with PrintIn3D.ie if you're unsure about material choice.
Step 5: Optimising Mesh Density and Resolution
The resolution of your 3D model, determined by its mesh density, plays a significant role in both print quality and file size. A model with insufficient resolution will appear faceted or blocky, especially on curved surfaces. Conversely, an excessively high-resolution model will result in an unnecessarily large file, which can slow down processing, consume more memory, and offer no discernible improvement in print quality beyond a certain point. Finding the right balance is key for efficient `3d prentunarþjónusta`.
When you export your model, particularly to an STL format, your software will convert your smooth curves and surfaces into a mesh of triangles. The "resolution" or "tolerance" setting during this export dictates how many triangles are used to approximate these curves. A low tolerance (high resolution) means more triangles and smoother curves, but a larger file. A high tolerance (low resolution) means fewer triangles, potentially visible facets, and a smaller file.
For most FDM 3D printing, a visual tolerance where facets are barely perceptible to the naked eye is ideal. Aim for an angular deviation (the maximum angle between adjacent triangle normals) of around 1 degree, and a chord height (the maximum distance from the surface of the original model to the facet created by the triangles) of about 0.01mm to 0.05mm. These values will typically produce a smooth-looking print without creating an unwieldy file. Extremely fine details, however, might warrant slightly higher resolution settings.
- Adjust export settings: Most CAD software allows you to control the mesh density during STL export. Look for terms like "resolution," "tolerance," "chord height," or "angular deviation."
- Avoid over-triangulation: Do not use the highest possible resolution setting unless absolutely necessary for incredibly intricate models. Beyond a certain point, the printer's physical resolution (nozzle size, layer height) will be the limiting factor, not the model's digital resolution.
- Check file size: A typical well-optimised STL file for a medium-sized object might be a few megabytes. If your file is hundreds of megabytes or even gigabytes, it's likely over-resolved and needs simplification.
- Balance detail and efficiency: The goal is to capture all necessary details without creating redundant data that bloats the file and offers no print benefit.
Step 6: Considering Supports and Overhangs
3D printing builds objects layer by layer from the bottom up. This means that if a part of your model extends outwards with nothing directly beneath it to support the new layer, it's an "overhang." Without proper support, these overhangs will sag, warp, or detach, leading to a failed print. Understanding how overhangs work and whether to include supports (or let the service handle it) is a vital part of file preparation for `3d prentun reykjavík` or any other location.
Most FDM printers can successfully print overhangs up to a certain angle (typically around 45-60 degrees from the vertical) without support. This is because each new layer can partially bond to the layer below it, even if it's slightly offset. However, if an overhang is steeper than this angle, or if it's a "bridge" (a horizontal span with no support beneath either end), support structures become necessary. These structures are temporary, printed material that holds up the overhangs during printing and are then removed during post-processing.
When using a professional service like PrintIn3D.ie, you generally don't need to add supports to your model yourself. Our expert technicians will analyse your model, orient it optimally on the print bed, and generate the necessary support structures using advanced slicing software. This ensures efficient printing, minimal material waste, and easier support removal. However, it's helpful for you to be aware of areas that will require support, as these areas might have a slightly rougher finish after support removal. If you have specific requirements for surface finish or orientation, communicate them in your order.
- Identify overhangs: Visually inspect your model for any areas that extend out at angles greater than 45 degrees or bridges.
- Understand support implications: Be aware that areas requiring support will have minor cosmetic imperfections where the supports were attached.
- Design to minimise supports: Where possible, modify your design to reduce steep overhangs, incorporate chamfers, or split complex models into smaller, easier-to-print parts that can be assembled later.
- Communicate specific needs: If you have a critical surface finish requirement on an area that will need supports, mention it to PrintIn3D.ie so we can orient the model to prioritise that surface.
Step 7: The Art of Hollowing Your Model
Hollowing a 3D model means creating an internal cavity while maintaining the outer shell, effectively making the object hollow instead of solid. This technique is primarily used to save material, reduce print time, and decrease the overall weight of the printed object. It's an important consideration for larger prints, particularly when material cost or weight is a significant factor, but it requires careful execution.
When hollowing, you need to define an interior wall thickness. This thickness must still adhere to the minimum wall thickness guidelines discussed in Step 4, as a hollow model with walls that are too thin will be fragile and prone to breakage. For FDM printing, an internal wall thickness of 1.5mm to 3.0mm is often a good starting point, depending on the model's size and intended use. The stronger the material, the thinner the walls can potentially be.
Crucially, a hollow model requires "drainage holes." These holes allow un-cured resin (in resin printing) or excess powder (in powder-based printing) to escape the internal cavity. For FDM, drainage holes are less about removing material and more about preventing pressure build-up from trapped air during printing, as well as allowing for internal support structures to be designed if needed. Typically, at least two drainage holes (minimum 2-3mm diameter) on opposing sides or at the bottom of the model are recommended to ensure proper air circulation and material escape. Without drainage holes, your hollow model can lead to print failures due to pressure or trapped material.
- Assess necessity: Determine if hollowing is beneficial for your project. For small, functional parts, it may not be necessary. For large, decorative items, it can save significant cost.
- Define wall thickness: When hollowing, set an appropriate internal wall thickness based on material and model size.
- Add drainage holes: Incorporate at least two strategically placed drainage holes (minimum 2-3mm in diameter) into your design. Consider placing them in less visible areas if aesthetics are important.
- Utilise software tools: Many CAD and 3D modelling software (e.g., Meshmixer, Simplify3D) have dedicated hollowing tools that allow you to define wall thickness and automatically add drainage holes.
Step 8: Final Checks and Exporting Your Print-Ready File
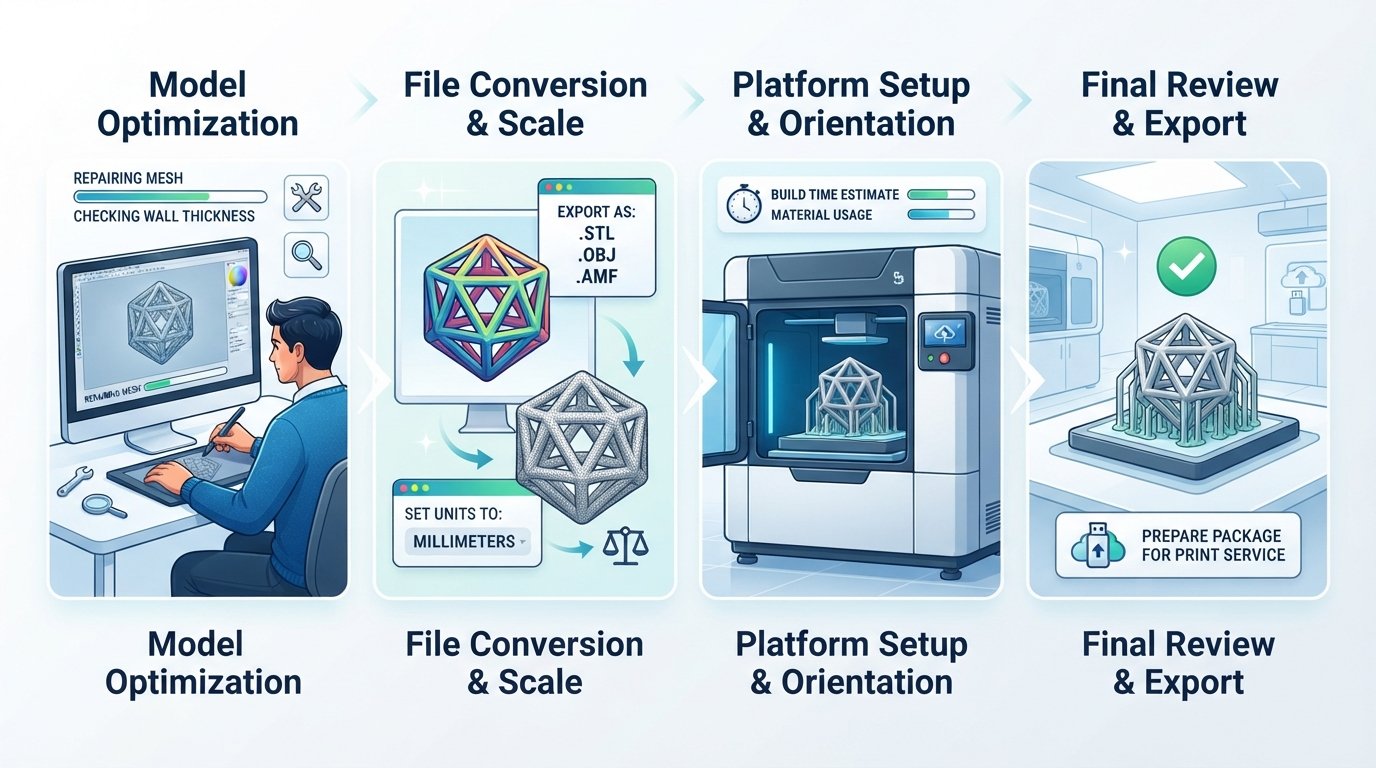
You've meticulously designed your model, ensured its watertightness, scaled it correctly, considered wall thickness, and optimised its resolution. Now comes the final stage of 3D model file preparation: performing a last comprehensive check and exporting your file correctly. This step is about reviewing all your hard work to catch any last-minute errors before handing it over to a professional `3d printing ísland` or Irish service.
Before hitting that export button, take a moment to virtually inspect your model one last time. Rotate it, zoom in on critical features, and run any built-in analysis tools in your software (e.g., integrity checks, wall thickness analysis, manifold checks). Some software allows for a "printability analysis" which can highlight potential issues. If you have access to a slicer program (even if you're not printing it yourself), importing your model into it can provide a visual representation of how it will be interpreted, often highlighting any non-manifold edges or inverted normals with distinct colours or warnings.
When exporting, always ensure you select the correct file format (STL, OBJ, or 3MF as discussed in Step 2). Double-check the unit settings during export, ensuring they match your design (e.g., millimetres). Use binary STL for smaller file sizes. Name your file clearly and descriptively (e.g., "ProjectName_PartName_V1.stl") to help PrintIn3D.ie identify your project easily. If you have multiple parts, either export them as separate, clearly named files or as a single combined file if they are meant to be printed as one unit.
- Perform a final visual inspection: Scrutinise your model from all angles, checking for any overlooked flaws or unexpected geometry.
- Run internal software checks: Use your CAD software's built-in analysis and repair tools one last time.
- Test in a slicer (optional but recommended): Load your exported file into a free slicer (like PrusaSlicer, Cura, or Bambu Studio) to see how it's interpreted. Look for warnings or unusual visual artefacts.
- Select correct export format and units: Confirm STL (binary), OBJ (with MTL/textures), or 3MF, and ensure units are set to millimetres during export.
- Name your file clearly: Use descriptive file names to avoid confusion.
- Consolidate files: If submitting multiple related files, consider zipping them into a single archive for easy upload.
Common Mistakes to Avoid in 3D Model File Preparation
Even experienced designers can sometimes overlook crucial details. Avoiding these common pitfalls will significantly improve your chances of a perfect print from PrintIn3D.ie, whether it's for `3d prentun eftir pöntun` or custom design.
- Non-Watertight Models: This is the most frequent issue. Holes, gaps, and inverted normals prevent the slicer from understanding the model's volume, leading to errors or failed prints. Always run a manifold check.
- Incorrect Scaling or Units: Designing in inches and exporting as millimetres (or vice-versa) without adjustment results in prints that are drastically too large or too small. Confirm your units before export.
- Insufficient Wall Thickness: Walls or features that are too thin for the chosen material and printing process will be fragile, break during printing, or simply not print at all. Always adhere to minimum thickness guidelines.
- Overly Complex or Under-Resolved Meshes: An excessively high polygon count creates huge files with no practical benefit, while a low polygon count leads to blocky, faceted prints. Find the right balance.
- Forgetting Drainage Holes for Hollow Models: Hollowing a model without providing drainage can cause pressure build-up and print failures. Always include at least two holes.
- Expecting Miracles with Overhangs: While supports handle most overhangs, extremely challenging geometry might still result in minor cosmetic issues. Design to minimise supports where feasible.
- Submitting Multiple Unrelated Objects in One File: If you have several distinct parts, it's usually better to submit them as separate files unless they are designed to be printed as a single, combined unit.
- Ignoring Material Properties: Different materials (PLA, PETG, etc.) have distinct characteristics regarding strength, flexibility, and heat resistance. Factor this into your design's structural elements. Check our filament options and consult our team if unsure.
- Lack of Communication: If you have specific requirements (e.g., critical dimensions, preferred orientation, specific finish on a certain side), always communicate them clearly to PrintIn3D.ie.
FAQ: Your Questions About 3D Model File Preparation Answered
Can PrintIn3D.ie repair my 3D model file if it has errors?
Yes, often we can! PrintIn3D.ie uses advanced software and has experienced technicians who can identify and repair many common 3D model file issues, such as non-watertight geometry, inverted normals, or minor mesh errors. However, significant design flaws or complex repairs may incur additional charges or require you to resubmit a corrected file. To ensure the fastest turnaround and best results, we always recommend submitting the most print-ready file possible. For models that require extensive redesign or are created from sketches, our dedicated 3D design services are available to bring your concept to a perfect, printable reality.
What if my model is too large for a single print? Can it be split?
Absolutely! If your 3D model exceeds the maximum build volume of our printers, PrintIn3D.ie can professionally split your model into multiple, manageable sections. We then add interlocking features (like pins or keys) to these sections, making assembly after printing straightforward and precise. This approach allows us to print virtually any size object. If you anticipate your model might be too large, please let us know in your order notes, and our team will recommend the best course of action. You can learn more about specific requirements by checking our FAQs for 3D printing in Iceland, which outlines our general service capabilities.
Which software is best for preparing 3D models for printing?
Many software packages are suitable, each with its strengths. For organic shapes and sculptural models, Blender, ZBrush, or Meshmixer are popular choices with robust tools for mesh repair and optimisation. For precise, mechanical parts and engineering designs, CAD software like SolidWorks, Fusion 360, Onshape, or AutoCAD are excellent. Most of these programs offer export options to STL, OBJ, or 3MF. The best software is ultimately the one you are most comfortable with and that provides the necessary tools for creating watertight, print-ready models. Remember, the principles of good file preparation apply regardless of the software you use.
Do I need to orient my model for optimal printing before sending it?
While you can orient your model to your preferred print direction, it's generally not necessary when using a professional service like PrintIn3D.ie. Our experienced technicians will review your model and determine the optimal print orientation to minimise support material, maximise print quality, and reduce printing time. We consider factors like surface finish, structural integrity, and layer lines. If you have a specific desired orientation for aesthetic or functional reasons (e.g., "this surface must be perfectly smooth"), please include this information in your order notes, and we will do our best to accommodate your request.
Can I submit multiple different 3D models in one order?
Yes, you can! PrintIn3D.ie is designed to handle multiple projects efficiently. For optimal processing and clear communication, we recommend submitting each distinct 3D model as a separate, clearly named file (e.g., "Gear_V2.stl", "Housing_Top_Final.obj"). If you have a collection of related parts for a single assembly, you can also group them and upload them as a single ZIP archive. This ensures that each component is accurately identified, quoted, and printed according to your specifications. Our platform makes it easy to upload multiple files when placing your custom `3d printing services` order.
Next Steps: Bring Your 3D Dreams to Life with PrintIn3D.ie
Now that you're equipped with the knowledge to prepare your 3D model file for professional printing, you're ready to transform your digital designs into physical objects. Upload your print-ready file today to our custom 3D printing service, or visit our submission page to get started. PrintIn3D.ie is your expert partner, ensuring your next project, whether it's an innovative prototype or a bespoke component, receives the highest quality `3d prentunarþjónusta` available.