How to Prepare Your 3D Model File for Professional Printing in the UK
Bringing a 3D design from concept to a tangible object is an incredibly rewarding process. Whether you're an engineer developing a prototype, a designer creating custom merchandise, or a hobbyist crafting a unique piece, the magic of 3D printing makes it all possible. However, the journey from a digital file to a physical print isn't always straightforward. The quality of your final 3D print hinges significantly on one crucial, often overlooked, step: preparing your 3D model file correctly.
For those in the UK looking to leverage a professional 3D printing service, understanding how to properly prepare your digital assets is paramount. It ensures not only a successful print but also saves time, avoids costly reprints, and guarantees that your vision is accurately realised. This comprehensive guide will walk you through every essential step of optimising your 3D model for professional printing, helping you transform your designs into high-quality physical objects with ease and confidence. We'll cover everything from selecting the right file format to critical structural checks and expert communication with your chosen 3D printing service GB.
By the end of this guide, you'll possess the knowledge to confidently prepare your 3D models, whether you're ordering custom replacement parts 3d printing, intricate prototypes, or decorative items. This expertise will empower you to collaborate effectively with services like PrintIn3D.ie, ensuring your projects in the UK are printed to perfection every single time.
Who This Is For
- Individuals and Businesses: Anyone in the UK needing high-quality 3D prints but without access to a personal 3D printer.
- Designers and Engineers: Professionals looking to outsource rapid prototyping or production for various projects.
- Hobbyists and Makers: Enthusiasts who design their own models and want to ensure a perfect print from a professional service.
- Clients Seeking Custom Solutions: Those looking for custom replacement parts 3d printing or unique items from their digital designs.
- Users of CAD Design Service UK or 3D Scanning to CAD Service UK: If you've had a model created or reverse-engineered and now need it printed.
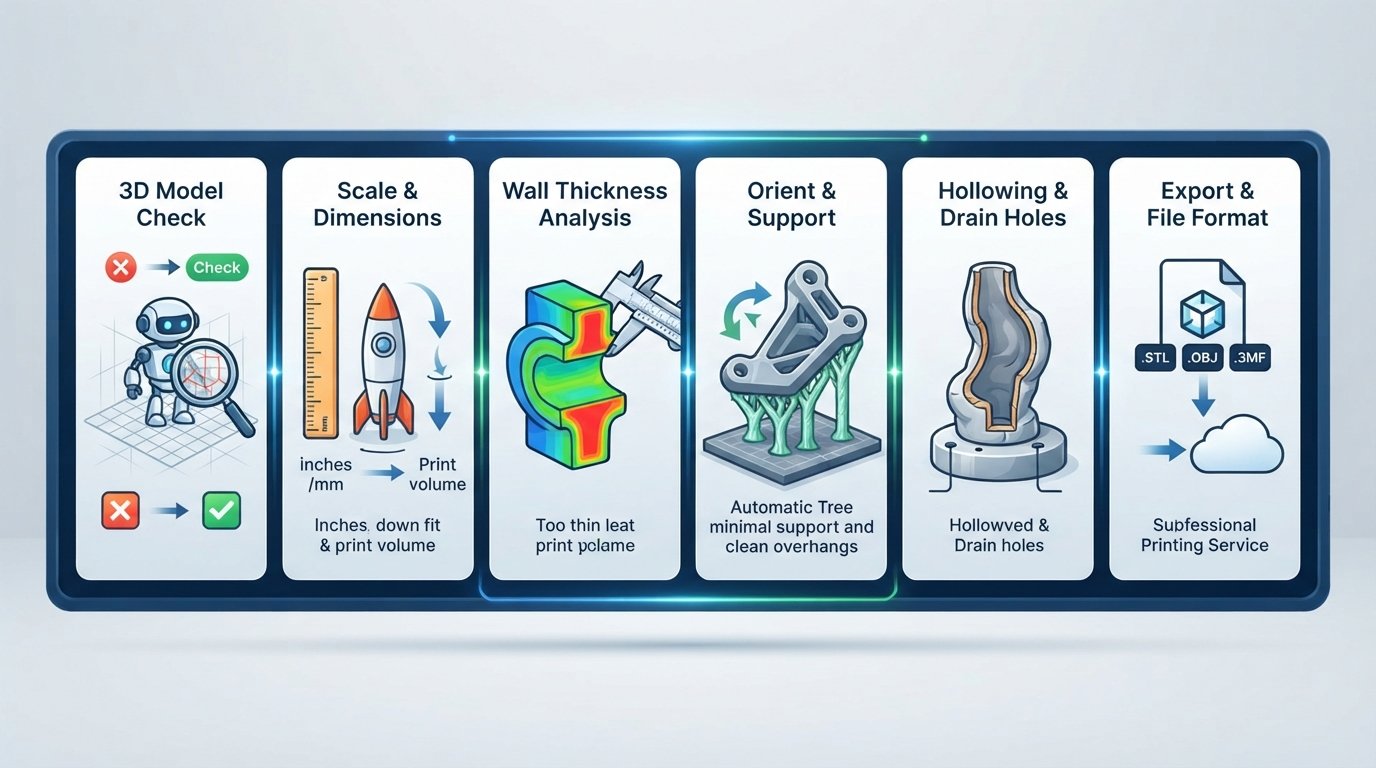
Step 1: Choose the Right File Format
The first crucial decision in preparing your 3D model for professional printing is selecting the appropriate file format. While there are many 3D file formats available, only a few are universally accepted and optimised for additive manufacturing. The choice of format can impact the success of your print, particularly concerning detail, colour, and texture information.
The most common and widely accepted format for 3D printing is STL (Stereolithography). STL files represent the surface geometry of a 3D object as a collection of interconnected triangles, creating a "mesh." It's essentially a simplified, triangulated representation of your object's skin, defining its shape and volume. Most 3d printing service gb filament uk providers, including PrintIn3D.ie, primarily work with STL files because of their simplicity and broad compatibility with 3D slicing software.
However, if your design includes colour, texture, or multiple materials, STL files fall short as they only store geometry. In such cases, OBJ (.obj) or 3MF (.3mf) formats become indispensable. OBJ files can store geometry, colour, and texture maps, making them suitable for visually rich models. 3MF (3D Manufacturing Format) is a newer, more advanced format designed specifically for additive manufacturing. It's an open-source, XML-based format that can contain comprehensive model information, including geometry, colours, textures, materials, and even print settings. 3MF aims to address the limitations of STL by providing a richer, more robust platform for describing 3D models for printing.
When preparing your file, always consider the capabilities of your design software and the requirements of your chosen local 3d printing service uk. Most CAD software packages offer export options for these formats. Ensuring you select the correct format from the outset will streamline the printing process and avoid conversion issues down the line.
- Default to STL: For single-colour, geometrically defined objects, STL (.stl) is the safest and most compatible choice for most professional 3D printers and services.
- Consider OBJ or 3MF for Colour/Texture: If your model features intricate colours, textures, or multiple materials, choose OBJ (.obj) or, preferably, 3MF (.3mf) to preserve this data.
- Check Export Settings: When exporting from your CAD software, look for options to define resolution (number of triangles). A higher resolution means more detail but a larger file size. Aim for a balance where curves appear smooth without creating an excessively large file.
Step 2: Ensure Your Model is Watertight and Manifold
This is arguably the most critical step for successful 3D printing: your model must be "watertight" and "manifold." These terms describe the structural integrity of your 3D model, ensuring it's a solid, enclosed volume without any gaps, holes, or self-intersecting geometry. Imagine trying to fill your digital model with water; if any virtual water leaks out, it's not watertight, and a 3D printer won't know how to fill it.
A "watertight" model means every edge of your model is connected to exactly two faces, forming a completely enclosed volume. There are no open edges, cracks, or missing faces. A "manifold" model further ensures that the geometry can exist in the real world. This means no self-intersections (where parts of the model pass through themselves), no inverted normals (faces pointing inwards instead of outwards), and no isolated vertices or edges that aren't part of a solid surface.
When a 3D printer's slicing software encounters a non-watertight or non-manifold model, it struggles to determine the inside from the outside, leading to errors. This can result in holes in the final print, missing layers, structural weaknesses, or even complete print failure. Design software, especially those not specifically geared towards solid modelling (like some sculpting programs), can often produce non-manifold geometry. It's essential to use dedicated tools to check and repair these issues before submission.
Many CAD programs have built-in tools for checking and repairing mesh integrity. Software like Meshmixer, Netfabb (now part of Autodesk Fusion 360), Blender (with 3D Print Toolbox add-on), or online services like MakePrintable are excellent for diagnosing and often automatically fixing common problems. For complex models or if you're unsure how to proceed, leveraging a cad design service uk or a professional 3d modelling service uk can be incredibly beneficial. These experts can meticulously review and repair your model, ensuring it's perfectly prepared for printing.
- Use Repair Tools: Utilise mesh repair tools within your 3D software (e.g., Solid Inspector in SketchUp, Print 3D in Windows 10, or plugins in Blender/Maya) or dedicated mesh editors like Meshmixer or Netfabb.
- Check for Gaps and Holes: Visually inspect your model for any obvious gaps, open edges, or internal geometry that isn't connected to the exterior.
- Verify Normals: Ensure all face normals are consistently pointing outwards. Inverted normals can confuse the slicer.
- Remove Non-Manifold Edges: Actively search for and fix any edges connected to more or fewer than two faces.
Step 3: Verify Scale and Dimensions
Once your model is structurally sound, the next critical step is to verify its scale and dimensions. It might seem obvious, but issues with scaling are a frequent cause of disappointment when a physical print doesn't match the intended real-world size. Different 3D modelling software packages use various default units (e.g., millimetres, centimetres, inches), and this inconsistency can lead to models being imported into a slicing program or by a 3d printing service gb at an incorrect size.
For example, a model designed in inches might be interpreted as millimetres by a printing service that defaults to metric units, resulting in a print that is 25.4 times smaller than intended! Conversely, a model designed in millimetres could be read as inches, leading to a massive, unexpectedly large print.
Beyond unit conversion, you also need to confirm that the dimensions of your model fit within the build volume of the 3D printer being used. While professional services often have large-format printers, understanding the physical limitations is important, especially for very large parts. If your model exceeds the maximum print dimensions, it will need to be sectioned into multiple smaller parts, which requires careful planning in the design phase.
Always double-check your model's dimensions within your design software and, more importantly, communicate your desired final dimensions and units clearly to your professional 3d modelling service uk. Providing a specific measurement (e.g., "The longest side should be 150mm") eliminates ambiguity and ensures the final product is exactly the size you need, particularly when ordering custom replacement parts 3d printing where precision is vital.
- Confirm Units: Ensure your design software is set to the desired units (e.g., millimetres for most industrial 3D printing).
- Specify Dimensions: Explicitly state the intended real-world dimensions of your model to your 3D printing service. It's helpful to provide a reference dimension (e.g., "The model is 100mm long").
- Check Build Volume: While not always necessary when using a professional service, be aware that extremely large models may require splitting. Discuss this possibility with your service provider early.
- Export with Correct Scaling: Some export options allow you to specify units, ensuring the STL or OBJ file itself contains the correct scale information.
Step 4: Check Wall Thickness and Detail Resolution
Wall thickness and detail resolution are critical factors that directly impact the printability, strength, and aesthetic quality of your 3D model. If walls are too thin, they may not print successfully, could be extremely fragile, or simply shatter during post-processing. Conversely, details that are too small or fine might not be resolved by the printer, leading to missing features or blobby textures.
Each 3D printing technology and material (_type plastic filament 3d printer uk, such as PLA or PETG) has specific minimum wall thickness requirements. For FDM (Fused Deposition Modelling) printing, where plastic filament is extruded layer by layer, typical minimums for robust parts usually range from 1.5mm to 2mm. However, these can vary based on the nozzle size of the printer and the specific material properties. For very small or unsupported features, even thicker walls might be required to ensure structural integrity during printing and handling.
Similarly, the resolution of your printer determines the smallest feature it can reliably reproduce. This applies to fine text, intricate patterns, small holes, or tiny protruding elements. If your design includes features smaller than the printer's resolution (often determined by nozzle diameter for FDM, or laser spot size for SLA), they might merge, become distorted, or simply disappear. It's crucial to design with these limitations in mind. For example, a raised text feature might need to be at least 0.8mm tall and 0.4mm wide to be visible with a standard 0.4mm FDM nozzle.
When preparing your file, carefully review your model's thinnest sections and smallest details. If you're designing custom replacement parts 3d printing, ensuring correct wall thickness is vital for the part's functionality and durability. If you are uncertain about the specific requirements for the material you wish to use (e.g., PLA plastic filament 3d printer UK or PETG plastic filament 3d printer UK), it is always best to consult with your 3d printing service gb filament uk provider.
- Reinforce Thin Walls: Identify any walls or features below 1.5-2mm (for FDM) and thicken them where possible to enhance durability. Consider specific material guidelines (e.g., flexible filaments might handle thinner walls, while brittle ones need more).
- Simplify Fine Details: If a detail is extremely small or delicate, consider enlarging it slightly or simplifying its geometry to ensure it prints reliably.
- Use Analysis Tools: Many CAD software packages have analysis tools that can highlight areas with insufficient wall thickness or overhangs that require support.
- Communicate Intent: If a specific thin feature is critical to your design, make sure to highlight this to your 3d design service uk or printing provider for expert advice.
Step 5: Address Overhangs and Support Structures (Pre-emptively)
3D printing builds objects layer by layer, typically from the bottom up. This means that features that "hang" in the air without anything underneath them (overhangs) require temporary support structures during the printing process. While professional 3d printing service gb providers will automatically generate these supports, understanding how overhangs affect your design can significantly impact print quality, material usage, and post-processing effort.
An overhang is any part of your model that extends outwards without direct support from the layer below. A general rule of thumb for FDM printing is that angles greater than 45 degrees relative to the vertical axis will likely require support. Without support, these sections will print into thin air, causing the plastic to droop, sag, or create messy "spaghetti" failures. While supports are essential, they can leave marks on the surface where they connect to the model, requiring sanding or other post-processing steps to achieve a smooth finish.
As part of your 3D model file preparation UK, it's beneficial to design with printability in mind. By strategically adjusting your model's geometry, you can minimise or even eliminate the need for supports. This could involve incorporating chamfers or fillets to soften sharp overhangs, splitting complex models into parts that can be printed with less support, or orienting the model in a way that reduces unsupported areas. This foresight not only improves the final print quality by reducing surface blemishes but also often reduces the overall printing time and material cost for your custom replacement parts 3d printing or prototypes.
Consider the impact of gravity on molten plastic during the printing process. Any part that extends too far horizontally will inevitably sag. By designing features that gradually increase in angle or incorporate bridging techniques, you can guide the printer to build without additional support structures. This thought process is a hallmark of experienced professional 3d modelling service uk designers.
- Identify Overhangs: Use your CAD software's analysis tools to detect steep overhangs (typically >45 degrees).
- Optimise Design: Where possible, modify your design to reduce severe overhangs. Consider adding fillets, chamfers, or breaking up complex geometry into smaller, more printable sections.
- Consider Orientation: While your 3d printing service gb will handle final orientation, you can often conceptualise how your part might be oriented to reduce support requirements.
- Factor in Post-Processing: Be aware that areas requiring support will likely need some post-processing to achieve a smooth finish. Design critical aesthetic surfaces to avoid support if possible.
Step 6: Optimise Your Mesh and Reduce File Size
While detail is important, an excessively complex 3D model (one with too many triangles or polygons) can be counterproductive. Overly dense meshes can lead to unnecessarily large file sizes, slow down processing for slicing software, and offer no additional visual or structural benefit beyond what the 3D printer can physically reproduce. Conversely, a mesh that is too sparse can result in a faceted, blocky appearance, especially on curved surfaces.
The goal of mesh optimisation is to strike a balance: enough polygons to accurately represent the curves and details of your model, but not so many that the file becomes cumbersome or redundant. Modern 3D printers, particularly FDM machines, have a finite resolution. Adding millions of extra triangles to define a smooth curve that the printer can only reproduce at 0.1mm layer height or with a 0.4mm nozzle is simply overkill. These additional polygons just add computational overhead without improving the final physical print quality.
Tools for mesh decimation or simplification allow you to intelligently reduce the number of polygons while preserving the overall shape and critical details of your model. These tools typically offer settings to control the percentage of reduction or a target polygon count. When reducing, pay close attention to critical areas such as fillets, small features, or areas where tight tolerances are required, ensuring these are not overly simplified.
This optimisation step is particularly important when submitting files to a 3d printing service gb filament uk, as smaller, cleaner files can be processed more quickly and efficiently. It demonstrates attention to detail and a clear understanding of the digital manufacturing workflow, leading to a smoother experience for both you and your service provider.
- Assess Polygon Count: Check the polygon/triangle count of your model. For FDM prints, models with millions of triangles are often excessive.
- Use Decimation Tools: Employ mesh decimation or simplification tools in your 3D software (e.g., Blender's Decimate Modifier, Meshmixer's Reduce tool, or ZBrush's Decimation Master).
- Maintain Critical Details: Carefully monitor the reduction process to ensure important features, sharp edges, or functional elements are not lost or distorted.
- Balance Quality and Size: Aim for the lowest polygon count that still retains acceptable visual smoothness and fidelity to the original design.
Step 7: Prepare for Multi-Part Assemblies (If Applicable)
Many complex 3D projects, especially functional prototypes or custom replacement parts 3d printing, consist of multiple individual components that will be assembled after printing. When preparing such models for professional printing, it's crucial to handle each part correctly to ensure seamless assembly and functionality.
Firstly, each distinct part of an assembly should be exported as a separate, individual 3D model file (e.g., separate STL files). This allows the 3d printing service gb to print each component independently, optimising its orientation and print settings based on its unique geometry and required strength. Attempting to print an entire assembly as a single, combined file usually leads to print failures, internal support nightmares, or non-functional, fused components.
Secondly, clearances are paramount. When designing parts that need to fit together (e.g., a peg in a hole, or interlocking gears), you must build in sufficient gaps to account for the physical limitations of the 3D printer and the slight dimensional inaccuracies inherent in the printing process. A common mistake is designing parts with zero clearance, which almost guarantees they will fuse together or be impossible to assemble without significant sanding and post-processing.
For most FDM prints, a minimum clearance of 0.2mm to 0.5mm between moving or fitting parts is a good starting point, depending on the desired fit tolerance and material. Tighter tolerances are sometimes achievable with higher-resolution printers or specific materials, but always err on the side of slightly larger clearances if smooth movement is critical. Our cad design service uk often advises clients on appropriate tolerances for their specific applications, especially for those pursuing 3d scanning for reverse engineering uk to create replacement parts that fit perfectly.
- Export Individually: Each distinct component of your assembly should be exported as its own watertight, manifold 3D model file.
- Label Clearly: Name your files logically (e.g., "PartA_Base.stl", "PartB_Lid.stl") to avoid confusion for the printing service.
- Design with Clearances: Incorporate appropriate gaps (e.g., 0.2mm - 0.5mm) between mating surfaces to ensure parts can be assembled post-print. Test these clearances virtually in your CAD software.
- Provide Assembly Instructions: For complex assemblies, consider including a simple diagram or exploded view to help the service understand how the parts fit together, especially if they need to check tolerances.
Step 8: Perform a Final Pre-Flight Check
Before you hit send on your perfectly prepared 3D model file, conducting a final "pre-flight check" is crucial. This step acts as a last line of defence against common printing errors and ensures that all the previous preparation steps have been successfully implemented. It's an opportunity to catch any lingering issues that might have slipped through the cracks, giving you confidence in the quality of the file you're submitting to your local 3d printing service uk.
Several tools and methods can assist with this final inspection. Many professional slicing software packages (like Ultimaker Cura, PrusaSlicer, or Bambu Studio) allow you to import your model and perform a virtual "slice" without needing a physical printer. This allows you to visually inspect how the printer's toolpath will interpret your model layer by layer. Look for unexpected gaps, areas where walls disappear, or features that appear distorted. The visual representation of the sliced layers can often reveal non-manifold geometry or insufficient wall thickness that might not be obvious in your original CAD software.
Online 3D model validators are another excellent resource. Websites like Shapeways or Sculpteo offer free upload and analysis services that check for common printability issues, highlighting areas of concern such as thin walls, small details, or non-watertight geometry. These automated checks provide an objective assessment of your model's readiness.
If you're unsure about any aspect of your file's readiness, or if your project is particularly critical (e.g., custom replacement parts 3d printing for industrial use), consider leveraging a professional 3d modelling service uk for a final review. Experts in cad design service uk can use advanced software and their extensive experience to perform a thorough audit of your model, ensuring it meets all printability standards. This final verification step significantly reduces the risk of issues during the actual printing process, guaranteeing a smoother and more successful outcome.
- Use Slicer Software: Load your final STL/OBJ/3MF file into a 3D slicing software (even if you don't own a printer) and visually inspect the layered preview. Look for any anomalies or missing sections.
- Online Validators: Utilise online 3D printability analysis tools to get an automated report on potential issues like wall thickness, overhangs, or mesh errors.
- Review Dimensions Again: Make one last check of the overall dimensions and critical feature sizes to confirm they match your requirements.
- Self-Review: Take a fresh look at your model, focusing on the points covered in previous steps: watertightness, manifold geometry, and potential support needs.
- Consider Expert Review: For complex or critical prints, don't hesitate to ask your chosen 3d printing service gb for a pre-print review, or engage their 3d design service uk for an in-depth assessment.
Step 9: Package and Communicate with Your Printing Service
You've meticulously prepared your 3D model, ensuring it's watertight, correctly scaled, and optimised for printing. The final step before submission is to package your files appropriately and communicate all necessary information to your chosen 3d printing service gb. Effective communication is just as vital as technical file preparation; it bridges the gap between your digital design and their manufacturing expertise.
When sending your files, always use clear and descriptive naming conventions. Instead of "model.stl," use something like "ProjectName_PartName_V3.stl." If your project involves multiple parts, number them clearly and consistently. For complex assemblies, it's beneficial to zip all related files into a single archive (e.g., a .zip or .rar file) to keep everything organised and ensure no files are missed during transfer.
Beyond the files themselves, provide a comprehensive set of instructions and information. This should include: the intended purpose of the print (e.g., "functional prototype," "display model," "custom replacement parts 3d printing"), desired material (PLA plastic filament 3d printer uk, PETG plastic filament 3d printer uk, etc.), preferred colour, and any critical dimensions or tolerances. If there are specific aesthetic requirements for certain surfaces or areas where support marks are unacceptable, highlight these clearly. If you started with a physical object and used a 3d scanning to cad service uk, mention any specific features that needed particular attention during the conversion.
Think of your submission as a complete brief for the manufacturing team. The more detail you provide, the less guesswork there is for the printing service, leading to a more accurate and satisfying final product. A professional service like PrintIn3D.ie appreciates a well-documented submission as it enables us to deliver precisely what you envision with maximum efficiency.
- Clear File Naming: Use descriptive names for all files, indicating project, part, and version.
- Bundle Files: For multiple parts or associated documents (like assembly diagrams), consolidate them into a single zipped folder.
- Provide Detailed Instructions: Include a separate document (e.g., a simple text file or PDF) with critical information:
- Intended use of the print.
- Desired material (e.g., Bambu Lab PLA filament UK or SUNLU PETG filament UK).
- Preferred colour.
- Exact critical dimensions.
- Any specific requirements for surface finish or orientation.
- Contact information for questions.
- Mention Design History: If the model originated from 3d scanning for reverse engineering uk or was significantly modified by a cad design service uk, noting this can sometimes provide useful context.
Common Mistakes to Avoid
Even with a detailed guide, certain common pitfalls can trip up even experienced designers. Being aware of these frequent errors can help you sidestep issues and ensure a smoother, more successful printing experience with your chosen 3d printing service gb.
- Non-Manifold or Non-Watertight Models: This is the number one cause of failed prints. Always ensure your model is a single, enclosed volume without any gaps, holes, or self-intersections. Slicing software cannot process ambiguous geometry.
- Incorrect Scaling or Units: Forgetting to verify dimensions or having incorrect unit settings in your design software can lead to prints that are either microscopic or vastly oversized compared to your intention. Always specify exact dimensions.
- Walls Too Thin: Designing features or walls below the minimum printable thickness for your chosen material and technology will result in fragile parts or features that simply don't print. Consult material guidelines.
- Overly Complex Models / High Polygon Count: While detail is good, excessive polygons beyond the printer's resolution only bloat file size, slow down processing, and can sometimes introduce errors without adding any tangible benefit to the physical print quality.
- Neglecting Overhangs and Support Implications: Not designing with printability in mind can lead to extensive support structures, poor surface finish on critical areas, and increased post-processing effort and cost.
- Ignoring Material Properties: Assuming all materials behave the same is a mistake. Different _type plastic filament 3d printer uk materials (e.g., PLA, PETG, ABS, Nylon) have varying strengths, flexibilities, heat resistances, and printability characteristics. Choose wisely based on your application.
- Lack of Clear Communication: Failing to provide clear instructions regarding material, colour, critical dimensions, and intended use leaves too much to interpretation and can lead to results that don't match your expectations.
- Incorrect File Format: Sending a file in an unsupported or unsuitable format can cause delays as the service attempts conversion or requests a different file. STL is usually safe, but check for colour/texture needs.
- No Final Check: Skipping the pre-flight check can allow easily detectable errors to proceed to the printing stage, wasting time and resources.
FAQ
What is the best file format for 3D printing services in the UK?
For most professional 3D printing in the UK, the standard format is STL (.stl). It's widely supported and contains all the necessary geometric information. For models with colour or texture, OBJ (.obj) or 3MF (.3mf) are better choices, as they can embed this additional data. Always check with your chosen 3D printing service for their preferred formats. At PrintIn3D.ie, we accept a range of formats to accommodate your specific project needs.
My model isn't "watertight." Can PrintIn3D help?
Absolutely! A non-watertight model (one with gaps, holes, or inverted normals) is a common issue and will prevent a successful print. If you're struggling to fix your model, our expert 3D design service can repair it, or even transform your sketches into a print-ready file. This is part of what makes us a leading professional 3d modelling service uk, ensuring your project is ready for fabrication from the ground up.
How do I know what wall thickness is appropriate for my design?
The ideal wall thickness depends heavily on the chosen material and the overall size/geometry of your part. Generally, for most FDM prints using PLA plastic filament 3d printer uk or PETG plastic filament 3d printer uk, a minimum wall thickness of 1.5mm to 2mm is a good starting point for structural integrity. However, smaller details might require thinner walls, while larger, load-bearing parts will need more. Always consult the material guidelines provided by your 3d printing service gb filament uk supplier or service provider. When in doubt, our team can advise you during the custom 3D printing service quotation process.
Can PrintIn3D create a 3D model from my sketches or a physical object?
Yes, we offer comprehensive 3d design service uk and 3d scanning to cad service uk. Whether you have a rough sketch, detailed drawings, or a physical object you need replicated or reverse-engineered, our team can convert your concept into a precise, print-ready 3D model. We also specialise in 3d scanning for reverse engineering uk, turning existing parts into digital designs for custom replacement parts 3d printing, ensuring accuracy and functionality.
What if I need custom replacement parts?
We excel at custom replacement parts 3d printing. Whether you have an existing part you need to duplicate (which might involve our 3d scanning for reverse engineering uk service), or you need a part designed from scratch to fit specific requirements, we can assist. Providing a well-prepared file, or collaborating with our cad design service uk, is the first step to getting those vital custom replacement parts 3d printing successfully produced with the right material and finish.
Next Steps / CTA
Ready to bring your perfectly prepared 3D model to life? Visit PrintIn3D.ie today to get an instant quote for our custom 3D printing service or explore our 3D design services for professional assistance and watch your ideas become reality.