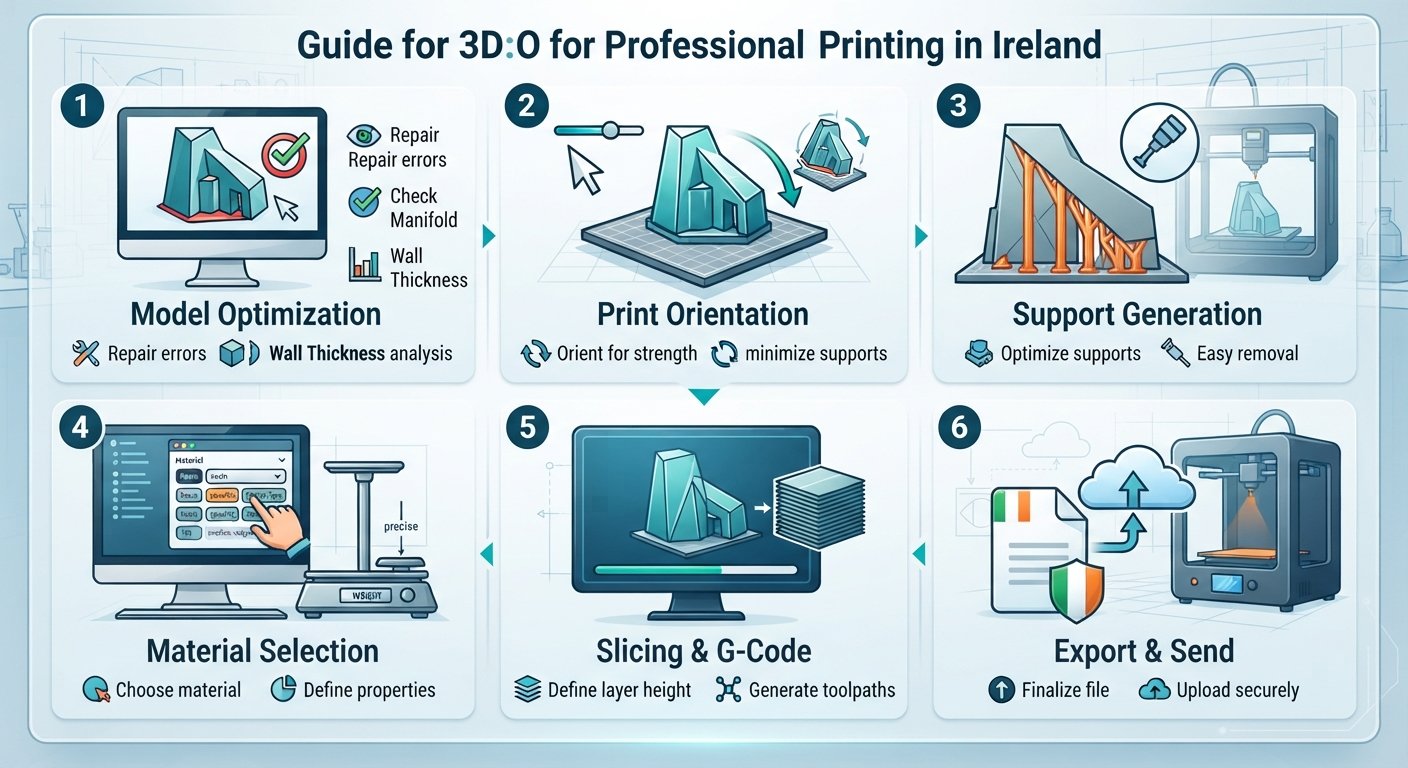
Prepare Your 3D Model for Professional Printing in Ireland
Bringing your innovative 3D ideas to life, whether for a prototype, a functional part, or a stunning artistic creation, is an incredibly rewarding experience. However, the journey from a digital concept to a tangible object isn't always straightforward. For those in Ireland and across the EU/EEA looking to leverage professional 3D printing services, especially when you don't own a 3D printer yourself, the crucial first step is always impeccable 3D model preparation.
A well-prepared 3D model can be the difference between a flawless print and frustrating errors, wasted time, and unnecessary costs. It streamlines the printing process, ensures accuracy, and ultimately delivers the high-quality results you envision. At PrintIn3D.ie, your trusted 3D printing partner, we understand the nuances of additive manufacturing and the importance of a solid foundation. While we handle the printing, scanning, and design heavy lifting, knowing how to prepare your 3D model correctly empowers you to achieve optimal outcomes and communicate your needs effectively.
This comprehensive guide will walk you through every essential step to prepare your 3D model for professional 3D printing with a service in Ireland, ensuring your designs transition seamlessly from screen to reality. We'll cover everything from initial design considerations and file export to mesh integrity, material selection, and effective communication with your chosen service provider. Whether you're an experienced designer or new to the world of 3D, mastering these steps will set you up for success and help you truly "Print Your 3D Dreams" with ease and confidence.
Who This Is For
- Designers and engineers creating prototypes or functional parts.
- Hobbyists and artists bringing unique creations to life.
- Small businesses and startups requiring custom 3D printed components without owning a printer.
- Anyone looking to understand the process of preparing 3D models for external manufacturing.
- Individuals and businesses in Luxembourg seeking a reliable `service impression 3d luxembourg`.
Step 1: Understand Your 3D Printing Goals and Material Requirements
Before you even begin designing or preparing your 3D model, the most critical foundational step is to clearly define the purpose of your printed part. What will it be used for? What conditions will it endure? Answering these questions will guide every subsequent decision, from design geometry to the choice of printing material, which profoundly impacts the final product's properties, cost, and printability.
Consider the environment and forces your part will encounter. Is it purely aesthetic, or does it need to withstand impacts, high temperatures, chemical exposure, or continuous wear? Will it be an indoor display piece, an outdoor functional component, or a medical device? Each application demands specific characteristics from the material. For instance, a decorative figurine might be perfect with standard PLA, which is easy to print and comes in a wide array of colours. However, a drone component or a robust jig would require something more durable like PETG or even more advanced `filament 3d composites luxembourg` to handle stress and environmental factors. Understanding these upfront helps you avoid costly reprints and ensures the printed part meets your expectations.
- Define the Part's Function: Clearly state the primary purpose of your 3D print. Is it a visual prototype, a functional mechanical part, a wearable item, or a decorative piece?
- Consider Environmental Factors: Will the part be exposed to heat, cold, moisture, UV light, chemicals, or significant physical stress? These factors dictate material resilience.
- Determine Required Properties: List essential characteristics such as strength, flexibility, rigidity, impact resistance, temperature resistance, surface finish, and biocompatibility.
- Research Available Materials: Familiarize yourself with common 3D printing materials like PLA, PETG, ABS, TPU, and their respective properties. PrintIn3D.ie primarily works with high-quality PLA and PETG from brands like Bambu Lab and SUNLU, which are excellent for a vast range of applications due to their balance of strength, ease of printing, and versatility. You can explore our range of filaments to see what's available.
- Budget for Materials: Different materials come at different price points. Factor this into your overall project budget. When looking for `filament 3d prix luxembourg`, remember that professional services often benefit from bulk purchasing and specialized suppliers, offering competitive rates for your final print.
Tip: Don't hesitate to discuss your project's intended use with your 3D printing service provider. Their expertise can help you select the most suitable material for your specific application and budget. They can advise on the best material for strength, flexibility, or even specific aesthetic requirements, potentially suggesting `filament 3d composites luxembourg` if your project demands it, ensuring optimal performance from your final product.
Step 2: Design Your Model with 3D Printing in Mind (CAD Principles)
The saying "design for manufacturability" is particularly relevant in 3D printing. Designing a model that looks great on screen doesn't automatically mean it will print successfully. Understanding the limitations and capabilities of additive manufacturing technology, specifically FDM (Fused Deposition Modeling) which PrintIn3D.ie utilises, is crucial. This involves considering factors like wall thickness, overhangs, necessary support structures, and tolerances from the very beginning of your design process.
A well-designed model minimizes the need for extensive post-processing, reduces print time, and significantly lowers the risk of print failures. For example, thin walls might appear fine in a CAD program but can be too fragile to print or break easily. Similarly, steep overhangs (sections of the model extending outward without support below) will often sag or detach without proper support structures, which then require removal and can affect surface finish. By proactively addressing these issues during the design phase, you can ensure your model is robust, accurate, and ready for efficient production by a professional `entreprise impression 3d luxembourg`.
- Ensure Adequate Wall Thickness: Generally, a minimum wall thickness of 1-2 mm is recommended for FDM prints to ensure structural integrity and printability. Thinner walls risk breaking or not forming correctly.
- Minimize Overhangs and Bridges: Design parts with angles less than 45 degrees relative to the print bed to reduce or eliminate the need for support material. If overhangs are unavoidable, consider incorporating chamfers or fillets to make them more printable.
- Consider Support Structures: Some geometries naturally require support. Design with easy support removal in mind, or consider splitting complex models into multiple parts that can be printed separately and assembled.
- Check for Watertightness (Manifold Geometry): Ensure your model has no holes, gaps, or intersecting/overlapping faces. A "watertight" model is a solid volume, which is essential for the slicer software to correctly generate print paths.
- Design for Tolerances: Account for slight variations during printing, especially when designing interlocking or assembled parts. A clearance of 0.2-0.5 mm between moving or fitting parts is often a good starting point.
- Avoid Fine Details that are Too Small: Very small embossed or engraved details (less than 0.5-1 mm) may not print clearly due to the nozzle size and layer resolution.
- Integrate Features for Assembly: If your project involves multiple parts, design them with interlocking features, alignment pins, or bolt holes, considering the material shrinkage and precision of FDM.
Warning: Neglecting these design principles can lead to unprintable models or prints with poor quality. If you're unsure about the printability of your design, or if you only have a concept or sketch, a `design 3d professionnel luxembourg` service like ours can help you refine or create print-ready files. Our 3D design service bridges the gap between your idea and a functional, optimized 3D model.
Step 3: Export Your Model to a Print-Ready File Format
Once your 3D model is meticulously designed, the next crucial step is to export it into a format that a 3D printer's slicing software can understand and process. The most common and widely accepted file format for 3D printing is STL (STereoLithography). However, other formats like OBJ and 3MF are also gaining traction due to their ability to store more information, such as colour and texture data, which STL lacks.
The primary goal during export is to ensure that your model's geometry is accurately translated from your CAD software into a mesh of triangles (STL) or other polygons, without any loss of detail or introduction of errors. Crucially, you must pay close attention to the scale and units. Most 3D printing services, including those in Ireland and across the EU, operate in millimeters (mm) as the standard unit. Exporting in inches or centimeters without proper conversion is a very common mistake that can result in your model being printed at an incorrect size, potentially leading to costly reprints or unusable parts. Always double-check your export settings to confirm the correct units and resolution.
- Choose the Correct File Format:
- STL (.stl): The industry standard. It describes the surface geometry of a 3D object as a collection of triangles. It's universally accepted and ideal for single-colour, single-material prints.
- OBJ (.obj): Can store colour, texture, and material information alongside geometry. Useful for models with complex aesthetics, though less common for purely functional FDM prints.
- 3MF (.3mf): An open-source format designed to be more comprehensive than STL, storing model, material, colour, and print settings in one package. It's becoming increasingly popular.
- Verify Scale and Units: Before exporting, ensure your CAD software's units are set to millimeters (mm). When exporting, explicitly select 'millimeters' or verify the scale factor. An incorrect scale is one of the most frequent errors leading to unexpected print results.
- Set Appropriate Resolution/Tolerance: When exporting to STL, you'll often have options for "resolution," "chord height," or "tolerance." A higher resolution (finer tolerance) creates more triangles, resulting in a smoother surface but a larger file size. Too low a resolution can make curved surfaces appear faceted. A balance is key: aim for enough detail without creating excessively large files.
- Check for Manifold Output: Some CAD software offers an option to ensure the exported mesh is "manifold" or "watertight." Always select this if available to reduce post-export repair work.
Warning: Incorrect units during export are a common and frustrating error. If your CAD software defaults to inches or an internal unit, you must manually specify the correct scale (e.g., 25.4 for inches to millimeters) or change your base units before exporting. Always communicate your model's intended size with your chosen `service impression 3d luxembourg` to catch any discrepancies early.
Step 4: Perform a Comprehensive Mesh Analysis and Repair
Even with careful design and export, 3D models can sometimes develop issues that prevent them from being properly sliced and printed. These "mesh errors" include non-manifold edges (edges shared by more than two faces), inverted normals (faces pointing inward instead of outward), holes in the mesh, or self-intersections where parts of the mesh pass through themselves. These problems confuse the slicing software, leading to missing layers, incorrect infill, or complete print failure.
Performing a thorough mesh analysis and repair is a critical step in preparing your model for printing. This process ensures that your model is "watertight" – meaning it forms a completely enclosed volume without any gaps or ambiguities. Think of it like a perfectly sealed balloon; if there's a hole, it's not a true volume. While professional 3D printing services, including any `entreprise impression 3d luxembourg`, will typically perform their own checks, pre-repairing your model saves time, avoids communication back-and-forth, and demonstrates your attention to detail, leading to faster turnaround times for your `prototypage rapide luxembourg` needs.
- Identify Common Mesh Errors: Look out for:
- Holes/Gaps: Openings in the surface that expose the interior of the model.
- Non-Manifold Edges: Edges connected to more than two faces, creating ambiguous geometry.
- Inverted Normals: Faces pointing in the wrong direction, indicating the inside of the model is treated as the outside.
- Self-Intersections: Parts of the model's mesh passing through other parts of its own mesh.
- Isolated Vertices/Edges: Unconnected geometry floating within or near the model.
- Utilize Mesh Repair Software: Several tools are available for mesh analysis and repair:
- Netfabb (Autodesk): A powerful, professional-grade software for mesh analysis, repair, and optimization.
- Meshmixer (Autodesk): A free tool that offers a robust set of features for mesh editing, sculpting, and basic repair.
- Windows 3D Builder: A surprisingly capable free tool built into Windows that can automatically repair many common mesh errors.
- Online Repair Services: Websites like MakePrintable or Formlabs' own tools can also help.
- Perform Automatic Repair: Most repair software has an "auto-repair" function. Start with this, as it often fixes the majority of issues quickly.
- Manual Repair (if necessary): For more complex or stubborn errors, you may need to manually identify and address issues, such as filling holes, removing duplicate faces, or stitching edges.
- Verify Watertightness: After repair, the software should indicate that your model is "watertight" or "solid." This is your confirmation that the geometry is ready for slicing.
Tip: While many tools exist, it's always a good idea to learn the basics of mesh analysis. Understanding what "non-manifold" means will help you design better models from the outset and quickly troubleshoot issues. A clean, watertight model is the foundation for any successful 3D print, whether it's a small custom part or part of a larger `3d printer filament bulk buy luxembourg` order that requires many identical, perfect prints.
Step 5: Optimize for Printability: Orientation, Supports, and Infill
Even a perfectly designed and repaired 3D model can yield suboptimal results if not properly prepared for the slicing process. While a professional 3D printing service will handle the final slicing, understanding these optimization principles allows you to design smarter, communicate more effectively, and ensure the final print quality meets your highest standards. Key considerations include the model's orientation on the print bed, the necessity and placement of support structures, and the desired infill density.
The orientation of your part on the build plate significantly influences several factors: surface quality, print time, material usage (especially for supports), and structural integrity. For example, a part with a large flat base often prints more reliably, reducing warping. Overhangs, which were discussed in Step 2, will still be a factor, and proper orientation can minimize their severity or place them in less visible areas. Infill, the internal structure of your print, dictates the part's strength-to-weight ratio. A denser infill makes the part stronger but uses more material and takes longer to print. By considering these aspects, you empower your `service impression 3d luxembourg` to deliver exactly what you need, efficiently and effectively.
- Optimal Model Orientation:
- Minimize Supports: Orient the model to reduce the need for support material, especially on critical cosmetic surfaces.
- Maximize Build Plate Adhesion: Position the largest flat surface on the build plate for better adhesion and reduced warping.
- Consider Layer Lines: Be aware that layer lines are most visible along the Z-axis. Orient the part so that critical surfaces for aesthetics or function are parallel to the print bed where possible.
- Prioritize Strength: For functional parts, orient the model so that the primary stress direction is perpendicular to the layer lines for maximum strength.
- Support Structures:
- Identify Overhangs: Any part of your model that extends horizontally without material directly beneath it will likely need support. Overhangs greater than 45 degrees are a good indicator.
- Material & Removal: Supports are usually printed in the same material or a dissolvable one. Consider ease of removal and potential surface scarring. Orienting the part well can place supports on less visible surfaces.
- Design for Self-Support: Where possible, modify your design to incorporate chamfers, fillets, or small internal bridges that reduce the need for external supports.
- Infill Density and Pattern:
- Strength vs. Weight/Time:
- Low Infill (10-20%): Good for aesthetic models, quick prototypes, or parts where weight is a concern.
- Medium Infill (20-40%): Suitable for general-purpose functional parts requiring moderate strength.
- High Infill (50-100%): For parts requiring maximum strength, rigidity, and durability, albeit with increased material use and print time.
- Infill Patterns: Different patterns (e.g., rectilinear, grid, honeycomb, gyroid) offer varying strength, flexibility, and material efficiency. Discuss with your service if you have specific requirements.
- Strength vs. Weight/Time:
Tip: While a professional 3D printing service has specialized software and expertise, clearly communicating your priorities (e.g., "maximize strength," "minimize visible layer lines," "quickest `prototypage rapide luxembourg`") helps them make the best slicing decisions. If you have a specific orientation in mind, provide screenshots or notes.
Step 6: Select the Right Material for Your Project
Revisiting material selection (introduced in Step 1) is crucial now that your model is designed and optimized. The choice of 3D printer filament is not merely a preference; it's a fundamental aspect that dictates your part's mechanical properties, aesthetic finish, cost, and suitability for its intended environment. A professional 3D printing service in Ireland, like PrintIn3D.ie, offers a range of materials, each with unique characteristics. Making an informed choice ensures your final product performs as expected and delivers true value.
PrintIn3D.ie specialises in high-quality FDM printing, primarily using PLA and PETG filaments from reputable brands like Bambu Lab and SUNLU. These materials cover a wide spectrum of applications, from general prototyping to more demanding functional parts. While `impression 3d métal luxembourg` services exist for specialized industrial applications, they typically use different technologies (like DMLS or SLM) and come at a significantly higher cost and lead time. For most individual and business needs, especially for `prototypage rapide luxembourg` and functional models in a vibrant ecosystem, high-performance polymer filaments are the ideal and most cost-effective solution.
- PLA (Polylactic Acid):
- Pros: Easy to print, wide range of colours, low warping, environmentally friendly (biodegradable from renewable resources), excellent for aesthetic models and prototypes.
- Cons: Lower heat resistance, more brittle than PETG, not ideal for outdoor use or high-stress applications.
- Best For: Decorative items, visual prototypes, educational models, non-functional parts. PrintIn3D.ie offers Bambu Lab PLA Pure and other PLA options.
- PETG (Polyethylene Terephthalate Glycol):
- Pros: Excellent balance of strength, flexibility, and durability; good impact resistance, higher temperature resistance than PLA, chemical resistance, good layer adhesion, food-safe options available.
- Cons: Can be slightly trickier to print than PLA (more stringing), requires specific print settings.
- Best For: Functional prototypes, mechanical parts, enclosures, outdoor components, jigs and fixtures. Check out our SUNLU PETG filament.
- Specialty Filaments: Beyond standard PLA and PETG, there are other filaments like TPU (flexible), ABS (strong, but challenging to print), Nylon, and various `filament 3d composites luxembourg` (e.g., carbon fiber infused for extra strength or wood/metal infused for aesthetic effects). If your project requires these, discuss their availability and suitability with your service provider.
- Cost Implications: Material choice directly impacts the price. PLA is generally more affordable, while specialty filaments or high-performance composites can increase costs. When considering `filament 3d prix luxembourg`, remember that the overall service cost reflects material, print time, and expertise.
Warning: Never assume a material without consulting your professional `entreprise impression 3d luxembourg`. Using the wrong material can lead to premature part failure, unexpected performance, or a print that simply doesn't meet your needs. If your project demands `impression 3d métal luxembourg`, be aware that PrintIn3D.ie focuses on advanced polymer printing, which offers excellent solutions for many applications at a more accessible price point.
Step 7: Provide Clear Communication and Project Details to the Service
Even with a perfectly prepared 3D model, clear and concise communication with your 3D printing service provider is paramount for a successful outcome. Think of your service provider as an extension of your design team. The more detailed information you provide upfront, the better they can understand your vision, anticipate potential challenges, and deliver a product that precisely matches your expectations. This is particularly true when you are commissioning custom 3D printing services.
Ambiguity in your project brief can lead to misunderstandings, delays, or a final print that misses the mark. Whether you're sending a single file for a rapid prototype or initiating a larger `3d printer filament bulk buy luxembourg` order, providing comprehensive details ensures efficiency and accuracy. PrintIn3D.ie prides itself on being a hassle-free 3D printing partner, offering friendly WhatsApp support to ensure every detail is covered. We also understand the importance of confidentiality for businesses and innovators, offering Non-Disclosure Agreements (NDAs) to protect your intellectual property, whether for `design 3d professionnel luxembourg` or a new product `prototypage rapide luxembourg`.
- Complete the Order Form Thoroughly: Fill in all required fields on the service's submission platform. Don't skip sections, even if you think they're obvious.
- Specify Intended Use: Reiterate the function and environmental conditions your part will encounter. This helps confirm the material choice and print settings.
- Highlight Critical Dimensions and Tolerances: If certain dimensions are absolutely crucial for assembly or function, explicitly call them out in notes or a supplementary document. Indicate any required tolerances.
- Describe Desired Surface Finish: For FDM printing, layer lines are inherent. Specify if a smoother finish is critical (which might require post-processing or specific print orientations).
- Indicate Colour Preference: Clearly state your preferred colour, especially if specific shades are important. Note that exact colour matching can vary slightly between filament batches.
- Attach Supporting Documentation: If you have sketches, technical drawings, or even photos of an existing part, include them. Visual aids are invaluable for conveying your intent.
- Ask About NDAs: If your project involves sensitive or proprietary designs, inquire about Non-Disclosure Agreements. PrintIn3D.ie offers NDAs for your peace of mind.
- Be Responsive to Questions: Your service provider may have follow-up questions to clarify details. Responding promptly ensures your project stays on schedule.
Tip: Think of your interaction with the service as a collaboration. The more information and context you provide for your `design 3d professionnel luxembourg`, the better your partner can execute your vision. Utilise their customer support channels, like PrintIn3D.ie's WhatsApp support, for any queries or additional details to ensure a seamless experience.
Step 8: Review the Quote and Confirm Your Order
After submitting your 3D model and project details, the professional 3D printing service will generate a quote. This step is your final opportunity to review all parameters, understand the costs, and confirm that the service's interpretation of your request aligns with your expectations before production begins. Rushing through this stage can lead to unexpected outcomes or dissatisfaction with the final print.
The quote will typically detail the chosen material, quantity, estimated print time, any post-processing costs, shipping fees, and the overall total. It will also specify the estimated lead time or turnaround time. PrintIn3D.ie is known for its fast turnaround, offering options like 8-hour, 12-hour, or 28-hour custom printing services to meet urgent `prototypage rapide luxembourg` demands, alongside standard lead times. Carefully examining each component of the quote ensures transparency and helps you budget accurately for your custom 3D printed parts in Ireland or for your European project, including those needing `scan 3d professionnel luxembourg` services or `3d design service luxembourg`.
- Scrutinize All Line Items: Verify that the material, quantity, dimensions, and any specific post-processing steps (e.g., sanding, painting) listed in the quote match your request.
- Understand the Cost Breakdown: Familiarize yourself with how the cost is calculated (e.g., per gram of material, per print hour, setup fees). This helps you understand where your money is going and identify any potential discrepancies.
- Confirm Lead Time and Delivery: Check the estimated completion date and delivery timeframe. If you have an urgent deadline, ensure the quoted lead time accommodates it. PrintIn3D.ie offers various expedited printing services to suit different needs.
- Clarify Any Uncertainties: If anything in the quote is unclear or doesn't match your expectations, immediately contact the service provider for clarification. Do not proceed until you are fully satisfied.
- Review Terms and Conditions: Briefly review the service's terms and conditions, especially regarding payment, cancellation, and return policies (e.g., PrintIn3D.ie's 30-Day Risk-Free Return policy).
- Confirm Order: Once you are completely satisfied with the quote and all details, proceed to confirm your order. This typically initiates the printing process.
Warning: Always double-check the material specified in the quote. A misunderstanding here can significantly impact the final part's performance and cost. If you need a specific type of `filament 3d composites luxembourg`, ensure it is explicitly stated.
Common Mistakes to Avoid
Even with the best intentions, certain pitfalls can derail your 3D printing project. Being aware of these common mistakes can save you time, money, and frustration when preparing your 3D model for a professional 3D printing service in Ireland or any `entreprise impression 3d luxembourg`.
- Ignoring Minimum Wall Thickness: Designing walls that are too thin is a primary cause of print failures. Parts might not print, or they could be too fragile and break easily during printing or post-processing. Always adhere to recommended minimum wall thicknesses (e.g., 1-2mm for FDM).
- Incorrect Scale or Units: Exporting a model in inches when the service expects millimeters (or vice-versa) is a very common and easily avoidable error that results in parts being printed at completely wrong sizes. Always verify units.
- Non-Watertight (Non-Manifold) Models: Models with holes, gaps, or intersecting surfaces are ambiguous to slicing software and will almost certainly lead to errors or failed prints. Always ensure your model is "watertight" after design and before submission.
- Not Considering Material Properties: Choosing a material solely based on cost or colour without considering its functional properties (strength, heat resistance, flexibility) can lead to a part that simply doesn't perform as needed. Discuss with your `service impression 3d luxembourg` if unsure.
- Overlooking Support Requirements: Designing models with severe overhangs or complex unsupported geometries without considering how support material will be added and removed can lead to rough surface finishes, failed prints, or difficult post-processing.
- Poor Communication with the Service: Failing to provide clear instructions, intended use, critical dimensions, or desired finishes can result in a print that doesn't meet your expectations. Be thorough and ask questions.
- Expecting "Print Anything" from "Any Material": While 3D printing is versatile, it has limitations. Not all geometries are printable with all materials, and specialized processes like `impression 3d métal luxembourg` are distinct from FDM and SLA. Understand your service's capabilities.
- Ignoring File Size: While less common with modern systems, extremely complex models with unnecessarily high polygon counts can lead to very large file sizes, which can be slow to upload, process, and even lead to software crashes. Optimize mesh resolution where appropriate.
FAQ
What file formats do you accept for 3D printing services in Ireland?
At PrintIn3D.ie, we primarily accept .STL files, which is the industry standard for 3D printing. We can also work with .OBJ and .3MF files, especially if your design includes colour or texture information. If you have a file in a different format, please contact us; our `design 3d professionnel luxembourg` team may be able to assist with conversion.
How can I ensure my model is "watertight" for printing?
A "watertight" model means it forms a completely enclosed volume without any holes, gaps, or internal inconsistencies. You can check and repair your model using various software tools such as Autodesk Meshmixer, Netfabb, or the free 3D Builder application on Windows. These tools can automatically identify and fix most common mesh errors, ensuring your model is print-ready for any `service impression 3d luxembourg`.
Can PrintIn3D.ie help with design if I only have a concept or sketch?
Absolutely! PrintIn3D.ie offers a comprehensive 3D design service. Whether you have a detailed sketch, a conceptual idea, or need modifications to an existing file, our `3d design service luxembourg` experts can transform your vision into a print-ready 3D model. We work closely with you to ensure the final design meets your specifications and is optimized for 3D printing.
What's the typical turnaround time for your 3D printing service?
Our turnaround times are designed to be flexible and meet your project's urgency. For standard orders, we aim for quick dispatch. We also offer expedited `prototypage rapide luxembourg` services with options such as 8-hour, 12-hour, 28-hour, and 72-hour custom printing to ensure you get your parts exactly when you need them. Filament orders benefit from same-day dispatch before 4 PM, with fast delivery across Ireland and the EU/EEA.
Do you offer 3D scanning services, for example, a `scan 3d professionnel luxembourg`?
Yes, PrintIn3D.ie provides professional 3D scanning services. If you have a physical object that you need to replicate, modify, or convert into a digital 3D model, our advanced 3D scanning technology can capture its geometry with high accuracy. This service is available for clients across Ireland and for those seeking a `scan 3d professionnel luxembourg`.
Do you offer `3d printer filament bulk buy luxembourg` options?
While our primary focus is on custom printing and design services, we also supply high-quality 3D printer filaments from brands like Bambu Lab and SUNLU (PLA, PETG). For larger volume orders or potential `3d printer filament bulk buy luxembourg` inquiries, please contact us directly. We're happy to discuss your specific needs and provide competitive pricing.
Next Steps / CTA
Ready to turn your meticulously prepared 3D model into a physical reality? Trust PrintIn3D.ie, your award-winning 3D printing partner, to bring your designs to life with precision and speed. Visit our custom 3D printing service page today to upload your file, get an instant quote, and start your hassle-free printing journey.