Prepare Your 3D Model for Professional Printing in Ireland
How to Prepare Your 3D Model File for Professional Printing in Ireland
Bringing your 3D design from a digital concept to a physical object is an incredibly rewarding experience. Whether you're an engineer prototyping a new part, a designer creating a unique product, or a hobbyist bringing a custom model to life, the journey from screen to print relies heavily on one critical factor: the quality and preparation of your 3D model file. In Ireland, and indeed across the wider EU/EEA, professional 3D printing services like PrintIn3D.ie are here to turn your visions into reality. However, even the most advanced 3D printers and expert operators depend on a well-prepared file to deliver the best possible results.
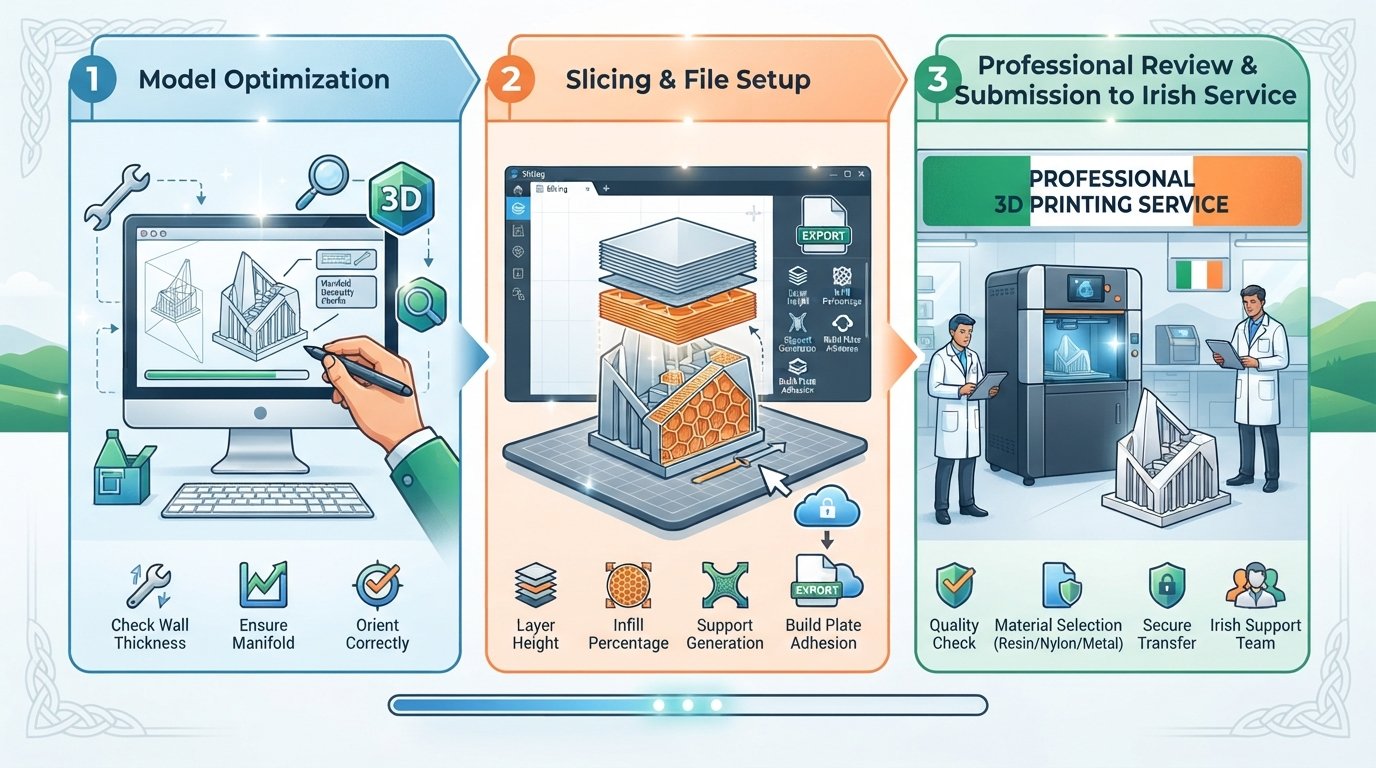
This comprehensive guide will walk you through every essential step to prepare your 3D model file for professional printing. You'll learn why certain file formats are preferred, how to ensure your model is "watertight," the importance of scale and resolution, and crucial considerations like wall thickness and support structures. By mastering these preparation techniques, you'll not only save time and avoid costly reprints but also guarantee that your final 3D print precisely matches your expectations. Let PrintIn3D be your trusted partner, providing a hassle-free solution for bringing your 3D ideas to life, from custom 3D design service to the final printed part, even if you’re looking for an `entreprise impression 3d luxembourg`.
Who This Is For
- Individuals and businesses with existing 3D models ready for professional printing.
- Designers and engineers seeking to optimize their files for manufacturing.
- Anyone looking to understand the technical requirements for print-ready 3D files.
- Customers in Ireland and across the EU, including the Grand Duchy of Luxembourg, seeking reliable 3D printing solutions.
Step 1: Understand File Formats and Why They Matter
The first critical decision in preparing your 3D model for professional printing is selecting the correct file format. Just like different documents have different file types (.doc, .pdf, .jpeg), 3D models also come in various formats, each with its strengths and specific uses. Choosing the right format ensures that your design's geometry, textures, and other vital data are accurately translated to the 3D printer's slicing software. Misinterpreting or misusing file formats can lead to significant issues, from missing details to complete print failures. For an `entreprise impression 3d luxembourg`, getting this right from the start is fundamental to efficient production.
While numerous 3D file formats exist, a few are standard in the additive manufacturing industry. The most common is STL (Stereolithography), a de-facto standard for 3D printing due to its widespread compatibility. However, newer formats like OBJ and 3MF offer advantages that might be beneficial depending on your project's complexity and requirements. For engineering-grade applications, formats like STEP (Standard for the Exchange of Product model data) are often preferred, as they preserve solid geometry more accurately than mesh-based formats. Understanding the nuances of these formats is crucial for seamless communication with your chosen professional 3D printing service in Ireland or elsewhere in the EU.
- Choose the Right Format:
- STL (.stl): The most common format, representing a 3D model as a series of connected triangles (a mesh). It's excellent for geometry but doesn't typically store color, texture, or material information. Ideal for most single-material prints.
- OBJ (.obj): Can store geometric data along with color, texture, and material properties, making it suitable for models requiring intricate visual detail or multi-color printing. Often accompanied by an MTL (material) file.
- 3MF (.3mf): A newer, open-source format designed to overcome limitations of STL. It includes model geometry, materials, colors, textures, and even slice information in a single package. It's often referred to as a "3D manufacturing format."
- STEP (.step/.stp): A CAD-native format that represents models using mathematical definitions (NURBS curves and surfaces) rather than meshes. This makes it highly accurate for engineering parts and assemblies, preserving precise dimensions and design intent, and useful for `usinage rapide 3d luxembourg` applications.
- Export Correctly from Your CAD Software: When exporting from your design software (e.g., SolidWorks, Fusion 360, Blender, SketchUp), pay close attention to the export settings. Ensure you select the desired file format and review any options for resolution or unit conversion during export. For STL files, choose a high enough resolution to capture details without creating an excessively large file.
- Check for Compatibility: Before finalising your choice, confirm which file formats your chosen custom 3D printing service, like PrintIn3D, prefers or recommends. While most services handle STL, providing an alternative like 3MF or even STEP for complex engineering parts can sometimes streamline the printing process.
Tip: Always save a master file in your native CAD format (e.g., .f3d for Fusion 360, .blend for Blender) before exporting to STL or other print-specific formats. This allows you to easily revert to the original design for modifications without losing data.
Step 2: Ensure a Manifold Mesh (Watertight Model)
One of the most critical requirements for any 3D model destined for printing is that it must be "manifold" or "watertight." Imagine your 3D model as a hollow shell. For a 3D printer's slicing software to correctly interpret and build that object layer by layer, it needs to understand precisely what's "inside" and what's "outside." A manifold mesh means there are no holes, gaps, self-intersecting faces, or flipped normals that would confuse the software, making it impossible to determine the volume of the object. Think of it as a perfectly sealed container that could hold water without leaking. This fundamental integrity is paramount for any `impression 3d grand-duché de luxembourg` project.
Non-manifold geometry is a common issue, especially with models created in less precise sculpting software or converted from other formats. Issues like unconnected vertices, edges shared by more than two faces, or faces pointing inwards (inverted normals) can all lead to a non-manifold mesh. When a slicer encounters such problems, it won't know where to start or stop printing, often resulting in missing layers, incorrect geometry, or complete print failure. Identifying and repairing these issues early will save immense frustration and material waste. Professional 3d design service Luxembourg providers frequently address these issues for clients, ensuring their files are print-ready.
- Use Mesh Repair Tools: Most 3D modeling software, such as Blender, Meshmixer, Netfabb, or even online tools, offer functions to analyze and repair mesh errors. These tools can automatically detect and often fix common issues.
- Blender: Look for "Non Manifold" selection options in Edit Mode (under Select -> Select All By Trait) and use tools like "Make Manifold" or "Limited Dissolve" to clean up geometry.
- Meshmixer (Autodesk): Specifically designed for mesh editing, Meshmixer has powerful "Analysis" tools, including "Inspector," which can automatically identify and fix holes, disconnected shells, and other non-manifold problems.
- Online Services: Websites like MakePrintable or the repair service offered by certain 3D printing platforms can also help fix models.
- Identify Common Issues:
- Inverted Normals: Faces pointing inward instead of outward. This often appears as dark or invisible areas in your 3D viewer. Most software has a "Recalculate Normals Outside" function.
- Non-Manifold Edges: An edge connected to more than two faces. This creates ambiguity for the slicer.
- Disconnected Vertices/Edges/Faces: Gaps or holes in the mesh that prevent it from being a solid, closed volume. These need to be filled (bridged or patched).
- Self-Intersections: Parts of the mesh passing through themselves. This creates internal conflicts. Simplification or careful editing might be required.
- Verify Integrity Before Export: Always perform a final check using a dedicated mesh analysis tool or the built-in functions of your software before exporting your file. Many slicers will also flag non-manifold issues upon import, but fixing them in your original CAD software is always easier and more accurate.
Warning: A non-manifold mesh is arguably the most common and frustrating reason for failed 3D prints. Do not skip this step, as a seemingly small error can lead to significant problems during printing. Dedicated `design 3d professionnel luxembourg` services will always ensure this is perfect.
Step 3: Optimize Model Scale and Dimensions
Once your model is watertight, the next crucial step is to ensure its scale and dimensions are correct. This might seem straightforward, but unit mismatches are a frequent cause of errors, leading to prints that are either microscopic or gargantuan compared to what was intended. Your 3D design software, the slicing software, and the 3D printer itself all operate with specific units (typically millimeters or inches). Any discrepancy in these settings during the design, export, or import phase can result in scaling issues that render your print useless. For `impression 3d sur mesure luxembourg` or a rapid prototype in Ireland, dimensional accuracy is key.
Consider the real-world application of your part. If you're designing a replacement component, it must fit precisely. If it's an architectural model, its scale needs to be consistent. Even aesthetic models benefit from accurate scaling to ensure they look right and fit where intended. Additionally, thinking about the final print size can influence material usage and print time, directly impacting the cost and turnaround time of your `usinage rapide 3d luxembourg` project. PrintIn3D aims for hassle-free 3D printing, and correctly scaled models are a big part of that.
- Work in Real-World Units from the Start: It is best practice to design your model using real-world units (e.g., millimeters or inches) from the very beginning in your CAD or 3D modeling software. This minimizes conversion errors down the line. Millimeters (mm) are generally preferred in the 3D printing world, especially for technical or engineering parts.
- Double-Check Export Settings for Units: When exporting your model, particularly to STL, most software will present options for units (e.g., "mm," "cm," "inches"). Carefully select the unit that matches your design. A common mistake is designing in millimeters but exporting as centimeters, which would result in a print ten times smaller than intended.
- Communicate Desired Dimensions: Clearly communicate the final desired physical dimensions to your professional 3D printing service. Providing the external bounding box dimensions (Length x Width x Height) in your preferred unit alongside your file can serve as a vital cross-reference for the printer.
- Consider Potential Material Shrinkage: While less of a concern for common FDM materials like PLA and PETG compared to industrial resins or metals, some materials do exhibit minor shrinkage during cooling. For highly precise functional parts, this might need to be accounted for in your design, especially if tight tolerances are required. Discuss this with your service provider for critical projects.
Tip: Always confirm the final dimensions with your chosen professional 3D printing service in Ireland or Luxembourg before production commences. Many services offer a quick check and can flag obvious scaling errors.
Step 4: Set Appropriate Resolution and Detail
The resolution of your 3D model, particularly when dealing with mesh-based formats like STL, dictates how smoothly curves and fine details will appear on the final print. It's a balance between capturing necessary detail and managing file size. A model with excessively low resolution will result in a "faceted" or "blocky" appearance, where curves look like a series of straight lines. Conversely, an overly high-resolution model creates an unnecessarily large file, which can slow down processing for both you and your print service, without offering any perceptible improvement in print quality given the inherent limitations of FDM (Fused Deposition Modeling) technology. Finding the sweet spot is key for efficient `impression 3d sur mesure luxembourg`.
The resolution in mesh models is determined by the number of polygons (triangles) used to represent the surface geometry. More triangles mean finer detail but also a larger file. For professional printing, you want enough resolution to capture your design's intended smoothness and features without overdoing it. Remember that the physical resolution of an FDM printer (its layer height and nozzle diameter) also sets a practical limit on how much detail can actually be reproduced. There’s no point in having a digital model with micro-scale features if the printer can’t physically produce them.
- Understand Polygon Count vs. Visible Detail: When exporting to STL, you typically have settings for "tolerance," "chord height," or "deviation." These control how closely the mesh approximates the original CAD surface. A smaller tolerance means more triangles and higher resolution. Aim for a balance: enough polygons so that facets aren't visible to the naked eye, but not so many that the file becomes unwieldy. A good rule of thumb for standard FDM printing is a chord height of 0.01mm or an angular tolerance of 1-5 degrees.
- Adjust Tessellation/Subdivision Settings: In your 3D modeling software, you might be able to control the "tessellation" or "subdivision" levels during export. Increasing these values will add more polygons to curved surfaces, making them smoother. Experiment with these settings to achieve the desired visual quality.
- Focus Detail Where It's Needed Most: Not all areas of your model require the same level of detail. Focus higher resolution on critical features, intricate designs, or visible curved surfaces. Simpler, flat surfaces can use fewer polygons. This smart optimization helps keep file sizes manageable while preserving aesthetic quality.
- Consider FDM Printing Capabilities: Remember the physical limitations of the FDM process. Standard FDM printers typically have nozzle diameters ranging from 0.2mm to 0.8mm. This means any digital detail smaller than your chosen nozzle diameter (e.g., 0.4mm) might not be accurately reproduced. For example, a tiny engraved text of 0.2mm line thickness might not be legible on a print from a 0.4mm nozzle. Align your digital resolution with the practical capabilities of the printer that will be used for your `impression 3d grand-duché de luxembourg` project.
Warning: Extremely high-resolution models can lead to excessively large file sizes, which not only take longer to upload and process but can also cause issues for slicing software, potentially leading to crashes or significant delays without providing any noticeable improvement in the final print quality for FDM. It's about smart optimization, not just maximum resolution.
Step 5: Define Wall Thickness and Structural Integrity
One of the most frequent reasons for failed or flimsy 3D prints is insufficient wall thickness. When designing a 3D model, it's crucial to consider the physical strength and printability of the object, which are directly related to the thickness of its walls and features. A digital model might look solid on screen, but if its walls are too thin in reality, they can crack, break, or simply be too fragile to print successfully. The choice of `3d printer filament bulk buy luxembourg` and its properties also heavily influences this.
Minimum wall thickness requirements vary depending on the chosen material, the size of the object, and its intended function. For FDM printing, there's a practical lower limit determined by the nozzle diameter. If a wall is thinner than the extrusion width of the nozzle, the printer literally cannot create it. Furthermore, intricate details or unsupported overhangs also need careful consideration to ensure structural integrity throughout the printing process and in the final printed part. PrintIn3D’s expert `entreprise impression 3d luxembourg` team often advises clients on these crucial design elements.
- Design with Minimum Wall Thickness in Mind: For most FDM 3D prints using common materials like PLA or PETG, a minimum wall thickness of 1.5mm to 2mm is generally recommended for adequate strength and reliability. For very small or decorative features, you might go as low as 0.8mm, but these will be more fragile. Always aim for at least two nozzle passes (e.g., 2 x 0.4mm nozzle width = 0.8mm minimum thickness).
- Consider Adding Fillets or Chamfers: Sharp corners, especially internal ones, can be stress concentration points in 3D prints, making them prone to cracking. Adding small fillets (rounded corners) or chamfers (angled corners) can significantly improve the structural integrity of your part by distributing stress more evenly. This is especially vital for functional prototypes.
- Avoid Unsupported Thin Features: Be wary of features like thin, tall pins or delicate cantilevers that extend far from the main body without support. These are highly susceptible to breaking during printing or post-processing. If such features are essential, consider thickening them, adding gussets for support, or designing them to be printed separately and assembled.
- Hollow Out Large Models (with Drain Holes): For very large models, printing them completely solid can be wasteful of material, increase print time significantly, and even cause warping due to internal stress. Hollowing out the model (leaving an internal void) can save material and time. However, if you hollow a model, you *must* include one or more drain holes (e.g., 2-3mm diameter) to allow uncured resin (in SLA) or air/trapped heat (in FDM) to escape. This is crucial for successful printing.
Tip: For robust functional parts or components that will undergo stress, opting for thicker walls (e.g., 2.5-3mm) often leads to a significantly more durable and reliable final product. Always consult with your `3d design service luxembourg` or print provider if you have specific strength requirements.
Step 6: Plan for Support Structures
In FDM 3D printing, objects are built layer by layer from the bottom up. This means that if any part of your model extends horizontally into thin air without anything below it to build upon, the printer's extruder will attempt to print plastic onto nothing, resulting in spaghetti-like strands or failed layers. This is where support structures come into play. Supports are temporary structures printed alongside your model, designed to hold up overhangs and bridges, preventing them from collapsing during the printing process. They are then removed after the print is complete.
While supports are often necessary, they are also a double-edged sword. Generating and removing supports adds to print time and material consumption, and their removal can leave marks on the surface of your model, impacting the aesthetic finish. Therefore, a thoughtful approach to design can minimize the need for supports or make their removal easier, ensuring a cleaner, more efficient `impression 3d grand-duché de luxembourg` project. Understanding the angles at which supports become necessary is a key aspect of `design 3d professionnel luxembourg`.
- Identify Areas Requiring Support: Generally, any overhang with an angle greater than 45-60 degrees from the vertical will likely require support. Horizontal bridges (gaps between two points) also need support if they are longer than a few millimeters, depending on the material and printer capabilities. Visualise the printing process layer by layer to identify unsupported areas.
- Minimize Overhangs in Design Where Possible: The best support is often no support. When designing your model, try to incorporate chamfers, fillets, or angles that are less than 45 degrees where possible, as these can often be printed without needing additional support. For example, instead of a sharp 90-degree overhang, create a 45-degree bevel.
- Consider Splitting Complex Models into Parts: For highly intricate models with many severe overhangs, it might be more effective to design the model in multiple, simpler parts that can be printed individually with minimal or no supports, and then assembled afterwards. This can lead to better print quality and easier post-processing.
- Discuss Support Generation Strategies: Professional 3D printing services use sophisticated slicing software that can automatically generate supports. However, there are often options for support density, pattern, and placement. You might want to discuss with your print provider if specific areas are critical for surface finish or if you have specific support removal preferences. They can advise on optimal strategies for your particular design and material.
Warning: Poorly placed, insufficient, or overly dense supports can lead to print failure, damage to the model's surface during removal, or excessive post-processing. While your professional printer will handle support generation, understanding the principles helps you design more printable parts.
Step 7: Consider Material Properties and Post-Processing
The choice of 3D printer filament is fundamental to the success of your project, influencing everything from the strength and flexibility of your part to its aesthetic finish and functional suitability. Different materials possess unique characteristics that dictate how your model should be designed and how it will perform in its final application. A professional service like PrintIn3D offers a range of high-quality `3d printer filament bulk buy luxembourg` options, including popular choices like PLA and PETG, each with distinct advantages.
Beyond material selection, consider what happens to your part after it comes off the print bed. Will it need sanding, painting, gluing, or assembly? Designing with post-processing in mind can save considerable time and effort. For example, ensuring surfaces are accessible for sanding or creating features that allow for easy assembly can streamline the finishing stages of your project. This holistic approach ensures your `impression 3d sur mesure luxembourg` isn't just printed, but truly finished to your specifications.
- Choose Material Based on Application:
- PLA (Polylactic Acid): Easy to print, biodegradable, and offers good visual quality. Ideal for prototypes, aesthetic models, and non-functional parts. It's rigid but can be brittle. Available in a wide range of colours, making it a popular choice if you `buy 3d filament luxembourg`.
- PETG (Polyethylene Terephthalate Glycol): Stronger, more durable, and more flexible than PLA. It also has better temperature resistance and layer adhesion, making it suitable for functional prototypes, mechanical parts, and outdoor applications.
- Other Filaments: Materials like ABS (tough, heat-resistant), TPU (flexible), or Nylon (very strong, wear-resistant) offer specialised properties for specific needs. Discuss these with your print service if your project requires unique characteristics.
- Account for Material-Specific Considerations:
- Adhesion: Some materials, like PETG, can be more prone to stringing or oozing but offer excellent layer adhesion for strong parts.
- Shrinkage/Warping: Materials like ABS are more prone to warping than PLA or PETG due to significant thermal contraction. While professional services manage these challenges, being aware can inform your design choices (e.g., avoiding very large flat surfaces in ABS if possible).
- Strength and Flexibility: A design that works well with a rigid material like PLA might fail if printed in a flexible TPU without design modifications (e.g., thicker walls for stiffness).
- Think About Post-Processing:
- Surface Finish: If a smooth surface is critical, consider sanding or applying coatings. Design your model with accessible surfaces that can be easily worked on.
- Painting: If you plan to paint your model, design it with smooth surfaces that take paint well. Some materials might require primer.
- Assembly: If your model is multipart, ensure that connection points (e.g., pegs, holes) are designed with appropriate tolerances for easy assembly. Usually, a tolerance of 0.2-0.3mm is needed between parts that fit together.
- Detail Retention: Materials like PLA often capture finer details well, while others might be better for robust, less detailed parts.
Tip: For robust functional parts that require good strength and temperature resistance, PETG filaments are an excellent choice, widely available for purchase in Luxembourg and across Europe. If you're unsure, chat with PrintIn3D; we're happy to guide you!
Step 8: Final Review and Communication with Your Printer
You've meticulously designed your model, optimized its mesh, scaled it correctly, considered wall thickness, and accounted for supports and material properties. The final, yet equally crucial, step is a thorough review of your prepared file and clear communication with your chosen professional 3D printing service. Even the most perfectly prepared file can benefit from a professional eye, and transparent communication ensures that your vision for the final print is perfectly understood and executed by the `entreprise impression 3d luxembourg`.
Think of your 3D printing service as a partner in bringing your ideas to life. Providing all necessary information and being open to feedback can prevent misunderstandings, accelerate the printing process, and ensure that the final product meets or even exceeds your expectations. PrintIn3D prides itself on being your 3D printing partner, offering friendly WhatsApp support and expert advice to ensure your project is a success.
- Perform a Final Visual Inspection: Before sending your file, open it in a 3D viewer or a basic slicer program (like PrusaSlicer, Cura, or Bambu Studio, even if you don't own a printer) to perform a final visual check.
- Look for any obvious gaps, holes, or irregularities that might have been missed.
- Verify the scale and orientation one last time.
- Use the "slice preview" function if available to see how the software interprets your model and where it proposes supports.
- Document Specific Requirements or Concerns: Do you have specific requests regarding print quality (e.g., layer height for aesthetics), infill density (for strength vs. weight), or colour? Are there particular areas you're worried about regarding strength or surface finish? Compile a brief document or note detailing these points.
- Material Preference: Explicitly state your desired material (e.g., "PLA Tough, Black" or "PETG, Translucent Blue"). You can buy `achat filament 3d luxembourg` or have PrintIn3D supply it.
- Colour: If not specified by material, state desired colour.
- Infill Density: (e.g., "20% for standard part," "100% for maximum strength").
- Layer Height: (e.g., "0.2mm standard," "0.12mm for fine detail").
- Critical Dimensions: Highlight any dimensions that require high precision.
- Send Clear Instructions Along with Your Files: When you upload your files to PrintIn3D.ie, use the provided fields or include a simple text file to convey all necessary information. The more details you provide, the better your `impression 3d sur mesure luxembourg` will turn out. For general inquiries, consult our FAQs about ordering custom 3D prints.
- Be Open to Feedback and Suggestions: A good professional 3D printing service will review your file and might offer suggestions for improvement, flag potential issues, or recommend alternative approaches. Be receptive to this expert feedback, as it's aimed at ensuring the best possible outcome for your project. This collaborative approach is what makes PrintIn3D a true partner for your `design 3d professionnel luxembourg` needs.
Tip: A clear, concise description of your model's purpose and any specific functional or aesthetic requirements can be invaluable to your print service. It helps them make informed decisions during the slicing process.
Common Mistakes to Avoid
Even with careful preparation, some common pitfalls can derail a professional 3D printing project. Being aware of these typical errors can save you time, money, and frustration.
- Non-Manifold Meshes: This is by far the most common issue. Forgetting to check for holes, self-intersections, or flipped normals will almost always lead to print failure or severely flawed parts. Always verify your model's watertightness.
- Incorrect Units or Scaling: Exporting a model in centimeters when it was designed in millimeters (or vice versa) results in a print that is either ten times too large or too small. Double-check your export and import unit settings.
- Walls Too Thin: Designing features or walls that are thinner than the printer's minimum capability will result in fragile parts that break easily, or features that simply don't print at all. Always adhere to recommended minimum wall thicknesses (e.g., 1.5-2mm for FDM).
- Ignoring Support Needs: Overhangs and bridges that lack proper support will inevitably droop, sag, or fail completely. While printers generate supports automatically, designing with fewer extreme overhangs or splitting models can improve print quality and reduce post-processing.
- Exporting with Too Low or Too High Resolution: Too low resolution leads to blocky, faceted prints. Too high resolution creates unnecessarily large files that are slow to process, without offering a noticeable improvement in print quality for FDM. Find the optimal balance.
- Assuming All Materials Print the Same: Different filaments have unique properties and printing requirements. A design perfect for PLA might not work without modification for a flexible TPU or a high-shrinkage material like ABS. Always consider your chosen material's characteristics.
- Lack of Communication with the Print Service: Failing to clearly articulate your project's specific requirements, critical dimensions, or desired post-processing can lead to prints that don't match your expectations. A brief, clear note can make all the difference.
FAQ
What is the best file format for professional 3D printing?
For most professional 3D printing services, STL (.stl) remains the most widely accepted and recommended file format due to its universality and simplicity for geometry. However, for models requiring color, texture, or intricate material information, 3MF (.3mf) or OBJ (.obj) are superior. For highly precise engineering parts, a CAD-native format like STEP (.step) is often preferred to maintain exact mathematical definitions. It's always best to consult with your chosen `entreprise impression 3d luxembourg` for their preferred format.
How thick should my walls be for an FDM 3D print?
For FDM (Fused Deposition Modeling) 3D prints using common materials like PLA or PETG, a minimum wall thickness of 1.5mm to 2mm is generally recommended to ensure adequate strength and prevent fragility. For very small, non-structural decorative features, you might go as low as 0.8mm, but these will be more delicate. The optimal thickness can also depend on the material and the intended use of the part, so discuss critical applications with your `design 3d professionnel luxembourg` service.
Can PrintIn3D help me fix my 3D model if it's not print-ready?
Absolutely! PrintIn3D offers comprehensive `3d design service luxembourg` to assist with this. If your model has issues like non-manifold geometry, incorrect scaling, or simply needs optimisation for printing, our expert team can review your file, make necessary adjustments, or even help convert your concept into a print-ready 3D model from scratch. Our goal is to make 3D printing hassle-free for you.
Why is clear communication with the 3D printing service so important?
Clear communication is paramount because it ensures that your expectations align perfectly with the capabilities and processes of the 3D printing service. By providing detailed instructions on material, colour, desired finish, critical dimensions, and the intended use of your part, you enable the `entreprise impression 3d luxembourg` to make informed decisions during slicing and printing. This minimises errors, prevents costly reprints, and guarantees that the final `impression 3d sur mesure luxembourg` matches your vision, saving you time and ensuring satisfaction.
Can PrintIn3D handle urgent 3D printing projects or rapid prototyping in Luxembourg?
Yes, PrintIn3D understands the need for speed, especially for prototypes or urgent components. We offer various expedited custom 3D printing services, including 8-hour, 13-hour, and 28-hour turnaround options. Whether you need `usinage rapide 3d luxembourg` for a quick prototype or a fast replacement part, our efficient workflow and advanced printers are geared to deliver quickly across Ireland and the EU, including the Grand Duchy of Luxembourg.
Next Steps / CTA
Ready to bring your expertly prepared 3D model to life? Upload your file to our custom 3D printing service online for an instant quote, or if you require a dedicated `3d design service luxembourg` to perfect your concept, contact PrintIn3D today. Let's print your 3D dreams!