CAD File Prep for Professional 3D Printing Services in Ireland
Welcome to the ultimate guide for preparing your Computer-Aided Design (CAD) files for professional 3D printing services in Ireland! Whether you're an engineer developing a new prototype, an artist bringing a sculpture to life, or a small business owner creating custom parts, getting your digital design ready for the physical world is a crucial step. A well-prepared CAD file can be the difference between a perfect print and a frustrating setback, saving you time, money, and hassle.
At PrintIn3D.ie, we understand that not everyone owns a 3D printer or has the expertise to navigate complex software settings. That's why we offer custom 3D printing services designed to be as seamless as possible. This comprehensive guide will walk you through every essential step, from choosing the right file format to optimising your model for printability, ensuring your vision translates flawlessly into a tangible object. We'll cover everything you need to know to confidently submit your designs, helping you achieve high-quality results for your projects, big or small, right here in Ireland. Let's get your ideas off the screen and into your hands!
Who This Is For
- Individuals and businesses needing professional 3D printing services without owning a 3D printer.
- Engineers, product designers, architects, and artists.
- Anyone looking to turn a digital 3D model into a physical object.
- Those new to 3D printing and needing guidance on file preparation.
- Makers and professionals who want to understand the best practices for optimal print results.
Step 1: Understand Your Project Requirements and Choose the Right Material
Before you even touch your CAD software, it's vital to have a clear understanding of what your final 3D printed part needs to achieve. Considerations like its intended function, environmental exposure, required strength, flexibility, and aesthetic appeal will directly influence your material choice and, consequently, how you prepare your CAD file.
Different materials, or 3d printer filaments, have unique properties that dictate design considerations. For example, a part needing high stiffness and detail might use PLA, while one requiring durability and impact resistance might be better suited for PETG. If your project demands flexibility, you might want to buy flexible TPU filament Ireland to achieve the desired elasticity. Knowing your material beforehand allows you to design with its specific limitations and strengths in mind.
- Define Functionality: Will the part be structural, decorative, exposed to heat, or endure stress?
- Consider Environment: Will it be indoors or outdoors? Exposed to moisture, UV light, or chemicals?
- Determine Mechanical Properties: Does it need to be rigid, flexible, strong, or impact-resistant?
- Think About Aesthetics: What surface finish is desired? Does colour consistency matter?
- Research Materials: Familiarise yourself with common 3D printing materials like PLA, PETG, ABS, and TPU. For beginners, PLA is generally considered which filament is best for beginners due to its ease of printing and wide range of applications.
Tip: If you're unsure which filament is best for beginners or for your specific project, consult with the 3D printing service provider. PrintIn3D.ie offers expert advice on material selection, helping you match your design with the perfect filament for optimal results.
Step 2: Design Your Model with Printability in Mind
Once you've chosen your material, it's time to design or refine your 3D model. This step is critical, as a model not designed for additive manufacturing can lead to significant issues during printing, regardless of the printer's quality. Think about wall thickness, overhangs, bridging, and support structures from the outset. Designing with these factors in mind will minimise the need for extensive post-processing and ensure a higher success rate for your print.
If you're wondering how to get a 3d model made without prior CAD experience, PrintIn3D.ie also offers 3D design services. Our team can help convert your sketches, concepts, or even existing physical objects (via 3D scanning for product development) into print-ready CAD files, making us a comprehensive 3d design and prototyping company.
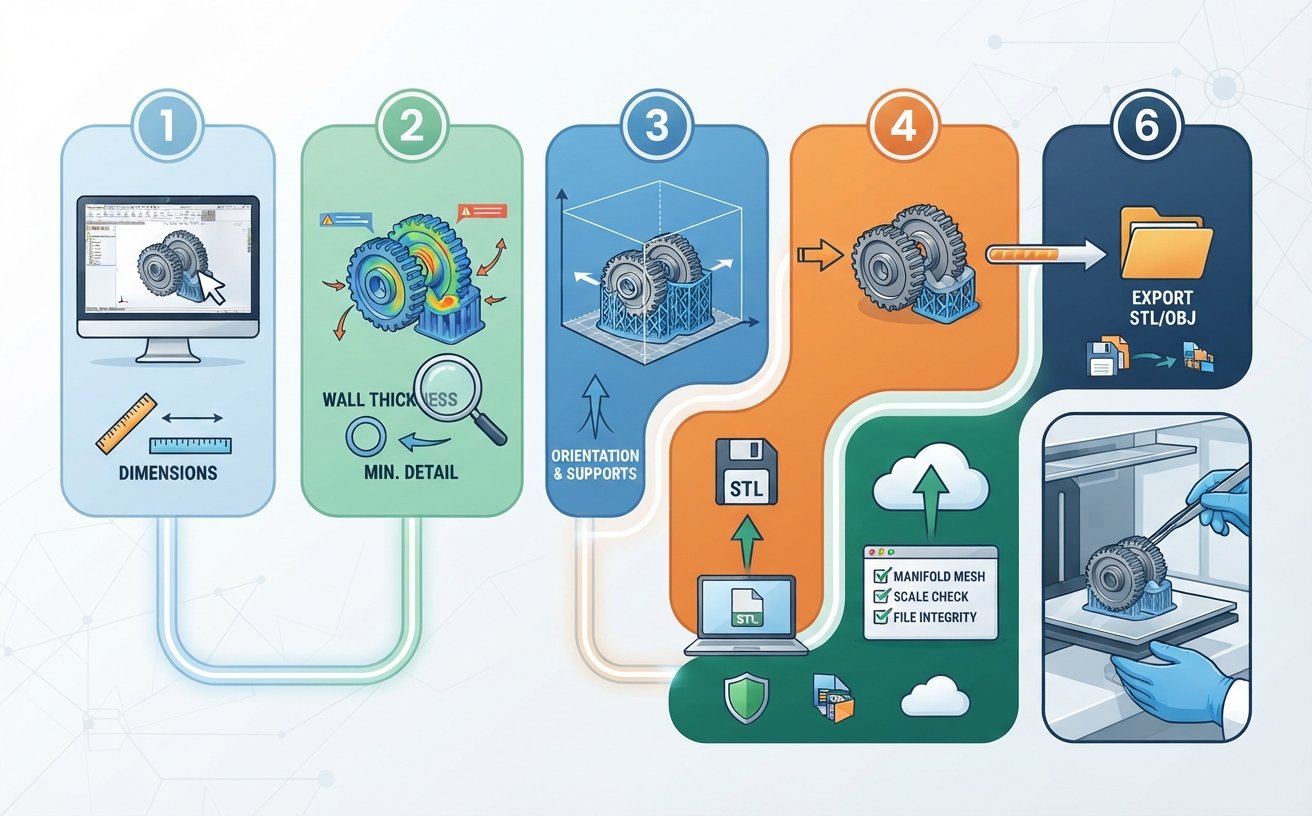
- Minimum Wall Thickness: Ensure all walls, features, and details are thick enough to be structurally sound and printable. Generally, a minimum of 1-2mm is recommended for most FDM prints, but this can vary by material and printer.
- Overhangs and Bridging: Minimise unsupported overhangs (angles greater than 45 degrees) and long bridges (horizontal gaps without support underneath). These features will require support structures, which can affect surface finish and add to post-processing time.
- Holes and Gaps: Ensure holes are designed with slight tolerances to account for material expansion and shrinkage, especially if mating parts are involved. Small gaps should be avoided if they are not intended to be filled by the printer.
- Interlocking Parts: If designing assemblies, include sufficient clearance between parts (e.g., 0.2-0.5mm) to prevent them from fusing together during printing.
- Part Orientation: Consider how the part will be oriented on the print bed. This can impact strength, surface quality, and the need for support material.
Warning: Ignoring printability during the design phase is one of the most common reasons for failed prints or poor quality. Always design with the limitations of the 3D printing process in mind.
Step 3: Export Your CAD File to a Suitable Format (STL or OBJ)
Once your 3D model is finalised in your CAD software (e.g., SolidWorks, Fusion 360, Blender), the next crucial step is to export it into a format that 3D printing software can understand. The most widely accepted file formats for 3D printing are STL (Stereolithography) and OBJ (Object). These formats represent your 3D model as a mesh of triangles, defining its surface geometry.
The quality of this mesh is vital. A low-resolution export will result in a faceted, blocky print, while an excessively high-resolution file can be unnecessarily large and slow down processing. The goal is to strike a balance that accurately captures your model's detail without creating unmanageable file sizes.
- Choose STL: This is the industry standard for 3D printing. Most CAD software has a direct export option for STL.
- Consider OBJ: OBJ files can store colour and texture information, making them useful for multi-colour prints or models with intricate surface details, though less common for purely functional prints.
- Set Export Resolution: When exporting to STL, you'll usually have options for resolution (e.g., 'fine', 'medium', 'coarse' or chord deviation/angle tolerance).
- For smooth curves and detailed surfaces, choose a finer resolution (smaller chord height/deviation, smaller angle tolerance).
- For less critical parts or very large models, a medium resolution might suffice to keep file size down.
- Ensure Units are Correct: Verify that your export settings match the units used in your design (e.g., millimetres, inches). This prevents scale issues when the service provider imports your file.
Tip: Always preview your exported STL or OBJ file in a basic 3D viewer before sending it to ensure the resolution looks correct and there are no unexpected anomalies or missing parts.
Step 4: Check and Repair Your Mesh for Errors
Even with careful design and export, CAD files can sometimes contain errors that prevent them from printing correctly. These errors often include non-manifold edges, inverted normals, self-intersections, or gaps in the mesh. A "water-tight" model, one with a completely enclosed volume and no internal inconsistencies, is essential for successful slicing and printing. Professional 3D printing services rely on clean files to ensure efficient workflow and high-quality outputs.
Thankfully, there are several tools, both standalone and integrated into 3D printing software, that can identify and automatically repair these common mesh errors. Addressing these issues now will save considerable time and potential rework later in the printing process, contributing to a truly hassle-free 3D printing experience.
- Use Mesh Repair Software:
- Online Tools: Services like MakePrintable or Netfabb Basic (now part of Fusion 360) can analyse and repair STLs.
- Slicer Software: Most slicers (like PrusaSlicer, Cura, Bambu Studio) have built-in mesh repair functionalities when you import an STL.
- CAD Software: Some advanced CAD packages offer mesh analysis and repair tools.
- Look for Key Errors:
- Non-Manifold Edges: Where more than two faces meet at an edge, creating ambiguity for the printer.
- Inverted Normals: Faces pointing inward instead of outward, confusing the slicer about the "inside" and "outside" of the model.
- Gaps/Holes: Openings in the mesh that prevent it from being a solid, enclosed volume.
- Self-Intersections: Where parts of the mesh pass through themselves.
- Verify After Repair: After running a repair tool, always re-check the model visually and, if possible, run the analysis again to confirm all errors have been resolved without introducing new ones.
Warning: Submitting a file with mesh errors is a common mistake that can lead to delayed prints, incorrect geometries, or outright print failure. Always dedicate time to this crucial step.
Step 5: Define Dimensions and Scale Accurately
Accurate dimensions and correct scaling are paramount for 3D printing. Imagine designing a functional part only to have it print at the wrong size, rendering it useless. Discrepancies often arise from unit mismatches between CAD software, export settings, and the 3D printing service's software. For affordable 3D printing near me in Ireland, ensuring precise dimensions from the outset avoids costly reprints.
It’s essential that the service provider receives a file that clearly indicates the intended physical size of your model. This also applies to considerations like features for threaded inserts or tolerances for mating parts; if your design needs to fit with another component, precise scaling is non-negotiable. Furthermore, if you're looking into industrial 3D printing services, accuracy is vital for large-scale production runs.
- Specify Units Clearly: Always communicate the units of your design (e.g., millimetres, centimetres, inches) to your 3D printing service. Many CAD programs export STL files without embedded unit information, leading to assumptions during import.
- Verify Dimensions in CAD: Double-check all critical dimensions within your CAD software before exporting.
- Check Post-Export: Open your exported STL or OBJ in a 3D viewer or a basic slicer program to confirm its dimensions are as expected. If the software assumes different units, you can usually rescale it there.
- Account for Shrinkage (Advanced): Some materials (e.g., ABS, Nylon) experience minor shrinkage during cooling. For highly precise parts, you might need to slightly oversize your model in CAD to compensate, but this is often handled by the service provider's expertise and material profiles.
- Add a Reference Dimension: For complex models, consider adding a simple cube or cylinder of a known dimension within your model (or alongside it in the same file) as a visual check for scaling.
Warning: Never assume the printing service will automatically infer the correct scale. Always provide explicit unit information and, if possible, confirm the scaled dimensions with them before printing begins.
Step 6: Optimise for Post-Processing and Surface Finish
The journey from a digital file to a physical object doesn't always end with the print itself. Many 3D printed parts require some level of post-processing, from removing support structures to sanding, painting, or assembly. Designing your CAD file with these post-processing steps in mind can significantly reduce labour, improve final product quality, and minimise costs.
For example, designing parts with minimal overhangs or easily accessible support areas will make cleanup faster. If a smooth surface is critical, considering print orientation and material choice (e.g., some Bambu Lab PLA filament Ireland offers excellent surface finishes) can reduce the need for extensive sanding. This forethought is especially important for rapid prototyping for Irish SMEs and products destined for sale, such as Etsy 3D printed products Ireland.
- Minimise Support: Design features so they are self-supporting as much as possible. Overhangs under 45 degrees generally don't require support. If supports are unavoidable, try to place them on non-visible or non-critical surfaces.
- Chamfers and Fillets: Incorporating chamfers or fillets on edges can improve the aesthetics and strength of a print, and they often print cleaner than sharp corners.
- Surface Textures: If you intend to add texture post-print (e.g., paint, coating), consider how the surface finish of the raw print will interact. FDM prints often have layer lines; for smoother finishes, you might need higher resolution printing or specific materials.
- Assembly Features: If your print is part of an assembly, design features like snap-fits, screw holes, or slots with appropriate tolerances to ensure easy assembly and a secure fit.
- Print Orientation: Discuss with your service provider the optimal print orientation for your part. This can significantly impact layer line visibility, strength, and the amount of support material needed.
Tip: If you're creating a product for sale (like Etsy 3D printed products Ireland), consider investing in a prototype to test post-processing requirements before committing to a larger batch.
Step 7: Provide Clear Instructions and Project Details
Even the most perfectly prepared CAD file can benefit from clear communication with your 3D printing service provider. Think of it as providing a comprehensive brief for your project. This is particularly important for custom 3D printing services where specific requirements can vary wildly from one client to another.
Detailed instructions ensure that the service understands your intent, material preferences (like wanting to buy flexible TPU filament Ireland or buy Bambu Lab filament Ireland), and any critical aspects of your design. This collaborative approach helps PrintIn3D.ie deliver exactly what you envision, reinforcing our role as your 3D printing partner across Ireland.
- Project Overview: Briefly explain the purpose of the part and its intended use.
- Critical Dimensions: Highlight any dimensions that are absolutely critical for the part's function.
- Material Preference: Confirm your desired material. If you have a specific filament type or colour in mind, mention it.
- Surface Finish Expectations: Describe the level of surface smoothness or detail required.
- Infill Percentage/Density: If you have specific strength requirements, you might suggest an infill density (e.g., 20% for light parts, 100% for solid strength).
- Orientation Preferences: If you have a specific orientation in mind for printing to optimise strength or aesthetics, communicate it.
- Tolerance Requirements: If the part needs to fit into another component, specify the required tolerances.
- Contact Information: Ensure your contact details are accurate in case the service provider has questions.
Tip: A simple text file or PDF accompanying your CAD file with these details can be incredibly helpful. Screenshots of specific areas of concern or critical measurements can also aid communication.
Common Mistakes to Avoid
- Ignoring Wall Thickness: Designing walls too thin leads to fragile prints that can break easily or fail to print entirely. Always adhere to minimum thickness guidelines for your chosen material.
- Non-Manifold Geometry: Files with holes, gaps, or overlapping surfaces confuse the slicer, resulting in errors or incomplete prints. Ensure your model is "water-tight" and free of mesh errors.
- Incorrect Scaling/Units: Submitting a file with mismatched units (e.g., designed in mm, but interpreted as inches) is a frequent error leading to prints that are too big or too small. Always specify and verify your units.
- Excessive Overhangs Without Support: Large unsupported sections will droop or detach during printing. Design to minimise overhangs or plan for support material, knowing it will affect surface finish.
- Lack of Communication: Not providing clear instructions or details about your project to the 3D printing service can lead to assumptions and results that don't match your expectations.
- Choosing the Wrong Material: Selecting a material purely based on cost or availability without considering the part's functional requirements can lead to a print that fails its purpose. Always match the material to the application.
FAQ
What file formats do you accept for 3D printing?
We primarily accept STL and OBJ files, which are the industry standards for 3D printing. If you have your design in another CAD format (e.g., STEP, IGES, SolidWorks, Fusion 360), please contact us. We might be able to convert it for you through our 3D design services, or advise on the best export method.
How can I ensure my model is to scale?
The best way to ensure correct scaling is to design your model in real-world units (e.g., millimetres) and export it with the same unit settings. When submitting your file, explicitly state the intended dimensions and units. We will verify this during our file review process. If you're uncertain, adding a known reference dimension (like a 10x10x10mm cube) within your model can help us confirm the scale.
What if I don't have a 3D model, but have an idea or physical object?
No problem at all! At PrintIn3D.ie, we're a full-service 3D design and prototyping company. If you have an idea or sketches, our expert designers can how to get a 3d model made from scratch. If you have a physical object you want replicated or modified, our 3D scanning for product development service can create a digital model for printing. We offer a hassle-free solution to bring your concepts to life.
Which 3d printer filaments are best for beginners or general use?
For most beginners and general-purpose prints, PLA (Polylactic Acid) is an excellent choice. It's easy to print with, comes in a wide range of colours, and is biodegradable. PETG (Polyethylene Terephthalate Glycol) is another popular option, offering more strength and temperature resistance than PLA, while still being relatively easy to work with. We stock high-quality Bambu Lab filament Ireland and SUNLU 3d printer filaments, perfect for various projects.
Do you offer fast or same-day delivery for filaments?
Yes, we understand the urgency for makers! We offer same-day dispatch for filament orders placed before 4 PM, with typical delivery times of 2 working days for Ireland. So if you need to buy Bambu Lab filament Ireland or other materials quickly, we've got you covered.
Next Steps / CTA
Ready to turn your meticulously prepared CAD file into a physical reality? Upload your 3D model to PrintIn3D.ie today for an instant quote, or reach out to our friendly team via WhatsApp for expert advice on your next project. Let us be your trusted 3D printing partner, delivering quality and innovation right to your door across Ireland and the EU/EEA.