How to Transform Your Idea into a 3D Printed Prototype in Ireland
Introduction: Bringing Your Ideas to Life with 3D Printing
Every groundbreaking product starts as an idea, often a rough sketch or a concept whispered in a moment of inspiration. But how do you bridge the gap between that initial spark and a tangible, testable object? The answer, for countless innovators, lies in 3D printing and the power of rapid prototyping. In Ireland, and across the wider EU/EEA, transforming a vision into a physical prototype has never been more accessible or efficient.
This comprehensive guide is your roadmap to navigating the exciting journey from concept to a fully realised 3D printed prototype. Whether you're an entrepreneur with a revolutionary gadget, a designer refining a new product, or a small business owner looking to test a component, we'll walk you through each critical step. You'll learn how to conceptualise, design, choose the right materials, and leverage professional 3D printing services to bring your ideas to life without the need to invest in your own equipment. We'll demystify the process, highlight key considerations, and help you avoid common pitfalls, ensuring your path to innovation is as smooth and successful as possible. Get ready to turn your dreams into touchable reality with the power of 3D printing, right here in Ireland and beyond, including expert services like PrintIn3D.ie, your trusted 3D printing partner.
Who This Is For
- Entrepreneurs & Startups: Looking to validate product concepts and attract investment with functional prototypes.
- Product Designers & Engineers: Needing quick iterations of designs for testing and refinement.
- Small Businesses: Requiring custom tools, fixtures, or replacement parts without large-scale manufacturing.
- Inventors: Seeking to create physical representations of their unique ideas.
- Hobbyists & Makers: Wanting to bring complex personal projects to life with professional quality.
- Anyone without a 3D Printer: Who needs professional, hassle-free 3D printing, 3D design, or 3D scanning services, whether in Ireland, Luxembourg, or elsewhere in the EU.
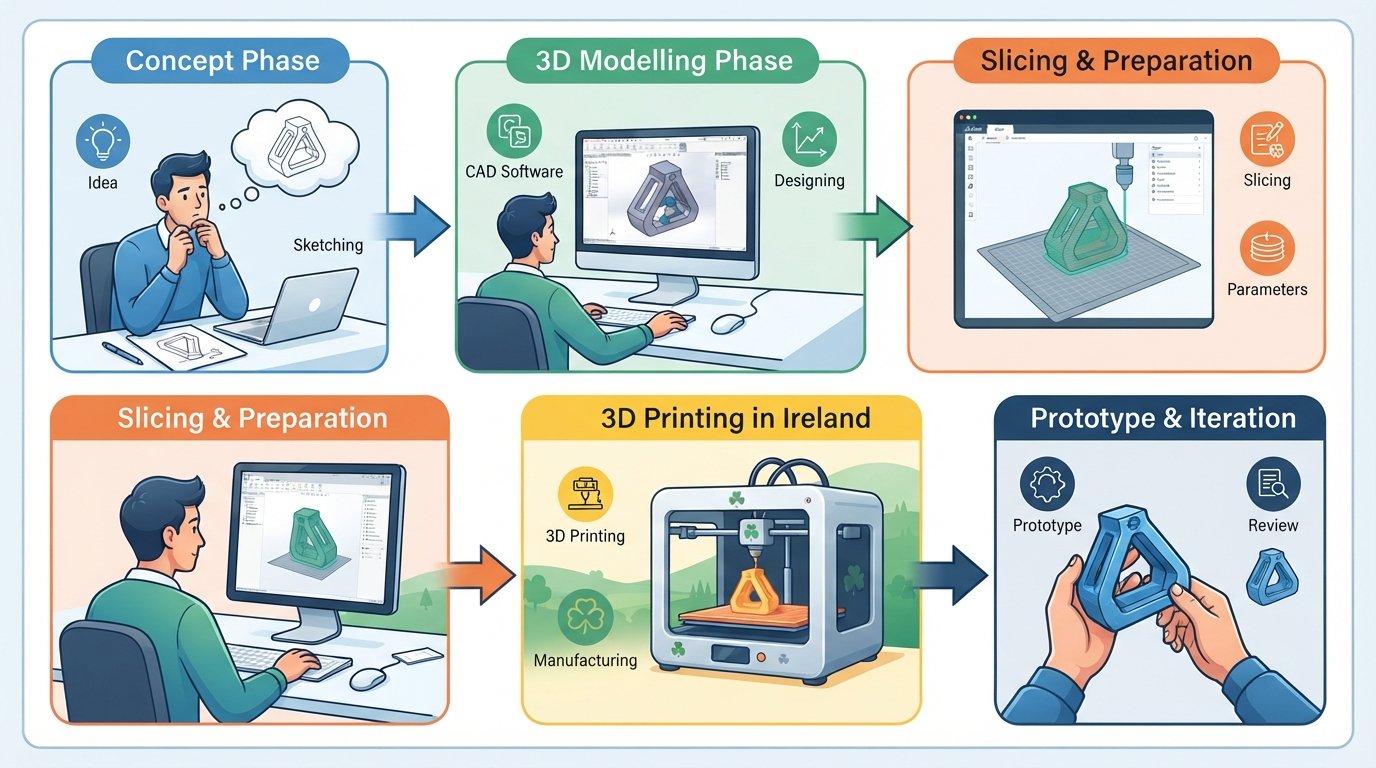
Step 1: Ideation & Initial Sketching – Laying the Foundation for Your Prototype
Before any digital model can be created or filament extruded, your product idea needs a clear and defined foundation. This initial phase, often underestimated, is crucial for the success of your prototype. It’s where you solidify your concept, define its purpose, and begin to visualise its form and function. Think of it as the blueprint for your innovation.
Start by asking fundamental questions: What problem does your product solve? Who is it for? What are its core functionalities? What will it look like? How will it interact with users or other components? Documenting these answers, even in rough notes, will guide your entire prototyping process. This isn't just about brainstorming; it's about critical thinking and defining the scope of your initial prototype. Remember, the goal of a prototype is often to test a specific aspect of your idea, not necessarily to create a perfect final product right away. Identifying that core testable feature is paramount.
- Clearly Define Your Product's Purpose: What is the single most important function or problem your prototype needs to address? Focus on this core element.
- Sketch Your Ideas: Don't worry about artistic skill. Use pen and paper, whiteboard, or even digital drawing tools to visualise your concept. Draw from multiple angles.
- Add Basic Dimensions and Scale: Even approximate measurements are helpful. Consider the overall size and key proportions of your desired object.
- Note Key Features and Components: List all essential parts, moving pieces, and connection points. How will they fit together?
- Consider Material Properties (Broadly): At this stage, think about whether your prototype needs to be rigid, flexible, heat-resistant, or transparent. This will inform later material choices.
- Research Existing Solutions: See if similar products exist. What works well? What could be improved? This helps differentiate your idea.
Tip: Don't try to perfect every detail at this stage. The beauty of 3D printing and rapid prototyping is the ability to iterate quickly. Focus on the core functionality you want to test with your first prototype. Less is often more for initial validation.
Step 2: Digital 3D Design & CAD Creation – Bringing Your Vision to the Digital Realm
With your initial sketches and concepts solidified, the next crucial step is to translate these ideas into a precise digital 3D model. This is where Computer-Aided Design (CAD) software comes into play, enabling the creation of intricate, print-ready files. For many, this is the most daunting part, but it doesn't have to be. Whether you're looking for design 3d professionnel Luxembourg or a local expert in Ireland, professional services can bridge the skill gap.
Choosing the right approach for 3D design depends on your personal skills, budget, and the complexity of your project. If you have experience with CAD software (like Fusion 360, SolidWorks, SketchUp, Blender, or Tinkercad), you can embark on creating the model yourself. This gives you maximum control. However, for those without the expertise, or for projects requiring high precision and intricate geometries, hiring a professional 3D designer is often the most efficient and cost-effective solution. A skilled designer can take your sketches, drawings, or even verbal descriptions and transform them into an optimised, manufacturable 3D file, saving you significant time and potential errors down the line. They can also advise on design-for-manufacturing principles specific to 3D printing.
- Self-Design (If Skilled): Utilise CAD software to create your 3D model. Pay close attention to dimensions, tolerances, and watertightness. Ensure your design considers the capabilities and limitations of 3D printing technology.
- Hire a Professional 3D Designer: If CAD is not your forte, collaborate with a professional. Provide them with detailed sketches, measurements, reference images, and a clear description of your product's function. Services like PrintIn3D.ie offer expert 3D design services to turn your concepts into print-ready models.
- Consider 3D Scanning for Existing Objects: If your prototype needs to replicate or integrate with an existing physical object, 3d scanning Luxembourg or Ireland services can create a digital model from the physical one. This is excellent for reverse engineering or fitting custom parts. Look for a scan 3d professionnel Luxembourg or local Irish service for best results.
- Focus on Functionality First: For a prototype, prioritise the functional aspects over intricate aesthetic details. These can be refined in later iterations.
- Ensure Design is 'Printable': A good designer will ensure the model is structurally sound for 3D printing, accounting for overhangs, wall thickness, and support structures.
Tip: When working with a professional designer, establish clear milestones and communication channels. Regular check-ins and iterative feedback are crucial to ensure the digital model accurately reflects your vision. Don't be afraid to ask for explanations about design choices or file formats.
Step 3: Preparing Your 3D Model for Printing – The Bridge to Physical Reality
Once your 3D model is complete, whether you designed it yourself or had a professional create it, it needs careful preparation before it can be sent to a 3D printer. This phase is critical to ensure a successful print, minimising errors, wasted material, and delays. It involves checking file integrity, ensuring correct scaling, and understanding how the model will translate into a physical object.
The most common file format for 3D printing is the STL (STereoLithography) file. This format represents your 3D model as a series of interconnected triangles. It's essential that this mesh is "watertight" – meaning it has no holes or gaps – otherwise, the slicing software (which prepares the model for the printer) won't know what's inside or outside the object, leading to printing errors. Many CAD programs automatically generate decent STLs, but it's always good practice to check. Additionally, consider the orientation of your model for printing, as this can affect print quality, strength, and the need for support structures. Optimising the model for the printing process at this stage can save a lot of headaches later on.
- Export to a Print-Friendly Format: Typically, this is an STL file, but OBJ and 3MF are also common. Ensure the export settings maintain good resolution without creating excessively large files.
- Check for Mesh Errors: Use free tools like Meshmixer, Netfabb Basic, or online services to check your STL file for common issues like non-manifold edges, inverted normals, or holes. These can cause significant problems during printing.
- Verify Dimensions and Scale: Double-check that your model is scaled correctly in your chosen units (mm or inches). An incorrectly scaled model is a common and frustrating mistake.
- Consider Print Orientation: Think about how the model will sit on the print bed. This affects the need for support material, print time, and the strength of the final part. Discuss this with your 3D printing service if you're unsure.
- Optimise Wall Thickness: Ensure all walls and features are thick enough to be printed reliably by your chosen technology and material. Too thin, and they might break or not print at all.
- Consolidate and Combine Parts: If your prototype consists of multiple components, decide whether to print them separately and assemble later, or combine them into a single print for testing fit.
Warning: Skipping thorough file preparation is a primary cause of failed prints and wasted time/money. A problematic file will often lead to a problematic prototype. Always ensure your file is 'watertight' and error-free before submission.
Step 4: Choosing Materials & Printing Services – The Heart of Your Prototype
With a perfectly prepared 3D model, you're now ready for the exciting step of choosing the right material and the best 3D printing service to bring your prototype to life. This is where your initial thoughts on material properties from Step 1 become concrete decisions. The material choice will significantly impact the prototype's functionality, appearance, and cost, while the service provider will determine the quality and speed of your print.
When selecting a material, consider the prototype's intended use. Is it purely for visual inspection? For form and fit testing? Or for functional testing under stress? Common materials like PLA (Polylactic Acid) are excellent for general-purpose prototyping due to their ease of use, affordability, and wide colour range. For parts requiring more durability, impact resistance, or temperature resilience, PETG (Polyethylene Terephthalate Glycol) is a popular choice. More advanced options, often referred to as filament 3d composites Luxembourg, are available for specialised needs, offering enhanced strength or unique properties. Furthermore, deciding on a professional 3D printing service, such as PrintIn3D.ie, is crucial. Services like ours offer not just the machines, but also the expertise to guide your material selection, optimise your print, and ensure a high-quality outcome, whether you're based in Ireland or seeking a reliable service impression 3d Luxembourg.
- Select the Right Material:
- PLA (Polylactic Acid): Ideal for visual prototypes, form and fit testing, and low-stress functional parts. It's biodegradable and easy to print. If you need to achat filament PLA Luxembourg for your own printer, PrintIn3D.ie offers a range of options like Bambu Lab PLA Basic.
- PETG (Polyethylene Terephthalate Glycol): Offers better strength, temperature resistance, and durability than PLA, making it suitable for functional prototypes that need to withstand more stress. You can also buy 3d filament Luxembourg in PETG from PrintIn3D.ie, such as Sunlu PETG Filament.
- Other Materials: For highly specialised prototypes, consider Nylon for strength and flexibility, ABS for heat resistance, or TPU for extreme flexibility. Discuss composite filament options with your service if high performance is critical.
- Choose a Professional 3D Printing Service:
- Expertise: Services like PrintIn3D.ie provide experienced operators who understand the intricacies of different materials and printing technologies. This ensures higher quality and fewer failures.
- Equipment: Access to industrial-grade printers and a variety of materials that might be too expensive or complex for personal ownership.
- Speed & Efficiency: Professional services are optimised for fast turnaround. We offer custom 3D printing with various speeds, including rapid options like 8-hour custom printing.
- Geographic Reach: If you're looking for an offre d'impression 3d Luxembourg or anywhere else in the EU/EEA, ensure the service can deliver to your location. PrintIn3D.ie ships across Ireland and the EU/EEA.
- Support: Look for a service that offers friendly WhatsApp support and guidance throughout the process.
- Get a Detailed Quote: Submit your 3D model for an accurate estimate of cost and production time. This is your chance to discuss specific requirements.
Tip: Always consider the environment and stresses your prototype will face. If it's a structural component, prioritize strength. If it's an enclosure, consider aesthetics and fit. Don't hesitate to ask your chosen 3D printing service for recommendations on the best material for your specific application.
Step 5: Submitting Your Design & Reviewing the Print – From Digital to Tangible
You've envisioned, designed, and prepared your model; now it's time for the magic to happen. This step involves entrusting your carefully crafted 3D file to a professional 3D printing service and eagerly awaiting the physical manifestation of your idea. The process should be straightforward and transparent, ensuring you're kept informed as your prototype takes shape.
When you choose a professional service like PrintIn3D.ie, submitting your design is typically a simple online process. You'll upload your prepared 3D file, specify your desired material and finish, and confirm the details of your order. Many services offer an instant quote, allowing you to quickly understand the cost and estimated delivery time. Behind the scenes, the service's experts will review your file one last time, prepare it for printing (slicing), and then send it to their high-precision 3D printers. For businesses and individuals in Ireland, or seeking a reliable custom 3d printing Luxembourg service, this streamlined approach minimises hassle and maximises efficiency, turning your digital concept into a tangible prototype ready for evaluation.
- Upload Your 3D File: Navigate to the custom 3D printing section of your chosen service (e.g., PrintIn3D.ie's online service). Upload your STL, OBJ, or 3MF file.
- Specify Print Parameters: Confirm your chosen material (e.g., PLA, PETG), colour, and any specific infill density or layer height requirements if you have them.
- Review and Confirm Your Order: Double-check the order details, including the estimated cost and turnaround time. This is also where you can often request specific finishing options or an NDA for sensitive projects.
- Wait for Production: Once your order is placed, the printing service will process your file and commence printing. Reputable services will provide updates on your order's status.
- Receive and Inspect Your Prototype: Upon delivery, carefully inspect the 3D printed prototype. Check for accuracy against your design, look for any printing imperfections, and assess the overall quality of the build.
- Provide Feedback if Necessary: If there are any issues or if the print doesn't meet your expectations, communicate promptly with the service provider. A good service will be responsive and helpful.
Tip: For highly sensitive product ideas, inquire about Non-Disclosure Agreements (NDAs) before submitting your files. Many professional 3D printing services, like PrintIn3D.ie, offer this as a standard practice to protect your intellectual property.
Step 6: Testing, Iteration & Refinement – Perfecting Your Innovation
Receiving your first 3D printed prototype is an exciting milestone, but it's not the end of the journey – it's just the beginning of the most critical phase: testing and iteration. This is where you put your physical prototype through its paces, gathering invaluable feedback that will inform future design improvements. The power of prototypage rapide Luxembourg and Irish services lies precisely in this ability to quickly create, test, and refine designs.
Your prototype is a tool for learning. Its purpose is to uncover flaws, identify areas for improvement, and validate assumptions made during the design phase. Conduct thorough functional tests: Does it fit? Does it move as intended? Is it strong enough? Is it comfortable to hold? Gather feedback not just from yourself, but from potential users or colleagues. Document everything – what works, what doesn't, and why. The insights gained here are far more valuable than a perfectly aesthetic first print. Remember, 3D printing allows for quick, affordable modifications. Don't be afraid to go back to the drawing board for a second, third, or even tenth iteration; each one brings you closer to your ideal product. This iterative cycle is the bedrock of successful product development.
- Conduct Comprehensive Testing:
- Form Fit & Function: Test how your prototype looks, feels, fits with other components, and performs its intended function.
- Stress Testing: If applicable, test the prototype under conditions it might experience in real-world use to assess material strength and design integrity.
- User Experience: Have others interact with the prototype. Their unbiased feedback can reveal issues you might have overlooked.
- Document All Feedback and Observations: Keep a detailed log of what worked, what didn't, and suggestions for improvement. Photos and videos can also be incredibly useful.
- Identify Areas for Improvement: Based on your testing and feedback, pinpoint specific elements of the design that need modification. This could be structural, aesthetic, or functional.
- Revise Your 3D Model: Go back to your CAD software (or engage your designer) to implement the necessary changes based on your testing results.
- Order a New Iteration: Once the digital model is revised, submit it for another print. This iterative cycle, known as rapid prototyping, is where significant progress is made.
- Compare Iterations: Keep previous prototypes to visually compare improvements and track the evolution of your design.
Warning: Never skip the testing and iteration phase. A prototype that isn't thoroughly tested is a missed opportunity for improvement and could lead to costly errors down the line if you proceed to manufacturing without proper validation.
Step 7: Scaling Up & Future Production – From Prototype to Product
Once you've refined your prototype through several iterations and are confident in its design and functionality, you've reached another pivotal point: considering its future beyond prototyping. Your functional prototype is now a powerful tool for attracting investment, showcasing your product, and planning for mass production. This final stage involves thinking about how your successfully prototyped idea can transition into a marketable product.
While 3D printing is excellent for prototyping and even small-batch production, scaling up to mass manufacturing often involves different technologies and considerations. Your refined 3D printed prototype serves as the master model, proving your concept works and providing a tangible example for manufacturers. At this point, you might consider design-for-manufacturing adjustments to make your product more amenable to injection moulding, machining, or other high-volume production methods, which could reduce unit costs significantly. Even if you don't pursue mass manufacturing, knowing that you have a fully validated design allows you to confidently pursue limited runs or bespoke orders. Whether your journey takes you to mass production or continued small-batch customisation, the robust prototyping process you've followed lays a solid foundation for your product's success.
- Finalise Your Prototype Design: Ensure all aspects of your prototype meet your functional, aesthetic, and quality standards. This is your "gold standard" for future production.
- Explore Manufacturing Options:
- Small Batch 3D Printing: For niche products or custom components, continuing with professional 3D printing services for small-batch manufacturing can be cost-effective.
- Traditional Manufacturing: For higher volumes, investigate methods like injection moulding, CNC machining, or vacuum casting. Your 3D printed prototype is invaluable for communicating your design to these manufacturers.
- Hybrid Approaches: Sometimes, a combination works best, with some custom parts 3D printed and others mass-produced.
- Consider Material Changes for Production: The material used for prototyping might not be the most economical or suitable for large-scale production. Research production-grade materials and finishes.
- Cost Analysis for Production: Work with manufacturers to get quotes for different production volumes and materials. Factor in tooling costs, unit costs, and assembly.
- Intellectual Property Protection: If you haven't already, ensure your design is adequately protected through patents, trademarks, or design registrations before full-scale public launch.
- Marketing and Sales: Use your impressive, functional prototype as a powerful visual aid for marketing, sales presentations, and crowdfunding campaigns.
Tip: Even for mass production, keep a strong relationship with your 3D printing service. They can often provide invaluable insights into manufacturability, create custom jigs and fixtures for assembly, or produce spare parts on demand. Your 3D printed prototype is not just a test piece; it's a foundation for a successful product launch.
Common Mistakes to Avoid When 3D Printing Prototypes
While the path to a 3D printed prototype is exciting, it's also fraught with potential pitfalls that can lead to wasted time, money, and frustration. Being aware of these common mistakes can help you navigate the process more smoothly and achieve better results faster.
- Skipping Thorough Ideation: Rushing into design without clearly defining the product's purpose and key features often leads to prototypes that don't effectively test what they're supposed to.
- Poor 3D Model Quality: Submitting files with mesh errors (non-manifold edges, holes, inverted normals) is a leading cause of print failures. Always ensure your model is "watertight" and error-free.
- Incorrect Scaling or Units: Accidentally designing in inches but printing in millimetres, or vice-versa, can result in a prototype that is wildly off-size. Double-check your units at every stage.
- Ignoring Material Properties: Choosing a material solely based on cost or colour without considering its mechanical properties (strength, flexibility, heat resistance) for your prototype's intended function. A visual prototype might be fine in PLA, but a functional gear often needs PETG or even stronger filament.
- Over-Complicating the First Prototype: Trying to incorporate every single feature and aesthetic detail into the very first iteration. Prototypes should be focused on testing core functionality; refinements can come later.
- Not Communicating Clearly with Designers/Printers: Ambiguous instructions to your 3D designer or printing service can lead to misinterpretations and prototypes that don't meet your expectations. Provide detailed notes, sketches, and clear objectives.
- Underestimating the Value of Iteration: Believing the first prototype will be perfect. The true power of 3D printing lies in its ability to facilitate rapid, multiple iterations based on testing and feedback.
- Neglecting Post-Processing: Expecting a print to be flawless directly off the bed. Some prototypes may require sanding, painting, or assembly to truly represent the final product or to function correctly.
- Failing to Protect Intellectual Property: Not considering NDAs for sensitive projects or researching patent/design protection early enough can leave your idea vulnerable.
- Choosing the Wrong Printing Service: Opting for the cheapest service without verifying their quality, experience, material range, or customer support. For reliable service impression 3d Luxembourg or Irish custom printing, choose a reputable partner like PrintIn3D.ie.
Frequently Asked Questions (FAQ)
What's the best material for a first prototype?
For most initial prototypes, PLA (Polylactic Acid) is an excellent choice. It's affordable, easy to print, available in a wide range of colours, and ideal for visual models and basic fit/form testing. If your prototype needs more durability or heat resistance, PETG (Polyethylene Terephthalate Glycol) is a good step up. Your chosen 3D printing service can guide you based on your specific application.
How long does 3D printing a prototype take?
The time it takes to 3D print a prototype varies greatly depending on its size, complexity, chosen material, and the service's current workload. Small, simple parts can be printed in a few hours, while larger, intricate designs might take days. At PrintIn3D.ie, we offer various turnaround times, including 28-hour custom printing options, and for filament orders, we provide same-day dispatch for swift delivery across Ireland and the EU.
Can I get a quote for service impression 3d Luxembourg?
Absolutely! PrintIn3D.ie proudly serves customers across the EU/EEA, including Luxembourg. You can easily get an instant quote by uploading your 3D file to our website. Our platform will provide an estimate for your offre d'impression 3d Luxembourg based on material, size, and complexity, with clear delivery timelines to your location. We're committed to providing exceptional custom 3D printing in Luxembourg.
What if I don't have a 3D model?
No problem at all! Many innovators start with just a sketch or an idea. PrintIn3D.ie offers professional 3D design services where our experts can transform your concept, drawings, or even physical objects (through 3d scanning Luxembourg or Ireland services) into a print-ready 3D model. This makes the entire prototyping process accessible even if you lack CAD skills.
Do you offer 3d scanning Luxembourg services?
Yes, we provide comprehensive 3D scanning services that can convert physical objects into digital 3D models. This is invaluable for reverse engineering, replicating parts, or integrating custom designs with existing components. Whether you need scan 3d professionnel Luxembourg for industrial applications or artistic projects, our team can assist in generating accurate digital representations.
Next Steps: Turn Your Idea into Reality with PrintIn3D.ie
You now have a clear understanding of how to transform your product idea into a tangible, 3D printed prototype in Ireland and across the EU. The journey from concept to creation is exciting, and with the right partner, it can also be hassle-free. Ready to take the next step? Upload your 3D model for an instant quote today, or contact us to discuss your 3D design needs, and let PrintIn3D.ie be your trusted partner in bringing your innovative ideas to life.