Prepare Your 3D Model for Professional 3D Printing Services in the UK
Introduction: Your Guide to Flawless 3D Prints with Professional Services in the UK
In the exciting world of 3D printing, transforming a digital idea into a tangible object requires more than just a great concept. For truly professional results, especially when engaging a dedicated 3D printing company UK, preparing your 3D model meticulously is paramount. Whether you're a designer, engineer, or hobbyist, understanding the nuances of file preparation can dramatically impact the success, quality, and cost-effectiveness of your final print.
This comprehensive guide is designed to empower you with the knowledge and actionable steps needed to prepare your 3D models for professional printing services. We'll delve into everything from choosing the right file format and optimising your model's geometry to ensuring printability and understanding material considerations. By following these expert insights, you'll minimise errors, accelerate turnaround times, and achieve outstanding results, making your experience with any 3D printing service in the UK as seamless and successful as possible. Get ready to turn your digital dreams into physical realities with confidence!
Who This Is For
- Designers and engineers creating prototypes or final products.
- Hobbyists looking to elevate their 3D printing results.
- Businesses seeking reliable 3D printing for engineering prototypes or replacement parts UK.
- Anyone planning to use a professional 3D printing service, particularly in Great Britain.
Step 1: Understand Your Design Software and Export Options
The journey to a perfect 3D print begins with your design software. Whether you use CAD programs like SolidWorks, Fusion 360, AutoCAD, or sculpting tools like Blender and ZBrush, each has specific strengths and export capabilities. Familiarising yourself with these options is crucial for creating a print-ready file that a professional 3D printing service can easily interpret.
Most professional services prefer standard mesh formats, with STL (Stereolithography) being the most common. Other acceptable formats include OBJ, 3MF, and sometimes STEP or IGES for industrial applications. The quality of your export directly affects the quality of your print, so paying close attention to resolution settings during the export process is vital. A high-quality mesh ensures smooth surfaces and accurate details, while a poor export can lead to faceted surfaces and lost information.
- Choose appropriate software: Select design software that suits your project's complexity and intended use (e.g., CAD for engineering, sculpting for organic forms).
- Export to common formats: Prioritise STL, OBJ, or 3MF for compatibility with most 3D printing services.
- Adjust export settings: When exporting to STL, look for options like "tolerance," "resolution," or "chord height." A finer tolerance (e.g., 0.01mm) creates a smoother mesh, while a coarser one leads to a faceted appearance.
- Verify the export: After exporting, open the file in a 3D viewer or a basic slicer to ensure it looks as expected and isn't corrupted.
Step 2: Check Model Scale and Units
One of the most frequent and easily preventable issues in 3D printing is incorrect scaling. Your 3D model exists in a digital space with units (millimeters, inches, meters), and it's imperative that these units translate correctly when sent to a professional 3D printing service. A discrepancy can result in a model that is significantly too large or too small, rendering it unusable or incredibly expensive.
Before sending your file, confirm that your design software's unit settings match the expected units of the 3D printing service, which for most services in the UK, will typically be millimeters (mm). If you design in inches, ensure your export or the service's upload portal correctly converts it. Many services offer an online quoting tool that will display the dimensions of your uploaded model, providing an excellent opportunity to double-check the scale.
- Standardise units: Design in or convert your model to millimeters (mm), as this is the most widely accepted unit in 3D printing globally, including for any 3D printing express UK service.
- Verify dimensions: Manually measure key dimensions of your model within your design software and compare them to your real-world requirements.
- Communicate clearly: If you must use non-standard units, explicitly state them in your order notes or communication with the 3D printing service.
- Use online tools: Take advantage of online upload portals that display detected dimensions to confirm scale before finalising an order.
Step 3: Ensure Manifold (Watertight) Geometry
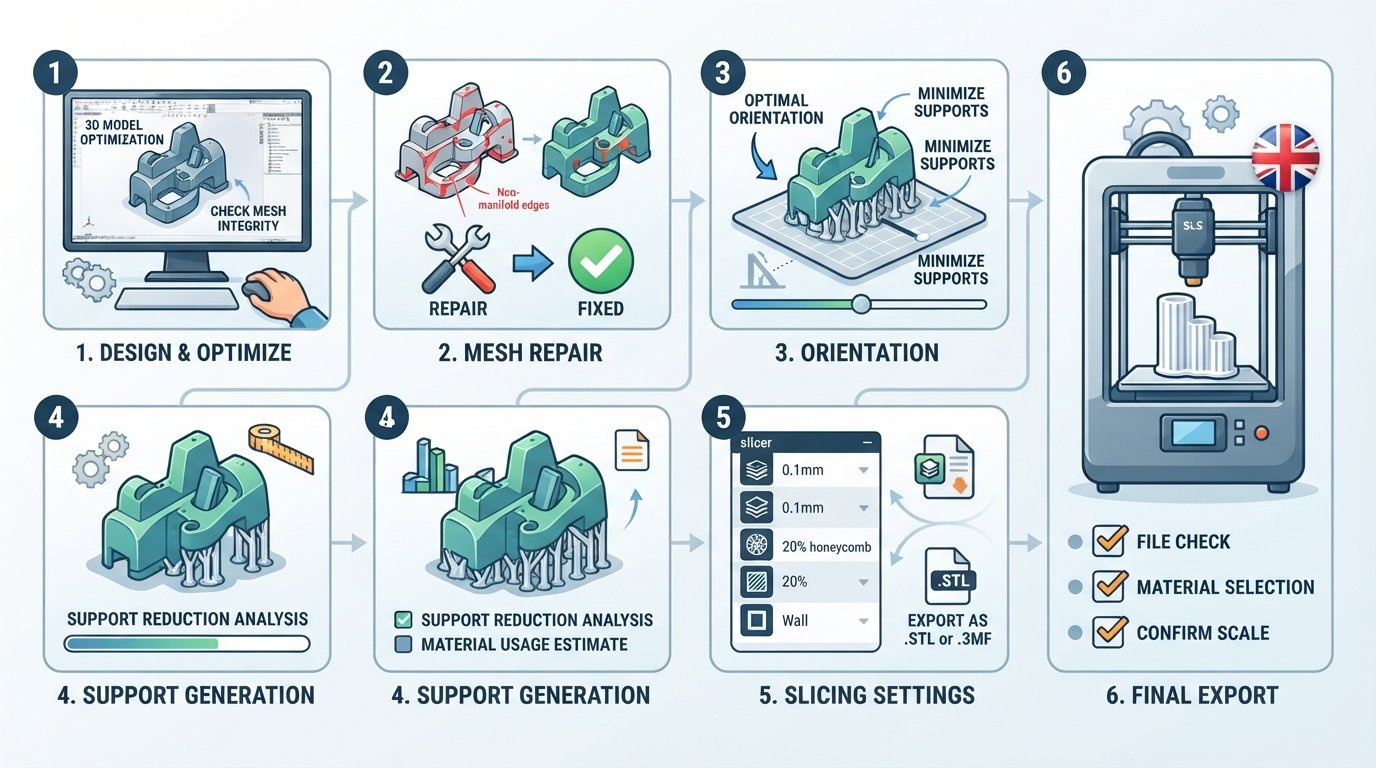
For a 3D model to be successfully printed, its digital representation must be "watertight" or "manifold." This means that every edge of the model must be connected to exactly two faces, forming a continuous, enclosed volume without any gaps, overlaps, or internal inconsistencies. Think of it like an inflatable balloon: if there's a hole, it can't hold air; similarly, a non-manifold model can't be filled with material by a 3D printer.
Common issues include open edges, inverted normals (faces pointing inwards instead of outwards), intersecting geometry, and duplicate faces. Most CAD software inherently creates watertight models, but issues can arise when importing, modifying, or exporting complex meshes, especially from sculpting or mesh-editing programs. Professional 3D printing services rely on manifold models to slice them correctly into print layers, so repairing these issues is a critical step in model preparation.
- Use repair tools: Utilise built-in mesh repair tools in your CAD software (e.g., "Check Geometry," "Solid Inspector") or dedicated mesh repair software like Meshmixer, Netfabb Basic, or online services.
- Identify common errors: Look for visual cues like dark spots, unusual shading, or missing surfaces when inspecting your model.
- Close all gaps: Ensure there are no open edges or holes in your model's surface.
- Orient normals correctly: Confirm all faces are oriented outwards. Many software packages have a "normal recalculate" or "flip normals" function.
- Remove internal geometry: Delete any internal, non-functional geometry that adds unnecessary complexity or can cause printing errors.
Step 4: Analyse Wall Thickness and Detail Size
The physical constraints of 3D printing mean that there are minimum limits for how thin walls can be and how small details can appear. These limits vary significantly depending on the 3D printing technology (e.g., FDM, SLA, SLS), the material used (e.g., PLA, PETG, PLA, ABS filament 3d printer UK), and the specific printer's capabilities. A wall that is too thin will be fragile, might not print at all, or could deform during the printing or post-processing stages.
Similarly, tiny embossed or engraved details, delicate features, or slender unsupported elements might not resolve properly, leading to lost features or failed prints. It's crucial to consult the professional 3D printing service's guidelines for minimum wall thickness and detail size for your chosen material and technology. For functional 3d printing for engineering prototypes, ensuring adequate wall thickness is critical for structural integrity.
- Consult service guidelines: Always check the specific minimum wall thickness and feature size recommendations provided by your chosen 3D printing service.
- Reinforce thin areas: Increase the thickness of any walls or features that fall below the recommended minimum.
- Simplify delicate details: If a detail is too small to print, consider redesigning it to be more robust or slightly larger.
- Add fillets and chamfers: Incorporate small fillets or chamfers on sharp edges, especially for features requiring strength, as sharp corners can be stress points.
Step 5: Consider Material Properties and Print Orientation
Choosing the right material is not just about aesthetics or strength; it significantly impacts how you prepare your model. Different materials (like PLA, PETG, ABS, Nylon, Resins) have unique properties that influence design choices, such as ideal wall thickness, support requirements, and susceptibility to warping. For instance, PLA is generally easy to print, but PETG offers more flexibility and temperature resistance. If you require ABS filament 3d printer UK, for its strength and heat resistance, be aware that it can be more prone to warping.
Print orientation is another critical factor. While a professional 3D printing service will typically optimise this for you, understanding its impact can help you design better. Orientation affects surface quality, strength, and the need for support structures. For example, features printed horizontally tend to be stronger than those printed vertically if loaded along the print layers. If you have specific strength requirements for 3d printing replacement parts UK, communicate them to the service.
- Research material characteristics: Understand the strengths, weaknesses, and common applications of various 3D printer filaments.
- Design for material: Adjust your design based on the chosen material's properties (e.g., thicker walls for brittle materials, less overhang for materials prone to warping).
- Communicate requirements: If your model has critical strength axes or aesthetic surfaces, inform the professional 3D printing service about your desired print orientation or any specific functional requirements.
- Minimise supports (if possible): While services handle supports, designing with fewer overhangs can reduce post-processing and potentially lower costs or improve surface finish.
Step 6: Optimise for Cost and Efficiency
Professional 3D printing services, like a 3D printing express UK provider, often base pricing on material volume, print time, and post-processing. Optimising your model for efficiency can significantly reduce costs without compromising quality. This involves considering techniques like hollowing, strategically reducing material, and ensuring your file is as clean as possible to avoid unexpected print failures.
Hollowing a model involves creating an internal cavity while maintaining sufficient wall thickness. This saves material and print time, especially for large, solid objects where internal strength isn't paramount. Additionally, simplifying overly complex geometries that don't add functional or aesthetic value can also trim costs. A clean, well-prepared file also means less manual intervention from the service, which can translate to faster turnaround and lower overall expenses for your 3d printing for engineering prototypes.
- Hollow your model: For larger, non-functional parts, consider hollowing the interior, ensuring you include a few drain holes for resin printing or to reduce internal pressure for FDM.
- Reduce infill (conceptually): While services set infill, designing models that are structurally sound with thinner walls or less dense structures conceptually reduces material.
- Simplify geometry: Remove unnecessary small details or internal complexities that won't be visible or functional.
- Combine parts: If you have multiple small parts, consider if they can be arranged into a single, combined print to potentially reduce setup costs, as long as they don't compromise printability.
Step 7: Check for Intersecting or Overlapping Geometry
Intersecting or overlapping geometry occurs when two or more distinct parts of your 3D model occupy the same digital space. While this might look acceptable in your design software, it creates ambiguity for a 3D printer. The printer's slicing software won't know whether to combine these overlapping volumes, treat them as separate, or ignore one altogether, often leading to printing errors, voids, or unexpected artefacts in the final print.
This issue is particularly common when combining multiple components into a single model, importing elements from different sources, or performing boolean operations that don't completely merge or subtract volumes. For a professional 3d design service GB, this is a fundamental check. Ensuring your model is a single, clean, cohesive shell is crucial for any 3d printing service London UK.
- Boolean operations: Use boolean union operations to merge intersecting solids into a single, cohesive volume.
- Inspect for intersections: Most CAD software offers tools to check for interfering bodies or overlapping volumes. Use these diligently.
- Review imported parts: Always check models imported from external sources for cleanliness and correct geometry before integrating them.
- Simplify assemblies: If printing an assembly as a single part, ensure all components are properly merged and don't create internal conflicts.
Step 8: Consider Tolerances for Assembled Parts
If your 3D model consists of multiple parts designed to fit together, either permanently or as moving assemblies, accounting for manufacturing tolerances is absolutely essential. 3D printing, while precise, is not infinitely accurate. The molten plastic or cured resin adds a thin layer, and some shrinkage or expansion can occur during cooling or post-processing. Failing to add sufficient clearance between mating parts will result in components that won't fit together or require significant sanding and rework.
The required tolerance depends on the chosen material, the printing technology, and the desired fit (e.g., tight press-fit, loose clearance fit). For 3d printing for engineering prototypes, precise fits are often critical. A professional 3D printing service can offer advice on typical tolerances for their specific machines and materials. When engaging a professional 3d modelling service UK, they will factor these into the design.
- Add clearance: For parts designed to fit together, add a small gap (e.g., 0.2mm to 0.5mm) between mating surfaces. Experiment with test prints to find the ideal tolerance for your specific application and printer.
- Account for shrinkage/expansion: Some materials (like ABS) are known for higher shrinkage. Factor this into your design dimensions if extreme precision is required.
- Chamfer edges: Adding small chamfers to mating edges can help guide parts together and compensate for slight misalignments.
- Communicate fit requirements: Clearly describe the intended fit (e.g., "loose fit," "snug fit," "press fit") to your 3D printing service for their recommendations.
Step 9: Review Surface Finish and Aesthetics
Beyond structural integrity and printability, the visual appearance of your 3D model is often paramount, especially for aesthetic parts or prototypes needing a premium look. Different 3D printing technologies offer varying surface finishes. FDM prints often show layer lines, while SLA prints are much smoother. Material choice also influences finish; for example, matte filaments can hide layer lines better than glossy ones.
If your design has specific aesthetic requirements, such as a desire for a perfectly smooth surface on one side or textured details, it's essential to communicate this to your 3D printing service. They might recommend specific post-processing techniques (sanding, painting, vapor smoothing) or alternative printing methods (e.g., opting for SLA over FDM for smoothness). For a 3d printing service London UK, these aesthetic considerations are part of a quality offering.
- Identify critical surfaces: Mark or communicate which surfaces require the highest fidelity or best finish.
- Consider layer lines: Understand that most FDM prints will have visible layer lines. If unacceptable, explore alternative technologies or post-processing.
- Design for post-processing: If you plan to sand or paint your print, design features that are accessible and robust enough for these processes.
- Texture considerations: If your model has intentional textures, ensure they are sufficiently pronounced to be resolved by the printer.
Step 10: Leverage Professional 3D Modelling & Scanning Services
Sometimes, preparing a 3D model for professional printing goes beyond simply exporting a file. You might start with a physical object that needs to be replicated, or a concept sketch that needs to be turned into a complex, print-ready 3D model. This is where professional 3d design service GB and 3d printing service GB scanning UK come into play, offering invaluable support.
If you have a physical item but no digital model, a 3D scanning service can create an accurate digital replica, which can then be refined for printing. This is particularly useful for 3d printing replacement parts UK where original CAD files are unavailable. Conversely, if you have an idea but lack the CAD skills, a professional 3d modelling service UK can take your concept, sketch, or 2D drawing and transform it into a perfectly optimised, print-ready 3D file, ensuring all the previously discussed steps are professionally addressed. These services provide a hassle-free solution for bringing complex ideas to life.
- For physical objects: If you need to digitise a physical part for 3d printing replacement parts UK, consider using a professional 3d printing service GB scanning UK to capture its precise geometry.
- For concept-to-model: If you have a concept or sketch, engage a professional 3d modelling service UK to develop a print-ready CAD file from scratch.
- Ensure communication: Provide clear requirements, dimensions, and intended use to the design/scanning service to ensure the final model meets your needs.
- Review the outcome: Always review the scanned or designed 3D model carefully before approving it for printing.
Common Mistakes to Avoid
- Ignoring Scale: Submitting a model in incorrect units (e.g., inches instead of millimeters) leading to massively oversized or undersized prints.
- Non-Manifold Geometry: Sending files with holes, inverted normals, or overlapping surfaces that confuse the printer's software and cause print failures.
- Insufficient Wall Thickness: Designing features that are too thin to be printed or are excessively fragile, resulting in broken parts.
- Overlooking Tolerances: Failing to add clearance between mating parts, leading to assemblies that won't fit together.
- Unoptimised Files: Sending overly dense meshes or unhollowed solid models that dramatically increase material usage, print time, and cost.
- Lack of Communication: Not specifying critical requirements (e.g., surface finish, strength orientation) to the 3D printing service, leading to unexpected results.
- Poor Export Quality: Exporting STLs with low resolution, causing faceted, blocky surfaces.
- Assuming Standardisation: Believing all materials and printers behave identically. Always check specific guidelines.
- Rushing the Process: Skipping thorough checks of the model before submission, hoping the service will catch all errors.
FAQ
What file format is best for professional 3D printing services in the UK?
For most professional 3D printing services in the UK, the STL (Stereolithography) format is the industry standard due to its widespread compatibility. OBJ and 3MF are also commonly accepted and can carry more information (like colour). For high-precision engineering projects, STEP or IGES files might be preferred, but always confirm with your chosen service.
How can I check if my 3D model is watertight (manifold)?
Many 3D design software packages include tools to check for manifold errors (e.g., Solid Inspector in Fusion 360, Print 3D in SolidWorks). Dedicated mesh repair software like Meshmixer or Netfabb Basic can also identify and fix these issues. Online 3D printing service portals often perform an automatic manifold check upon file upload, alerting you to any problems.
What is the typical minimum wall thickness for professional 3D prints?
Minimum wall thickness varies significantly depending on the 3D printing technology and material. For FDM with materials like PLA or PETG, a common recommendation is around 0.8mm to 1.5mm. For resin (SLA) prints, it can be as low as 0.5mm, and for SLS (Nylon), often 1mm. Always consult the specific guidelines provided by your 3d printing company UK, as their machines and materials may have specific requirements.
Can a professional 3D printing service help with design modifications or scanning?
Absolutely! Many professional 3D printing services, including PrintIn3D, offer comprehensive 3d design service GB and 3d printing service GB scanning UK. If you have a concept, sketch, or even a physical object that needs a digital model, they can assist in creating or refining your 3D file to be perfectly print-ready, often avoiding the common mistakes listed in this guide.
How can I reduce the cost of my 3D print without compromising quality?
To reduce costs, consider hollowing out large, non-functional parts of your model while maintaining sufficient wall thickness. Simplifying overly intricate internal geometry can also help. Ensure your model is watertight and free of errors, as this reduces the need for manual intervention from the service. Always clearly communicate your budget and priorities to your chosen 3d printing express UK provider, as they may suggest material alternatives or design tweaks.
Next Steps: Bring Your Perfect 3D Model to Life
With your 3D model meticulously prepared using these expert steps, you're ready to confidently engage a professional 3D printing company UK. Visit our custom 3D printing service page to upload your file and get an instant quote, or explore our 3D design service if you need assistance turning your concept into a print-ready masterpiece.