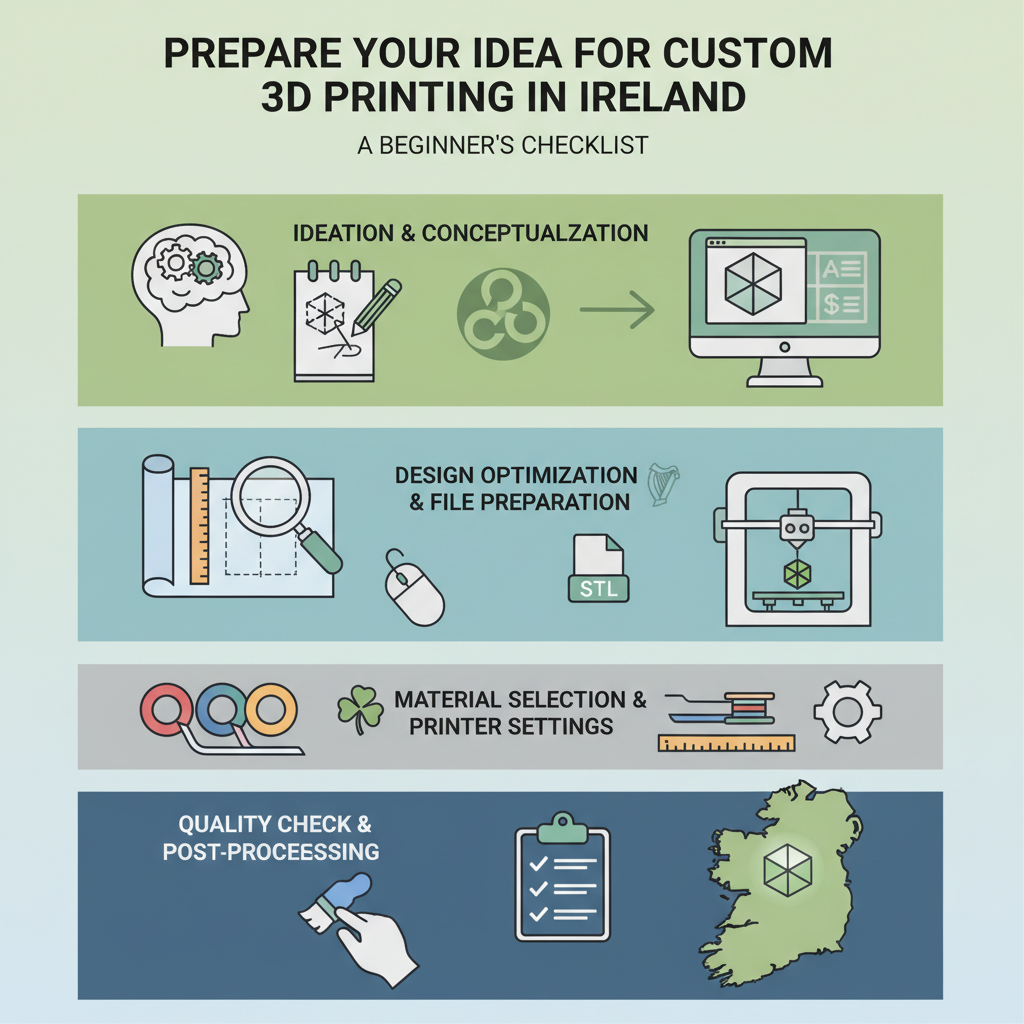
Prepare Your Idea for Custom 3D Printing in Ireland: A Beginner's Checklist
Do you have a brilliant idea for a custom part, a unique gift, a functional prototype, or a creative project floating around in your head? Turning that vision into a tangible 3D printed object can feel like a complex journey, especially if you're new to the world of additive manufacturing. But fear not! At PrintIn3D.ie, we believe bringing your ideas to life should be exciting and, above all, hassle-free.
This comprehensive guide is designed to walk you through every essential step of preparing your idea for custom 3D printing in Ireland. Whether you're an aspiring entrepreneur looking for a 3d design and prototyping company to create a new product, a hobbyist with a unique concept for custom 3d printed gifts ireland, or someone needing a specific 3d printed replacement parts service, this checklist will equip you with the knowledge to approach the process with confidence.
You'll learn how to clearly define your project, choose the right materials, navigate the design phase, and ensure your digital model is perfectly optimised for printing. By the end of this guide, you'll be ready to get an online 3d printing quote ireland and transform your imagination into reality, avoiding common pitfalls and ensuring a successful print every time. Let's make your 3D dreams happen!
Who This Is For
- Individuals and businesses with an idea for a physical object who don't own a 3D printer.
- Entrepreneurs seeking to create custom prototypes or product samples.
- Designers looking to bring their digital models to life.
- Hobbyists and creators interested in custom manufacturing.
- Anyone looking for custom 3d printing services ireland.
Step 1: Clearly Define Your Vision and Purpose
Before any design work begins, the most crucial step is to fully understand what you want to create and why. This foundational stage lays the groundwork for all subsequent decisions, from material selection to design complexity. A clear vision ensures that the final 3D print meets your expectations and serves its intended function.
Think about the problem your object solves or the need it fulfills. Is it purely aesthetic, a functional tool, a replacement part, or a prototype for a new product? Defining its primary purpose will guide you in making informed choices throughout the preparation process, saving time and potential redesigns later on.
- Articulate the Object's Function: What will it do? How will it be used? Will it interact with other components?
- Identify Key Features: What are the non-negotiable elements? Does it need to be flexible, rigid, waterproof, lightweight, or highly detailed?
- Consider the Environment: Where will the object be used? Indoors or outdoors? Will it be exposed to heat, cold, UV light, chemicals, or moisture? These factors heavily influence material choice.
- Determine Desired Aesthetics: What look and feel are you aiming for? Smooth, textured, specific colours?
Tip: Create a simple "design brief" for yourself. Even a few bullet points outlining the object's purpose, key features, and environmental conditions can be incredibly helpful. Imagine explaining your idea to someone else – what are the first things you'd tell them?
Step 2: Research and Select Your Material
The material you choose is paramount, as it dictates the object's physical properties, durability, finish, and even the feasibility of certain designs. With a wide array of 3D printer filaments available, understanding their characteristics is vital for a successful print. For those new to 3D printing, it can feel overwhelming, but focusing on common options like PLA and PETG is a great starting point.
PrintIn3D.ie offers a variety of high-quality filaments, including those from leading brands like Bambu Lab and SUNLU. Knowing which filament is best for beginners or for specific applications will directly impact the outcome of your custom 3D printed part. This step connects directly to your vision from Step 1; a part designed for outdoor use will require a different material than an indoor decorative piece.
- Understand Common Filaments:
- PLA (Polylactic Acid): Easy to print, good for aesthetic parts, prototypes, and custom 3d printed gifts ireland. Biodegradable and available in many colours. Lower strength and temperature resistance compared to other materials.
- PETG (Polyethylene Terephthalate Glycol): More durable than PLA, better temperature and UV resistance, good for functional parts and outdoor use. Slightly more challenging to print but offers excellent mechanical properties. Check out our SUNLU PETG filament.
- ABS (Acrylonitrile Butadiene Styrene): Strong and tough, good for mechanical parts. Requires higher printing temperatures and can warp.
- TPU (Thermoplastic Polyurethane): Flexible and rubber-like, ideal for flexible parts, gaskets, and dampening components. See our recent announcement on Gray TPU.
- Match Material to Purpose: Refer back to your defined vision. If the part needs to withstand impact or heat, PETG or ABS might be better than PLA. If it needs to bend, TPU is the clear choice.
- Consider Post-Processing: Some materials are easier to sand, paint, or finish than others.
Warning: Don't compromise on material selection based on price alone. The right material ensures your part performs as intended. If you're unsure, consulting with PrintIn3D.ie's experts can help you make the best choice. Explore our 3d printer filament shop ireland for options.
Step 3: Sketch & Develop Initial Dimensions
With your vision clear and material in mind, it's time to translate your abstract idea into a concrete form. This doesn't require artistic talent or complex software; a simple sketch on paper or even a basic diagram can be incredibly valuable. The goal here is to establish the fundamental shape, proportions, and critical dimensions of your object.
Even if you plan to use a professional 3d design and prototyping company like PrintIn3D.ie, providing a detailed sketch with measurements vastly speeds up the design process and ensures the final model accurately reflects your concept. This step helps visualise potential challenges and refine the overall structure before diving into digital modelling.
- Rough Sketching: Draw your idea from different angles (top, front, side). Don't worry about perfection; focus on conveying the form.
- Approximate Dimensions: Start assigning rough measurements (length, width, height) to your sketch. Consider the real-world scale of your object. If it's a replacement part, measure the original component accurately.
- Identify Key Features & Constraints: Mark out where specific features, holes, or connection points will be. Note any critical tolerances if the part needs to fit snugly with another.
- Material Consideration in Sketch: As you sketch, keep your chosen material in mind. For instance, if using a flexible material like TPU, you might design thinner walls. If using a rigid material, consider reinforcing critical stress points.
Tip: Use graph paper for easier scaling and dimensioning. If you're designing a 3d printed replacement parts service, measure the original part as precisely as possible with calipers for critical dimensions. This stage is about clarity, not necessarily artistic rendering.
Step 4: Choose Your 3D Design Approach
Now that you have a clear concept and initial dimensions, the next step is to create a digital 3D model. This is where your idea truly takes shape in a format that a 3D printer can understand. You essentially have two main paths: design it yourself using CAD software, or enlist the help of a professional 3d design and prototyping company.
The choice depends on your technical skills, the complexity of your design, and your available time. For simple objects, learning basic CAD can be rewarding. For intricate designs, functional prototypes, or when time is of the essence for custom prototype manufacturing ireland, a professional design service is often the more efficient and reliable option.
- Option A: Design It Yourself (CAD Software):
- Beginner-Friendly: Software like Tinkercad or Onshape are excellent starting points for simple shapes, custom text, or basic modifications.
- Intermediate/Advanced: Programs like Fusion 360, SolidWorks, Blender, or SketchUp offer more robust features for complex geometries, engineering designs, and organic shapes.
- Learning Resources: Numerous online tutorials (YouTube, Skillshare, etc.) can guide you through the basics of these programs.
- Time Investment: Be prepared to invest significant time in learning and designing, especially for your first few projects.
- Option B: Utilise a Professional 3D Design Service:
- Concept to Print: PrintIn3D.ie offers expert 3d design services to transform your sketches, ideas, or even existing physical objects into print-ready 3D models. This is ideal if you lack CAD skills or your design is too complex for DIY.
- Accuracy & Efficiency: Experienced designers ensure your model is geometrically correct, optimised for 3D printing, and meets your specifications quickly.
- Reverse Engineering: If you need a 3d printed replacement parts service but don't have the original CAD file, a design service can recreate it from measurements or by using 3D scanning.
- 3D Scanning: For intricate or organic shapes that are difficult to model from scratch, a 3d body scanning service or object scanning service can create a digital replica of an existing item.
Tip: If you're designing yourself, start with something simple. A small, non-mechanical part is a great way to learn the ropes. If you have a complex idea or need high precision for custom prototype manufacturing ireland, seriously consider leveraging the expertise of a 3d design and prototyping company from the outset.
Step 5: Design for 3D Printability (DFM)
Creating a beautiful 3D model is one thing; ensuring it can be successfully 3D printed is another. This step, known as Design for Manufacturability (DFM), involves understanding the limitations and capabilities of 3D printing technology and adjusting your design accordingly. Ignoring DFM principles is a common cause of failed prints, wasted material, and delays.
Even if you're using a professional design service, having a basic understanding of these principles will help you communicate your needs more effectively and appreciate the design decisions made. It's about designing smart, so your 3D printer (or our advanced Bambu Lab machines) can translate your digital file into a perfect physical object.
- Wall Thickness: Ensure all walls and features are thick enough to be structurally sound and printable. A general minimum for most FDM printing is 1.5mm-2mm, but this can vary by material and printer. Too thin, and your part will be brittle or simply won't print correctly.
- Overhangs and Support Structures: Features that "hang" over empty space (e.g., the top of an arch, the underside of an arm) will need support material during printing. Minimise steep overhangs (angles greater than 45-60 degrees from the vertical) or design them with chamfers/fillets to reduce the need for support, which can affect surface finish and add post-processing time.
- Bridges: Short horizontal spans between two vertical points can often be printed without support, but long bridges can sag. Keep them as short as possible.
- Tolerances: If your part needs to fit with another (e.g., a peg in a hole), allow for manufacturing tolerances. 3D printers have a certain level of precision, but a hole might print slightly smaller and a peg slightly larger than designed. A typical clearance of 0.2mm-0.4mm is often recommended for snug fits.
- Part Orientation: How the part is oriented on the print bed affects print quality, strength, and support requirements. A professional service will optimise this for you.
- Minimum Feature Size: Small details like embossed text or very thin pins have a minimum size they can reliably print. Consult printer specifications or your print service for guidance.
- Avoid Intersecting Meshes: Ensure your 3D model is "manifold" – a completely enclosed volume without holes, self-intersecting surfaces, or duplicate faces. Non-manifold meshes can cause slicing errors.
Warning: Don't try to violate the laws of physics or the limitations of your chosen 3D printing method. While 3D printing is versatile, it's not magic. Designing within its constraints ensures success. If in doubt, a quick consultation with PrintIn3D.ie can clarify printability for your specific design.
Step 6: Export Your Model Correctly
Once your 3D model is complete and optimised for printability, the next critical step is to export it into a format that 3D printing software (slicers) can understand. The most common file format is STL (STereoLithography), but OBJ and 3MF are also widely used. Correct file export ensures that all the details of your design are accurately preserved and ready for the printing process.
Incorrect export settings, such as low resolution or flawed mesh geometry, can lead to print errors, jagged surfaces, or even incomplete models. Taking the time to ensure your file is clean and correctly formatted will prevent headaches down the line, especially when sending your file for an online 3d printing quote ireland.
- Choose the Right File Format:
- STL (.stl): The industry standard. It represents the surface geometry of a 3D object using a collection of triangular facets. Ensure your software exports STL files as binary (smaller file size) or ASCII (human-readable, larger file size) with appropriate resolution.
- OBJ (.obj): Can store colour and texture information, making it suitable for models that require surface aesthetics beyond simple geometry.
- 3MF (.3mf): A newer format designed to overcome some limitations of STL, capable of storing colour, textures, and material information in a single file, leading to more reliable prints.
- Check Resolution/Tolerance: When exporting to STL, you often have a setting for "tolerance" or "resolution." This determines how finely the curved surfaces of your model are tessellated into triangles.
- Too Low: Your print will look faceted or blocky.
- Too High: Creates unnecessarily large file sizes, which can slow down processing without noticeable quality improvement. A good balance is crucial.
- Ensure Manifold Geometry: As mentioned in DFM, your model must be a "watertight" solid with no holes, inverted normals, or self-intersecting surfaces. Most CAD software will automatically produce manifold models, but if you're working with mesh modelling (e.g., Blender), you might need to manually check and repair.
- Verify Units: Confirm that your model is exported in the correct units (e.g., millimetres, inches). A common mistake is designing in millimetres but exporting in inches, leading to a print that is 25.4 times too large or too small!
Tip: Many 3D modelling programs and online tools offer "mesh repair" or "error checking" functions. Before sending your file, run it through one of these to catch any potential issues. Services like MeshMixer or online STL repair tools can be invaluable. If you're providing a file for custom 3d printing services ireland, PrintIn3D.ie will perform a final check on your file for printability.
Step 7: Get an Online 3D Printing Quote
With your perfectly designed and exported 3D model in hand, the exciting next step is to get an estimate for turning it into a physical object. This is where PrintIn3D.ie makes the process seamless and transparent. Getting an online 3d printing quote ireland allows you to understand the costs involved based on your design, material choice, and desired print quality.
Our online quoting system is designed to provide you with a fast and accurate estimate, allowing you to quickly move from concept to ordering. It’s a key part of the hassle-free experience we offer, empowering you to make informed decisions about your project.
- Upload Your File: Visit the PrintIn3D.ie website and navigate to our custom 3D printing section. You'll find an intuitive interface to upload your prepared 3D model file (e.g., STL, OBJ).
- Select Material and Colour: Based on your research in Step 2, choose the desired filament (e.g., PLA, PETG, TPU) and its specific colour. Our system will reflect the pricing implications of each choice.
- Specify Print Settings (Optional): Depending on the service, you might be able to select specific print quality settings (e.g., layer height, infill percentage). For most users, our standard settings are excellent, but if you have specific needs for strength or finish, discuss them.
- Review Instant Quote: Our system will process your file and selections to generate an instant quote. This will typically include the cost of the print, estimated print time, and shipping to your location in Ireland or the wider EU/EEA.
- Consider Quantity: If you need multiple copies of your item, adjust the quantity to see how it affects the total cost. For 3d printing in bulk, economies of scale often apply.
Tip: Play around with different material choices or even slight design modifications (e.g., hollowing out a part) in the quote system to see how they impact the price. This can help you optimise your design for cost-effectiveness without compromising functionality. If you have any questions during the quoting process, our friendly WhatsApp support is always ready to assist.
Step 8: Final Review & Consultation
You're almost there! Before you finalise your order and bring your creation to life, a final review and potential consultation ensure everything is perfect. This step is about double-checking all your choices and leveraging the expertise of your chosen 3D printing partner to address any lingering doubts or potential issues.
At PrintIn3D.ie, we pride ourselves on being your 3D Printing Partner, and this final stage is where our commitment to a hassle-free experience truly shines. We want you to be absolutely confident that your custom 3D printed part will meet your expectations.
- Review the Quote Details: Carefully examine the final quote, ensuring the material, colour, dimensions, and quantity are all correct. Check the estimated delivery time for custom 3d printing services ireland.
- Consider Non-Disclosure Agreements (NDAs): If your design is proprietary, sensitive, or part of a new product development, discuss NDA options with PrintIn3D.ie. We understand the importance of protecting your intellectual property, especially for custom prototype manufacturing ireland.
- Ask Questions: Don't hesitate to reach out to our team if you have any questions about the print process, material properties, lead times, or anything else. Our experts are here to provide clarity and guidance.
- Verify Delivery Information: Double-check your shipping address and contact details to ensure smooth delivery across Ireland and the EU/EEA.
- Confirm Order: Once you are satisfied with all aspects, proceed to confirm and place your order. Our fast turnaround times and efficient processes mean your idea will be printed and dispatched swiftly.
Tip: For complex or critical projects, a quick chat with our support team can provide invaluable peace of mind. They can offer advice on optimising your file further or confirming material suitability. Remember, PrintIn3D.ie offers friendly WhatsApp support, making it easy to get answers quickly.
Common Mistakes to Avoid
Even with careful planning, common pitfalls can derail a 3D printing project. Being aware of these can save you time, money, and frustration.
- Skipping the Planning Stage: Diving straight into design without clearly defining the object's purpose, environment, and required properties. This often leads to redesigns and unsuitable prints.
- Ignoring Material Properties: Choosing a material based solely on colour or cost without considering its functional characteristics (strength, heat resistance, flexibility). This is a frequent issue for beginners asking which filament is best for beginners without considering the end use.
- Poor Design for Manufacturability (DFM): Creating a visually appealing model that is impossible or very difficult to print due to thin walls, excessive overhangs, or incorrect tolerances.
- Using Non-Manifold Models: Uploading 3D files that have holes, reversed normals, or self-intersecting geometry. These issues prevent slicers from preparing the model correctly for printing.
- Incorrect File Units or Resolution: Exporting a model with the wrong scale or insufficient resolution, leading to prints that are the wrong size or have visible facets.
- Not Testing Prototypes: For functional parts, skipping test prints can lead to costly mass production errors. It's always better to create a few custom prototype manufacturing ireland models first.
- Overlooking Post-Processing: Not accounting for the time or effort required for sanding, painting, or assembly, especially for complex custom 3d printed gifts ireland.
- Not Utilizing Expert Advice: Hesitating to consult with a professional 3D printing service for design review, material selection, or printability concerns. Our team is here to help!
FAQ
What if I only have a sketch or an idea, but no 3D model?
No problem at all! Many of our customers start exactly like this. PrintIn3D.ie offers comprehensive 3d design services. You can provide us with a sketch, a detailed description, a photo, or even a physical object you want replicated or modified (which might involve our 3d scanning service in Ireland). Our expert designers will work with you to convert your concept into a print-ready 3D model, taking all the technical complexities off your shoulders.
Which filament is best for beginners or my specific project?
For beginners or most general-purpose applications like prototypes and decorative items, PLA (Polylactic Acid) is often the best choice due to its ease of printing and wide range of colours. However, if your project requires more durability, heat resistance, or flexibility, materials like PETG or TPU would be more suitable. For a deeper dive, check out our guide on PLA vs. PETG: Choosing the Right 3D Printer Filament. You can browse our 3d printer filament shop Ireland for specific options or contact us for personalised advice.
How long does it take to get an online 3D printing quote and receive my printed part?
Getting an online 3d printing quote ireland from PrintIn3D.ie is instant once you upload your file and select your options. For the actual printing and delivery, we pride ourselves on fast turnaround times. Filament orders placed before 4 PM receive same-day filament delivery Ireland. For custom 3D prints, delivery typically takes 2 working days within Ireland and 5-7 working days for Europe, depending on complexity and queue. We also offer various express custom printing services like 13-hour and 8-hour options for urgent needs.
Can PrintIn3D.ie help me create custom 3D printed replacement parts?
Absolutely! Providing a 3d printed replacement parts service is one of our specialities. If you have a broken part, we can often recreate it for you. You can send us the original part for 3d scanning, provide us with detailed measurements and sketches, or if you have the original CAD file, we can print directly from that. This is a perfect example of how our custom 3d printing services ireland can solve everyday problems.
What if my idea is confidential or proprietary?
We understand the importance of intellectual property, especially when dealing with new product ideas or business prototypes. PrintIn3D.ie offers Non-Disclosure Agreements (NDAs) to protect your sensitive designs and information. You can discuss this with us when you reach out for your project, ensuring your peace of mind while we bring your confidential ideas to life with our custom prototype manufacturing ireland services.
Next Steps / CTA
Ready to turn your incredible idea into a tangible reality? With your concept refined and this checklist in hand, you're perfectly positioned to leverage our award-winning custom 3D printing services in Ireland. Upload your file for an instant quote, or if you need design assistance, let our 3d design and prototyping company bring your vision to life from scratch. Your 3D printing journey starts here, hassle-free!