The Ultimate Guide to 3D Scanning: From Object to Digital Model
Welcome to the fascinating world of 3D scanning! In an era where digital transformation is paramount, the ability to convert physical objects into precise digital models has become an invaluable skill and service. Whether you're an engineer needing to reverse-engineer a part, an artist wanting to digitise a sculpture, or a hobbyist looking to replicate a beloved item, 3d scanning offers a powerful solution.
This comprehensive guide will demystify the process, walking you through everything from understanding the core technologies to preparing your objects, executing scans, and processing the resulting data. We'll explore the various applications and provide practical tips to help you achieve the best possible results. For businesses and individuals across Ireland, embracing 3D scanning opens up a realm of possibilities, enhancing design, manufacturing, and even preservation efforts. By the end of this guide, you'll not only understand how to approach 3D scanning projects but also recognise when a professional 3d scanning service in Ireland, like PrintIn3D.ie, can be your most efficient and reliable partner.
Who This Is For
- Individuals and businesses seeking to digitise physical objects.
- Engineers and designers interested in reverse engineering or custom part creation.
- Artists and creators looking to reproduce or modify physical artwork digitally.
- Anyone considering using 3d printing services to recreate or modify existing items.
- Students and educators keen to understand modern digital fabrication techniques.
Step 1: Understanding 3D Scanning Technology – The Science Behind Digital Capture
Before you dive into a 3D scanning project, it's crucial to grasp the fundamental technologies that make it possible. Different scanning methods have their strengths and weaknesses, making certain techniques more suitable for specific objects, environments, and desired levels of precision. Knowing these basics will help you choose the right approach or articulate your needs more effectively to a 3d scanning service.
At its core, 3D scanning involves capturing the geometric shape of a physical object, often along with its texture or colour, to create a three-dimensional digital model. This process is non-contact, meaning it doesn't physically alter the object, which is vital for delicate or irreplaceable items. The primary technologies you'll encounter include laser scanning, structured light scanning, and photogrammetry, each using distinct principles to achieve its goal.
- Laser Scanning: Employs a laser beam or line to project onto an object's surface. A sensor then measures the distance to the laser point or line, calculating the object's geometry.
- Pros: Highly accurate, fast for large objects, works well in varying light conditions.
- Cons: Can be expensive, may struggle with reflective or transparent surfaces.
- Structured Light Scanning: Projects a known pattern of light (e.g., stripes or grids) onto an object. A camera observes the distortion of this pattern caused by the object's surface, then calculates the object's 3D geometry.
- Pros: Very fast, captures dense point clouds, often good for intricate details.
- Cons: Sensitive to ambient light, can be challenging with highly reflective or dark surfaces.
- Photogrammetry: Takes multiple overlapping photographs of an object from various angles. Software then analyses these images, identifying common points and reconstructing the 3D geometry and texture.
- Pros: Relatively inexpensive to start (just a camera), can capture colour texture well, good for large environments.
- Cons: Requires excellent lighting, can be time-consuming for processing, less precise for very small or smooth objects without distinct features.
Understanding these differences is your first step. For complex or large-scale projects, or if you're unsure which method is best, consulting with experts offering 3d scanning in Ireland can save you significant time and resources.
Tip: Research the specific requirements of your project. If you need extreme precision for professional CAD design for manufacturing, a high-accuracy laser or structured light scanner is likely required. For artistic reproductions with rich texture, photogrammetry might suffice.
Step 2: Preparing Your Object and Environment for Optimal Results
The success of any 3D scan largely depends on the preparation of the object and its surroundings. Skipping this crucial step can lead to incomplete data, inaccurate models, and a frustrating post-processing experience. Proper preparation is key to achieving a clean, reliable digital representation of your physical item.
Consider the object's material, size, and surface characteristics. Small, intricate items require more delicate handling and often a more precise scanning method. Larger objects might need a different setup or a scanner with a wider field of view. The goal is to create ideal conditions for the scanner to "see" and interpret the object accurately.
- Clean the Object: Dust, dirt, grease, and fingerprints can interfere with scan data. Thoroughly clean your object to ensure the surface is pristine. Even small particles can be picked up as erroneous geometry.
- Manage Reflectivity and Transparency: Highly reflective (e.g., polished metal, glass) or transparent (e.g., clear plastic) surfaces are notoriously difficult for most 3D scanners.
- Solution: Apply a thin, even coat of a temporary, matte scanning spray or talcum powder. This creates a dull, non-reflective surface that scanners can easily pick up. Ensure the coating is uniform and won't damage the object.
- Add Tracking Markers (if necessary): For some scanners and objects, especially those with uniform surfaces or few distinct features, applying small, adhesive tracking markers (dots) can help the scanner maintain its position and stitch together multiple scans accurately. Ensure markers don't obscure critical details.
- Secure the Object: Place the object on a stable, non-vibrating surface. For smaller items, a turntable can be invaluable, allowing for easy rotation and consistent scanning angles. Ensure the background behind the object is plain and contrasting, ideally matte and non-reflective, to help the scanner focus on the object itself.
- Control Lighting: This is critical, especially for structured light scanning and photogrammetry.
- Structured Light: Minimise ambient light to prevent interference with the projected patterns. A dark, controlled environment is often ideal.
- Photogrammetry: Use soft, even, diffused lighting to eliminate harsh shadows and glare. A light tent or studio lighting setup can work wonders.
- Consider Object Size: For very large objects, you might need to scan in sections and later stitch the data together. For tiny, intricate parts, a high-resolution scanner is essential, often with macro capabilities.
Warning: Always test any sprays or coatings on an inconspicuous area first, especially with delicate or valuable objects, to ensure they don't cause damage or leave residue. If in doubt, discuss with a professional 3d scanning provider.
Step 3: Choosing the Right 3D Scanner or Service for Your Project
With an understanding of the technology and object preparation, the next critical decision is how you'll perform the scan. Do you invest in your own equipment, or do you leverage a professional 3d scanning service in Ireland?
The choice depends heavily on your budget, the frequency of your scanning needs, the required precision, and your technical comfort level. For many, especially businesses or individuals with occasional or highly specific needs, a service offers significant advantages without the upfront investment and learning curve.
- DIY Scanner Options:
- Entry-Level Handheld Scanners: Often USB-powered, these are relatively affordable and good for small-to-medium objects where extreme precision isn't paramount. Great for hobbyists or basic design work.
- Desktop Structured Light Scanners: These usually involve a fixed camera and projector setup, often paired with a turntable. They offer higher precision than handhelds and are excellent for small, intricate parts.
- Photogrammetry Software + DSLR: If you have a good camera, you can use free or paid software to process photos into a 3D model. This is cost-effective but demands skill in photography and lighting, and processing can be intensive.
- Key Factors When Choosing a Scanner:
- Accuracy & Resolution: How precise does your model need to be? (e.g., 0.1mm for engineering, 1.0mm for artistic replicas).
- Scan Volume: What's the maximum size of object it can scan effectively?
- Speed: How quickly can it capture data? (Important for scanning moving objects or large batches).
- Portability: Do you need to scan objects on-site, or can they be brought to a studio?
- Software Integration: Does it export in compatible formats for your 3D design software or 3d printing workflow?
- Why Choose a Professional 3D Scanning Service (e.g., PrintIn3D.ie):
- Access to High-End Equipment: Services invest in industrial-grade laser and structured light scanners, offering superior accuracy and speed.
- Expertise and Experience: Professionals understand the nuances of various objects, materials, and scanning challenges, ensuring optimal results.
- Time-Saving: You save the time of learning software, setting up equipment, and troubleshooting issues.
- Cost-Effective for Occasional Use: Avoid the significant upfront cost of purchasing and maintaining a professional scanner.
- Post-Processing & 3D Design Services: Many services, including PrintIn3D.ie, offer comprehensive post-processing, professional CAD design for manufacturing from scan data, and even 3D printing Ireland services to bring your digitised ideas to life.
For critical projects, complex geometries, or where precision is paramount (e.g., 3D scanning for reverse engineering in Ireland), outsourcing to a specialist like PrintIn3D.ie often proves to be the most efficient and reliable path. They have the advanced tools and knowledge to handle challenging tasks that DIY solutions might struggle with.
Tip: If you're based in Ireland and need a reliable solution, consider PrintIn3D.ie for your 3d scanning needs. They can provide advice on the best method and execute the scan with precision.
Step 4: Executing the Scan – Capturing the Data
Once your object is prepared and you've decided on your scanning method, it's time to capture the raw data. This step requires methodical execution to ensure you gather all necessary information without gaps or excessive noise.
The specific technique will vary depending on whether you're using a handheld scanner, a desktop setup, or photogrammetry. Regardless of the method, the goal is to capture enough overlapping data from all angles to reconstruct the entire object's surface accurately.
- For Handheld Scanners (Laser/Structured Light):
- Initial Scan: Begin by scanning a prominent feature of the object to establish a starting point.
- Smooth Motion: Move the scanner slowly and steadily around the object, maintaining a consistent distance and angle. Avoid jerky movements, which can cause tracking loss.
- Overlap: Ensure significant overlap between successive scan passes (typically 30-50%). This is crucial for the software to accurately stitch the data together.
- Cover All Angles: Systematically scan the entire object, including crevices, undersides, and any complex features. Rotate the object or the scanner as needed.
- Monitor Software: Pay attention to the scanner's accompanying software, which often provides real-time feedback on scan quality, coverage, and tracking.
- For Desktop Scanners (Structured Light with Turntable):
- Placement: Position the object centrally on the turntable.
- Automated Rotation: The scanner and software will typically automate the process, taking a series of scans as the turntable rotates the object.
- Multiple Angles: If the object has complex geometry or overhangs, you may need to reposition the object on the turntable and perform additional scan passes (e.g., scanning from the top, then flipping and scanning from the bottom).
- For Photogrammetry:
- Capture Many Photos: Take a large number of photos (hundreds for complex objects) from all angles around the object.
- High Overlap: Ensure at least 60-80% overlap between adjacent photos.
- Consistent Focus & Exposure: Keep camera settings consistent throughout the shoot. Use manual focus and exposure to prevent changes between shots.
- Vary Angles: Shoot at different heights and angles (e.g., eye-level, slightly above, slightly below) to capture comprehensive data.
- Detail Shots: Take close-up photos of intricate details if high resolution is needed for those areas.
Warning: Be mindful of moving shadows or changes in ambient light during the scan, especially for structured light and photogrammetry, as these can introduce errors. For large or complex objects, it's often better to take more scans or photos than too few.
Step 5: Processing the Raw Scan Data – From Points to Polygons
Once you've captured all the raw data, whether it's a series of point clouds or hundreds of images, the next critical phase is processing. This is where scattered data points are transformed into a cohesive, usable 3D mesh. The complexity of this step often highlights the value of using a professional 3d scanning service, as they have the expertise and software to handle intricate datasets efficiently.
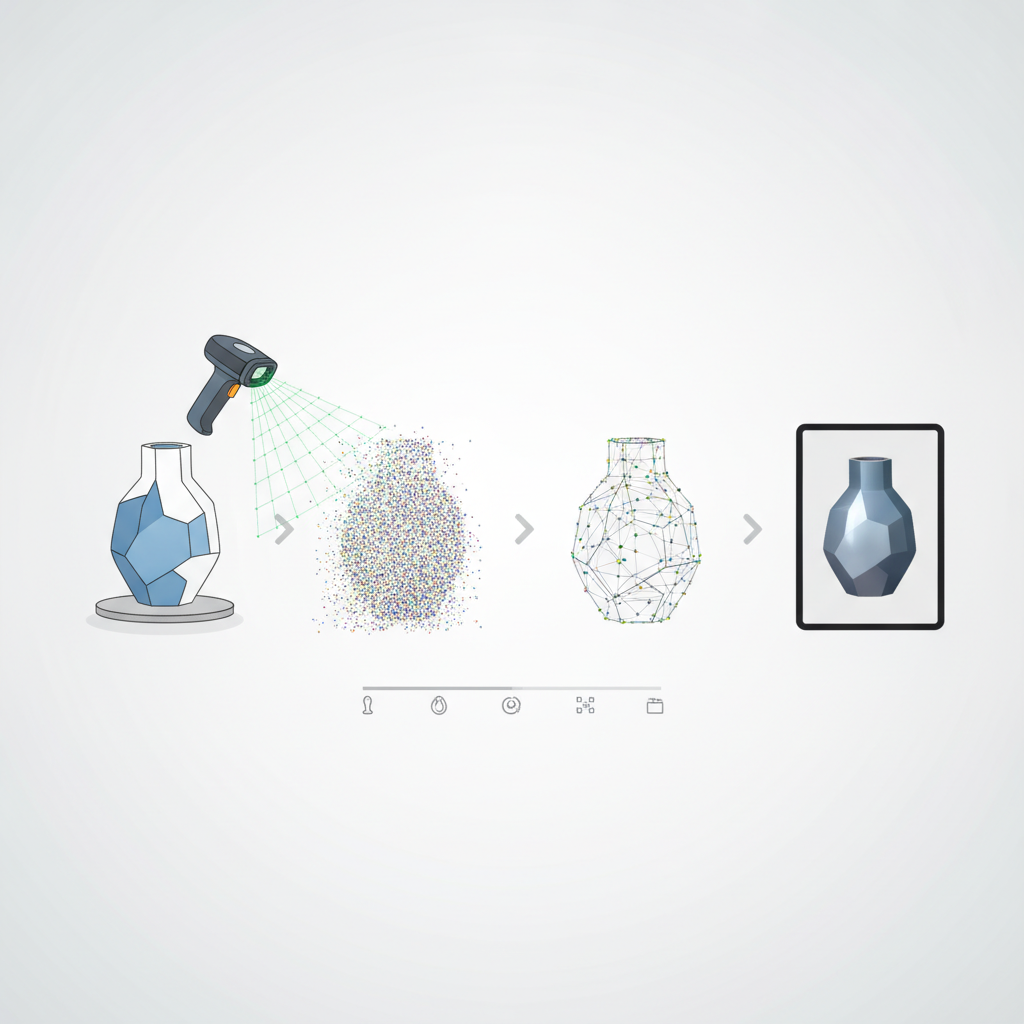
Scan data typically begins as a "point cloud" – a collection of millions of individual data points in 3D space. These points represent the surface of your object. The processing software then connects these points to form a mesh of polygons (usually triangles), creating the visible surface of your digital model.
- Alignment and Registration: If you performed multiple scans of an object (which is almost always the case for comprehensive coverage), the first step is to align these individual scans.
- Action: Use software tools to automatically or manually identify common features between scans and stitch them together into a single, cohesive point cloud. Good overlap from Step 4 makes this much easier.
- Merging/Fusion: After alignment, the overlapping areas from different scans need to be merged into a single, non-redundant point cloud. This cleans up duplicate data and prepares it for mesh generation.
- Noise Reduction: Raw scan data often contains "noise" – stray points or minor inaccuracies caused by environmental factors, scanner limitations, or object surface imperfections.
- Action: Apply filters to smooth the point cloud and remove outliers without losing critical detail. Be cautious not to over-filter, which can erase fine features.
- Mesh Generation (Surfacing): This is the core step where the point cloud is converted into a polygonal mesh. The software connects adjacent points to form triangles, creating a solid, manifold surface.
- Action: Choose appropriate meshing algorithms. Different algorithms might be better for organic shapes versus sharp, geometric forms.
- Hole Filling: Almost all scans will have small gaps or "holes" where the scanner couldn't capture data (e.g., deep crevices, complex undercuts, or areas missed during scanning).
- Action: Use software tools to automatically or manually fill these holes. For 3d printing, a "watertight" mesh (one with no holes) is essential.
Tip: Invest time in learning your scanning software. Each package has unique features and workflows. For beginners, using a 3d scanning service means bypassing this steep learning curve entirely, getting straight to a usable model.
Step 6: Refining and Optimising Your 3D Model – Achieving Perfection
After the initial mesh generation, your 3D model is often still in a rough state. The refinement and optimisation phase is crucial for transforming it into a high-quality, usable asset ready for its intended purpose, whether that's 3d printing, CAD design, or digital visualisation.
This stage involves cleaning up imperfections, optimising the mesh density, and ensuring the model is suitable for downstream applications. This is where skilled 3D designers shine, meticulously adjusting the model to meet specific requirements.
- Smoothing: Scan data can sometimes be "noisy" or faceted, even after initial noise reduction.
- Action: Apply smoothing algorithms to create a more aesthetically pleasing and geometrically accurate surface. Be careful not to over-smooth and lose fine details.
- Decimation/Retopology: High-resolution scans can result in meshes with millions of polygons, making them unwieldy for some applications (e.g., real-time rendering, gaming, or certain 3d printing software).
- Action: Use decimation tools to reduce the polygon count while preserving detail. Alternatively, retopology creates a new, optimised mesh with better edge flow and topology, often desirable for animation or clean 3D design.
- Sharpening Features: Sometimes, smoothing can dull sharp edges or fine features.
- Action: Use tools to selectively sharpen specific areas or manually reconstruct critical edges.
- Scaling and Orientation: Ensure the model is correctly scaled to its real-world dimensions and oriented in the desired direction (e.g., upright for 3d printing).
- Colour and Texture Mapping: If your scanner captured colour data, this is the stage to apply and optimise textures.
- Action: Project the captured photographic data onto the 3D mesh to add realistic colour and surface detail. Ensure UV maps are generated correctly for optimal texture display.
- Inspection and Repair: Carefully inspect the final model for any remaining errors, non-manifold geometry, or inverted normals that could cause issues in later stages. Many software packages have mesh analysis and repair tools.
Warning: The balance between polygon count, detail preservation, and smoothness is delicate. Always work on a copy of your model and save frequently. For critical professional CAD design for manufacturing applications, this stage is often followed by converting the mesh to a CAD-friendly format (NURBS or solids), a complex process best handled by skilled CAD engineers.
Step 7: Exporting and Utilising Your 3D Model – Bringing Your Digital Vision to Life
With your 3D model meticulously refined, the final step is to export it in a suitable format and put it to use. This is where the initial purpose of your 3d scanning project comes full circle, enabling a wide array of applications from digital archiving to physical reproduction.
Choosing the correct file format is essential, as different applications prefer different types of 3D data. The versatility of 3D scanned models makes them invaluable across various industries and creative fields.
- Choose the Right File Format:
- STL (STereoLithography): The most common format for 3d printing. It describes only the surface geometry of a 3D object as a collection of triangles. No colour or texture information is included.
- OBJ (Object): A widely supported format that can store geometry, colour, texture, and other material properties. Excellent for digital visualisation, VR/AR, and general 3D design.
- PLY (Polygon File Format): Can store both geometry and colour data. Often used for scanned data and can be a good alternative to OBJ.
- FBX (Filmbox): A proprietary Autodesk format, but widely used in animation, gaming, and film for exchanging 3D models with advanced features like animations, materials, and rigging.
- STEP/IGES: CAD-native formats, primarily for solid models created in CAD software. Converting a mesh from a 3d scan to these formats is part of a reverse engineering workflow, often requiring complex surfacing and modelling to achieve true CAD accuracy for professional CAD design for manufacturing.
- Applications of 3D Scanned Models:
- 3D Printing: Create physical replicas, prototypes, or custom parts directly from the digital model. PrintIn3D.ie offers fast and affordable 3d printing near me for customers in Ireland.
- Reverse Engineering: Obtain CAD models of existing parts for redesign, analysis, or manufacturing without original blueprints. This is a common use case for 3D scanning for reverse engineering in Ireland.
- Quality Control & Inspection: Compare scanned models against CAD designs to check for manufacturing deviations or wear.
- Archiving & Documentation: Preserve historical artifacts, art, or critical components digitally for future reference or virtual display. See how 3D scanning for Irish heritage is preserving our past.
- Virtual Reality (VR) / Augmented Reality (AR): Integrate realistic 3D models into immersive digital experiences.
- Customisation & Design: Use a scanned object as a base for custom modifications or as a component in a larger 3D design project.
- Data Sharing: When sharing your models, consider file size. Decimated versions are easier to transmit. If sharing for professional CAD design for manufacturing, ensure the recipient has the appropriate software and expertise.
Tip: Always specify the intended use of your 3D model to PrintIn3D.ie if using their 3d scanning service. This helps them optimise the output for your specific needs, whether it's for flexible TPU filament prints or rigid ABS filament parts.
Common Mistakes to Avoid in 3D Scanning
While the process of 3D scanning can be incredibly rewarding, it also comes with potential pitfalls. Being aware of these common mistakes can save you significant time, effort, and frustration, ensuring a smoother workflow and higher quality results for your projects, especially when seeking 3d scanning service in Ireland.
- Inadequate Object Preparation: Neglecting to clean objects, treat reflective/transparent surfaces, or use insufficient markers leads to incomplete or noisy data. This is perhaps the most common and easily avoidable mistake.
- Poor Lighting Conditions: For structured light and photogrammetry, inconsistent, harsh, or insufficient lighting will cause severe errors in data capture, leading to patchy scans or inaccurate textures.
- Insufficient Overlap Between Scans/Photos: If individual scans or photos don't have enough common features, the software will struggle to align and stitch them accurately, resulting in misaligned or fractured models.
- Excessive Movement During Scanning: Any movement of the object or instability of the scanner during the capture process will introduce blurring or distortion into the data.
- Ignoring Software Feedback: Most scanning software provides real-time feedback on tracking, coverage, and data quality. Ignoring these warnings often means you'll discover issues only during post-processing, requiring a rescan.
- Over-Smoothing or Under-Smoothing: Aggressive smoothing can erase critical fine details, while insufficient smoothing leaves a jagged or noisy surface. Finding the right balance is key to a high-quality model.
- Not Checking for "Watertightness" for 3D Printing: For 3d printing, a mesh must be "manifold" or "watertight" (no holes, no intersecting geometry). Failing to ensure this will lead to printing errors.
- Incorrect Scaling or Orientation: Exporting a model without verifying its real-world scale or correct orientation can lead to incorrect physical prints or issues in CAD applications.
- Choosing the Wrong Technology: Attempting to scan a large, outdoor scene with a desktop structured light scanner, or trying to capture highly precise mechanical parts with basic photogrammetry, will lead to disappointing results. Match the technology to the task.
- Underestimating Post-Processing Time: Raw scan data is rarely ready for use. Post-processing (alignment, meshing, cleaning, optimising) often takes as much, if not more, time than the actual scanning. Many turn to a 3d scanning service to avoid this time commitment.
Frequently Asked Questions about 3D Scanning
What types of objects can be 3D scanned?
Virtually any physical object can be 3D scanned, from small coins to large vehicles, intricate sculptures, and even human bodies. However, certain materials like highly reflective (e.g., polished chrome) or transparent (e.g., clear glass) objects can be challenging. These often require surface preparation, such as applying a temporary matte spray, to achieve successful results. Organic shapes, mechanical parts, and historical artifacts are all excellent candidates for 3d scanning.
How accurate are 3D scans?
The accuracy of a 3D scan varies significantly depending on the scanning technology, the quality of the equipment, and the skill of the operator. High-end industrial 3D scanners can achieve accuracies down to a few microns (0.001 mm), which is crucial for professional CAD design for manufacturing and quality control. More affordable consumer-grade scanners might offer accuracies in the range of 0.1mm to 1mm. Always clarify your accuracy requirements when using a 3d scanning service in Ireland.
What happens after an object is 3D scanned?
After 3d scanning, you get a digital 3D model, typically in formats like STL, OBJ, or PLY. This model can then be used for a multitude of applications. The most common include 3d printing a replica, reverse engineering (converting the mesh into a CAD model for design or manufacturing), quality inspection, digital archiving, creating custom parts, or integration into virtual reality experiences. Many clients use PrintIn3D.ie's 3D design services to modify or integrate the scanned data.
Can 3D scanning create a model ready for immediate 3D printing?
Often, yes, but some post-processing is usually required. Raw scan data might have holes, noise, or an excessively high polygon count. For a successful 3d print, the model needs to be "watertight" (manifold) and optimised. A professional 3d scanning service like PrintIn3D.ie will typically deliver a print-ready file, having handled all the necessary cleaning and optimisation steps. This ensures a smooth transition from digital model to a physical product using materials like 3d printer filaments from Bambu Lab or SUNLU.
Is 3D scanning expensive?
The cost of 3D scanning can vary widely. Investing in professional-grade 3D scanning equipment and software can be a significant upfront expense (€5,000 to €100,000+). However, using a 3d scanning service in Ireland, such as PrintIn3D.ie, allows you to access this advanced technology without the capital outlay. Service costs are typically based on factors like object size, complexity, required accuracy, and the amount of post-processing needed. For most individuals and businesses with intermittent needs, a service is the more affordable and efficient option.
Next Steps / CTA
Ready to bring your physical objects into the digital realm with precision and ease? Whether you need a one-off scan or ongoing 3d scanning services in Ireland, PrintIn3D.ie is your trusted partner. Visit our 3D scanning page to learn more about how we can help transform your ideas into reality, from initial scan to final 3d print, with fast turnaround times and expert support.